Dying Light Graphics & Performance Guide

Dying Light is a new first-person, zombie-slaying, freerunning-filled action game from Techland, creators of the Call of Juarez and Dead Island franchises. If you played Dead Island, much of Dying Light will be familiar: there's 4-player online co-op, weapon crafting, looting, levelling, mutated super zombies, and open-world exploration. Techland has of course refined those features extensively for Dying Light, and has expanded the scope of the game with a number of key changes.
First and foremost, freerunning adds verticality to the world and gives you the ability to speed across the map like Sébastien Foucan, negating the usual back and forth drudgery of open-world games. Secondly, they've introduced a dynamic day-night cycle, introducing terrifying mutated monsters that will quickly rip you limb from limb once the sun sets. Safe zones provide shelter from the night, but certain missions can only be completed after sundown, and XP rewards are doubled, giving you incentive to brave the darkness. Stealth becomes a factor, as does route planning, giving you the ability to lure an area's mutated zombies into player-controlled traps. Finally, there's the addition of human factions that fight over air drops and territory. Humans are smarter, have guns, and pose a huge threat. Grab one of their air drops though and you'll receive XP aplenty.
Behind the scenes, Dying Light receives a technical upgrade with the introduction of Chrome Engine 6, the latest iteration of Techland's self-developed engine. There are new and enhanced visuals, and support for larger worlds filled with more detail. In this article we’ll examine these features, reveal Dying Light's PC-only upgrades, show comparisons that highlight their benefits, and evaluate their performance impact.
Article Contents:
- System Requirements
- Chrome Engine 6
- Dying Light PC-Exclusive Graphics Enhancements
- Additional Graphics Settings
- Dying Light Patch 1.2.1
- Dying Light Patch 1.4.0
- Dying Light: The Following - Enhanced Edition
- Dying Light Tweaking
- NVIDIA Control Panel Anisotropic Filtering
- NVIDIA Dynamic Super Resolution
- GeForce Game Ready 347.25 Drivers: A Recommended Upgrade
- GeForce Experience: Optimal Playable Settings With A Single Click
- Conclusion
System Requirements
Dying Light' official system requirements are posted below, suggesting the kind of system you'll need to experience the zombie action game.
Minimum Specifications
- OS: Windows Vista 64-Bit or later
- Processor: Intel Core i5-2500 @ 3.3 GHz or AMD FX-8320 @ 3.5 GHz
- Memory: 4GB RAM or above
- Graphics: GeForce GTX 560 or above
- DirectX: Version 11 or above
Recommended Specifications
- Processor: Intel Core i5-4670K @ 3.4 GHz or AMD FX-8350 @ 4.0 GHz
- Memory: 8GB RAM or above
- Graphics: GeForce GTX 780 or above
Chrome Engine 6
Dying Light marks the debut of Techland's sixth Chrome Engine. Having powered three dozen games over the past 12 years, the Chrome Engine is a proven entity, excelling at open worlds like those found in Dead Island and Dying Light. Little is known about the inner workings of Chrome Engine 6, the only information available stating that "developers are able to create bigger and more detailed open worlds, as well as outdoor and indoor environments." Graphics are said to be "more photorealistic than ever, with such advancements like changeable weather conditions, physical lighting model, Spherical Harmonics based Indirect Lighting, and Atmospheric Scattering." The proof is in the pudding, so let's take an in-depth look at Dying Light.
Dying Light PC-Exclusive Graphics Enhancements
Like every multi-platform game, Dying Light looks and runs better on PC. Texture quality, view distance, and all the usual suspects are improved, and working with Techland we've further bolstered the game's graphical fidelity through the addition of NVIDIA HBAO+ Ambient Occlusion, NVIDIA Depth of Field, and NVIDIA PCSS technology. Additionally, rendering resolutions can be cranked up with NVIDIA Dynamic Super Resolution (DSR), gameplay can be enjoyed without tearing or extra input lag thanks to super smooth NVIDIA G-SYNC monitors, and the game itself can be streamed to your SHIELD device and TV with GameStream.
On PC, you can enjoy Dying Light at 144 FPS on your 144Hz gaming or G-SYNC monitor, and if you've got the performance you can push it even higher. Consoles, however, are limited to 30 FPS. And should you be unsure of the best settings for your PC, GeForce Experience can automatically determine and apply optimum graphics options for your system, giving you perfect performance with a single click.
NVIDIA HBAO+ Ambient Occlusion
Ambient Occlusion (AO) adds contact shadows where two surfaces or objects meet, and where an object blocks light from reaching another nearby game element. The AO technique used and the quality of the implementation affects the shadowing’s accuracy and whether new shadows are formed when the level of occlusion is low. Without Ambient Occlusion, scenes look flat and unrealistic, and objects appear as if they are floating.
In Dying Light, players can pick between Screen Space Ambient Occlusion (SSAO), and NVIDIA HBAO+. For SSAO, simply enable the 'Ambient Occlusion' option in-game. For HBAO+, enable 'Ambient Occlusion' and 'NVIDIA HBAO+'. As the interactive comparisons below demonstrate, HBAO+ produces vastly superior AO shadows, free from the unrealistic halos that are clearly visible around the lampshades and fan.
Outside, more realistic shadowing is observed scene wide. In particular, note the unrealistic, uniform shadowing on and around foliage when using SSAO.
With AO disabled entirely, the difference when enabling HBAO+ is even more drastic as the interactive comparison below demonstrates.
Our final comparison demonstrates how crucial AO in modern games - when disabled, the detail on the wall vanishes, making it appear flat, and the cable is shown to be hanging loose, rather than flush against the wall.
Performance: In a wide view filled with geometry and objects, SSAO costs a little under 5 frames per second, and offers a large improvement on image quality. Stepping up to NVIDIA HBAO+, meanwhile, has a negligible impact on performance, and further improves fidelity.
With superior image quality and an extra performance cost of less than 1 frame per second, HBAO+ is the clear choice for Ambient Occlusion in Dying Light.
NVIDIA Depth of Field
NVIDIA Depth of Field (NVDOF) enables developers to apply high-quality depth of field rendering to their games. In Dying Light, this DirectX 11-powered effect increases the precision and image quality of depth of field blurring, and enables Techland to specify the intensity of blurring on a case by case basis.
Depth of Field is rendered almost exclusively during cut scenes and conversations, with no ability to toggle the setting on the fly. As such, the main menu offers the most accurate 1:1 comparison between the two available settings.
Performance: The extensive use of high quality depth of field blurring during cutscenes and conversations results in a significant performance impact. However, as these are non-interactive, and frame rates are higher than during gameplay, the performance impact of NVDOF is typically negated, and therefore goes unnoticed.
NVIDIA Percentage Closer Soft Shadows (PCSS)
A February 29th, 2016 update for Dying Light introduced support for NVIDIA Percentage Closer Soft Shadows, referred to in-game and from here on out as "PCSS". As the technology’s name suggests, PCSS’s role is the rendering of shadows that progressively soften as the distance from the casting object increases. The result is realistic shadow rendering that better mirrors the properties of shadows in the real world, increasing image quality and immersion.
For examples, check out our interactive comparisons below.
To activate PCSS, select Very High or High on the "Shadow Map Size" setting, toggle NVIDIA PCSS On, press Enter, and then restart your game when prompted.
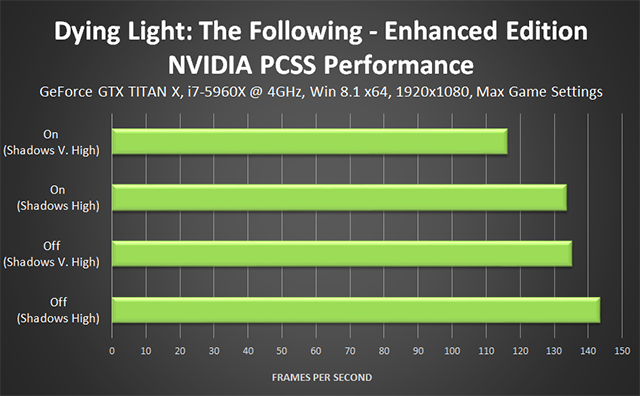
Performance: Enabling PCSS with maximum-quality shadows requires a significant amount of extra performance, especially in The Following's huge, foliage-filled zone. To be specific, PCSS costs 19 FPS with every other setting maxed out, and 10 FPS if the Shadow Map Size is on High rather than Very High. The improvement is well worth the cost in our opinion, though naturally others will prefer sharp, crisp shadows - if that's you, simply leave PCSS off, that's the beauty of PC gaming!
With numerous optimizations, improved CPU multi-threading, and many other tweaks, Dying Light now performs significantly faster than at launch. Take your system for a test drive in The Following and you'll quite possibly have the performance to now enable additional effects and PCSS, which will make Dying Light look even better.
Additional Graphics Settings
Anti-Aliasing
Dying Light's urban setting leads to innumerable aliased edges on buildings, objects, and vehicles. To reduce their visibility, a fast post-process anti-aliasing technique has been drafted in. Combined with visual effects, fast gameplay, and (optional) motion blur, the post-process anti-aliasing does a decent job, greatly reducing the visibility of Dying Light's jaggies.
An enlarged comparison better highlights the high degree of aliasing, the impact of anti-aliasing, and the surprisingly lack of texture blur that's typically associated with post-process anti-aliasing techniques.
Performance: Given its post-process technology, Anti-Aliasing has a negligible impact on performance. As such, it should be one of the first settings enabled.
To further diminish the impact of aliasing, crank up the rendering resolution as explained in the Dynamic Super Resolution section.
Foliage Quality
"Foliage Quality" is a misnomer, as this setting merely adjusts the density of grass found across Dying Light's expansive world. Take a look below to see for yourself.
| Interactive Comparisons | ||
| High vs. Medium | High vs. Low | Medium vs. Low |
In the occasional location, any detail level below maximum completely removes grass, decreasing image quality greatly.
| Interactive Comparisons | ||
| High vs. Medium | High vs. Low | Medium vs. Low |
Performance: Dying Light's vast fields of swaying grass can have a noticeable impact on performance, as our testing reveals.
If you're seeking extra performance we'd recommend lowering the
foliage
grass setting to Medium, but no lower. On Low, the ground is bare in many locations, and what grass that does remain does little to improve image quality.
Shadow Map Size
The Shadow Map Size setting controls the quality of shadows, despite its funky name. Higher settings equal better shadows with clearly visible detail, and fewer artifacts that distort or alias shadows.
| Interactive Comparisons | ||
| High vs. Medium | High vs. Low | High vs. Very Low |
| Medium vs. Low | Medium vs. Very Low | Low vs. Very Low |
January 30th, 2015 Update: Patch 1.2.1 has renamed the detail levels to Very High, High, Medium, and Low.
Performance: High's noticeably better fidelity commands a significant performance cost, but given the improvement in shadow definition we feel it's well worth the asking price.
If you're searching for extra performance, drop Shadow Quality to Medium, but we wouldn't recommend going any lower - on Low there's an appreciable reduction in shadow quality in all scenes, and Very Low sees the complete loss of all shadow definition.
Texture Quality
Unfortunately, Dying Light doesn't allow for Texture Quality to be changed mid-game. This, combined with checkpoint-style respawn locations and a constantly-changing time of day make direct comparisons in interesting locations impossible. From testing, it appears that there is no difference in quality between the two settings, and that High may merely be storing more textures in memory on suitably equipped GPUs. For example, running around an area on Medium resulted in a modicum of texture pop-in and VRAM usage of around 2GB. Repeating the test on High resulted in zero pop-in and VRAM usage that topped out at 3.3GB, though during longer gameplay sessions usage of nearly 4GB has been observed.
With so many variables it's impossible to draw any definitive conclusions, so all we can suggest is that you try High and see how you fare. If there's heavy stuttering it suggests you've hit the limits of your GPU and need to use a lower setting.
View Distance
Of all settings, View Distance has the largest impact on performance, reducing framerates by more than half at 1920x1080. Note: Patch 1.2.1, released January 30th 2015 has altered the View Distance setting. Click here to learn more.
In many other games a View Distance setting would reduce the overall visibility of the world, adding fog to hide detail, to improve the framerate. In Dying Light, however, the world is permanently visible as the player needs to plan their parkour route from A to B. With the removal of key geometry off the table, View Distance's attentions are instead turned towards extra, non-essential building detail, zombies, vehicles, objects, trees, and cliffs. Many of these features also fail to cast shadows at lower qualities, which in some scenes can greatly diminish image quality.
In the lower half of its twenty-step slider, the View Distance setting adds detail at medium and long ranges, making the aforementioned game elements visible the first time, or more visible through the addition of extra detail. In the latter half, added detail is improved in quality, and extreme distance detail introduced. From about 75% and up, many low-quality tree facsimiles are swapped for the real thing, making their up-close appearance visible at long range. This alone costs nearly 10 frames per second, and arguably reduces overall image quality because of their pixelated appearance (fine detail doesn't render well at distance at a comparatively low resolution like 1920x1080).
| Interactive Comparisons | ||
| 100% vs. 75% | 100% vs. 50% | 100% vs. 5% |
| 75% vs. 50% | 75% vs. 5% | 50% vs. 5% |
In a completely urban environment, the visual impact of the setting is less drastic, with the scene appearing sufficiently detailed and shadowed from the 45% mark.
| Interactive Comparisons | ||
| 100% vs. 75% | 100% vs. 50% | 100% vs. 5% |
| 75% vs. 50% | 75% vs. 5% | 50% vs. 5% |
The addition of extra detail does of course increase load on the GPU, but in testing we found the largest limiting factor to be the CPU. Usage of Core 1 will typically be pegged at 100% in Dying Light, but as the View Distance setting is raised GPU usage plummets, as does the framerate. Testing at other resolutions further confirms these results, with performance varying by only a few frames per second.
Resetting our i7-2600K clock speed from 4.8GHz to 3.4GHz saw performance decrease considerably, definitively proving the existence of the CPU bottleneck:
So what detail level is best? In screenshots such as these the answer is of course 100%, but during gameplay you'll be hard pressed to notice much of the added detail as you sprint and jump throughout the environment, especially if you enable Motion Blur. For us, 45% was the first level to offer decent-enough detail at mid range, and shadows, without egregious amounts of pop-in. Higher detail levels improve things further, but beyond 75% we noted no improvement whatsoever. In screenshots there's a clear improvement in extreme-distance detail, but when you're focused on lopping a zombie's head off in-game its sole impact is a reduction in your performance.
Whichever setting you choose, it's recommended you overclock your CPU for vastly improved performance. Google your CPU name and motherboard model to find countless guides, though make sure to read any and all disclaimers about potentially damaging your computer and its longevity. Please also note that warranties may be voided through overclocking, the upgrading of thermal interface material, or the replacement of CPU coolers.
Patch 1.2.1 Update
On January 30th, 2015, Techland released Patch 1.2.1, noting unspecified optimizations "that resolve many performance problems". Investigating these changes, we have discovered a significant reduction to the maximum View Distance range, decreasing the amount of detail rendered, thereby improving performance.
Upon closer examination, a reduction in maximum View Distance of more than two thirds is revealed, greatly decreasing the detail of extreme-distance game elements. Compared to the launch version of Dying Light (version 1.2), Patch 1.2.1's maximum View Distance falls between the 55% and 60% settings, which offered a good level of image quality and ran at over 45 frames per second in the game's most demanding locations in our previous tests.
To demonstrate the changes, and to see if there are any other image quality tweaks that could 'optimize' performance, we've put together a new set of interactive comparisons. The first compares version 1.2's maximum view distance against the new maximum in Patch 1.2.1, and the other two allow you to compare the 5% and 55% View Distance settings, which use identical config file values in both versions of Dying Light.
| Interactive Comparisons | ||
| v1.2 Max vs. v1.2.1 Max | v1.2 55% vs. v1.2.1 55% | v1.2 5% vs. v1.2.1 5% |
The biggest changes between the old and new maximum settings can be seen in the rear and periphery of the scene. Unique buildings are simplified to reduce load, several trees are substituted for low-detail facsimiles, distant shadows are removed, shading is simplified, and fine detail is scaled back or removed. However, as noted in our original analysis, the vast majority of this detail will go unnoticed during gameplay, and on occasion the higher-quality distant detail is less distinctive and appealing at 1920x1080.
At medium range, cables used by the player to traverse between buildings are hidden, which may make pre-planning a path from the screenshot's location more difficult. Additionally, some geometric detail is slightly scaled back, near-indistinguishable shadows are removed, the quality of some foliage is reduced, and the quality of objects like the trash bags in the lower right are also reduced.
At 5 and 55%, we see clear improvements to the sharpness and clarity of distant detail in version 1.2.1. In particular, note the clarity and detail of windows and building textures in the general vicinity around the quest log, in the center of the screen three streets back, and to the left amongst the many buildings. In all other regards, though, the scenes are identical. Whether the result of a bug fix or an improvement to the LOD system, the sharper detail is appreciable at medium range, particularly on large surfaces such as those around the quest log.
You can check out a complete set of View Distance screenshots for each version of the game below, enabling you to see the fidelity of each detail level in both versions of the game. For performance information, and to discover how to apply the old View Distance settings to Patch 1.2.1, keep on reading.
Version 1.2 View Distance Screenshots
Patch 1.2.1 View Distance Screenshots
Patch 1.2.1 Performance
In prior analysis we observed a severe CPU bottleneck in Dying Light that limited performance: CPU Core 1 load was locked at 100% at all times, reducing GPU usage and causing a range of performance issues on older and slower CPUs. Thankfully, Techland has acted quickly to rebalance core loads, improving CPU performance, GPU usage, and frame rates.
The result is a 8.1 FPS improvement at 5% View Distance, and a 5.9 FPS improvement at 55% View Distance, the two View Distance settings that display identical amounts of detail pre and post patch. Other detail levels sport similar 'VisRange' values in config files, and as you can see from the table below performance is improved across the board.
Note, outside of our bottlenecked test scene we're seeing significantly improved performance from higher GPU usage, though the extent of the improvement will vary with the power of your particular graphics card. Here however we're investigating the worst case scenarios that are regularly encountered in the game's second open-world location.
| v1.2 VisRange | v1.2 Performance | v1.2.1 VisRange | v1.2.1 Performance | |
| View Distance 5% | 1.40 | 79.9 FPS | 1.40 | 88.1 FPS |
| View Distance 10% | 1.40 | 79.8 FPS | 1.50 | 86.2 FPS |
| View Distance 15% | 1.41 | 78.2 FPS | 1.60 | 79.9 FPS |
| View Distance 20% | 1.43 | 77.6 FPS | 1.70 | 76.8 FPS |
| View Distance 25% | 1.46 | 77.1 FPS | 1.80 | 73.1 FPS |
| View Distance 30% | 1.52 | 73.6 FPS | 1.90 | 71.2 FPS |
| View Distance 35% | 1.62 | 70.9 FPS | 2.00 | 69.4 FPS |
| View Distance 40% | 1.74 | 68.8 FPS | 2.10 | 67.4 FPS |
| View Distance 45% | 1.91 | 63.9 FPS | 2.20 | 66.7 FPS |
| View Distance 50% | 2.13 | 60.3 FPS | 2.30 | 64.1 FPS |
| View Distance 55% | 2.40 | 56.5 FPS | 2.40 | 62.4 FPS |
| View Distance 60% | 2.73 | 53.8 FPS | 2.50 | 60.9 FPS |
| View Distance 65% | 3.13 | 50.2 FPS | 2.60 | 60.1 FPS |
| View Distance 70% | 3.60 | 47.9 FPS | ||
| View Distance 75% | 4.14 | 46.1 FPS | ||
| View Distance 80% | 4.78 | 43.6 FPS | ||
| View Distance 85% | 5.50 | 42.5 FPS | ||
| View Distance 90% | 6.31 | 41.5 FPS | ||
| View Distance 95% | 7.23 | 40.4 FPS | ||
| View Distance 100% | 8.26 | 39.7 FPS |
The in-game options may stop at 2.60 VisRange, but we've discovered that the old VisRange values can be applied to Patch 1.2.1. Here's how:
- Configure all game settings to your liking in Dying Light. Quit the game.
- Open C:\Users\USERNAME\Documents\DyingLight\out\settings\video.scr using Notepad++ or a similar application.
- Change the VisRange value to VisRange(8.26, 8.26) for maximum pre-patch graphics, or use any of the other numbers from the table above. Note, both numbers must be the same.
- Save the file, go back into its folder, right click it, select Properties, click Read Only, click Apply, close window. Note: after setting the file to Read Only, any further changes to the graphics options in-game won't apply properly, or will be undone when you next open Dying Light.
- Reopen Dying Light, enjoy the increased View Distance.
Using this method, we tested 8.26 VisRange, the old maximum, and found it to run at 44.5 FPS, a 4.8 FPS improvement. Given that this patch was developed in less than 4 days, and that several bottlenecks are still present, this is an excellent start , increasing performance and making Dying Light playable on systems with older and slower CPUs.
Patch 1.4.0 Update
On February 14th, 2015, Techland released Patch 1.4.0, stating that the new update included further optimizations, memory usage reductions, and a variety of other changes.
Put to the test, these new optimizations gave us 5 extra frames per second in our CPU bound trouble spot, and even faster framerates with the CPU-hungry View Distance setting turned down. Combined with the new GeForce Game Ready 347.52 WHQL drivers, Patch 1.4.0 performance in our benchmark location with 8.26 View Distance is now 12 frames per second faster than it was three weeks ago, and at 2.60 VisRange it's nearly 20 FPS faster.
Dying Light: The Following - Enhanced Edition
Since the release of Patch 1.4.0, further updates and tweaks have been released, culminating in the launch of Dying Light: The Following - Enhanced Edition. A re-release of the game, Dying Light: The Following - Enhanced Edition contains the original game, The Following, a new campaign in a new zone, gameplay enhancements for owners of all versions of the game, and additional graphics and performance optimizations. Included with the graphics updates are remade character models, changes to foliage density and visibility, and a few other tweaks and improvements.
Together, the many changes have further improved image quality and performance, so if you ever had issues running Dying Light in the past it's worth taking another look at this great game.
NVIDIA Control Panel Anisotropic Filtering
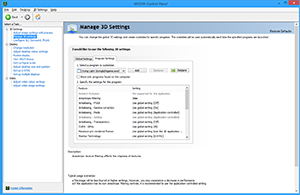
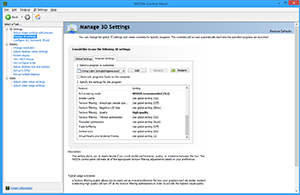
If you wish to sharpen distant textures and those viewed on an angle, forcibly enable High Quality Anisotropic Filtering (AF) via the NVIDIA Control Panel, like so:
Improvements are particularly evident in The Following, where wide-open fields and distant views of foliage-free surfaces can be seen throughout.
NVIDIA Control Dynamic Super Resolution
To amp up your graphics even further, activate Dynamic Super Resolution (DSR) to receive up to 4K-quality graphics on your HD monitor. How it works is simple: compatible games, such as Dying Light, are rendered at a higher, more detailed resolution, and the image intelligently shrunk back down to the resolution of your monitor using a custom-made filter, giving you up to 4K-quality graphics on your screen. The video below explains more, and the images show how to activate the setting in the NVIDIA Control Panel.
With DSR enabled, textures are sharper and clearer, aliasing is greatly reduced, objects have better definition, vegetation is more detailed and free of artifacts, and distant game detail is significantly clearer. As with Texture Quality, however, Dying Light prevents resolution changes during gameplay, making representative comparison screenshots impossible to capture. If you've used DSR in other games you'll know of its benefits already, and hopefully require little convincing of its benefits in Dying Light.
For the best DSR results download the GeForce Game Ready Dying Light 347.25 WHQL Drivers, and if you dislike configuring settings manually let GeForce Experience auto-configure Dying Light and DSR on your behalf.
Game Ready Dying Light Driver
For the best Dying Light experience we recommend updating to the new Dying Light GeForce Game Ready Drivers. Included are the latest performance optimizations and tweaks for Dying Light, as well as extended MFAA support for almost all DirectX 10 and 11 games. Download from GeForce.co.uk or via GeForce Experience.
After updating, open GeForce Experience 2.2.2 and click 'Check For Updates' on the Preferences tab to get a new Game Ready Dying Light SLI profile, which should improve performance on multi-GPU systems. If you're a power user and prefer to configure your own profiles, the SLI bits to use are 0x080000F5. Note, if you're CPU bound you may observe a decrease in performance in some scenes.
GeForce Experience: Optimal Playable Settings With A Single Click
The best way to automatically configure and apply Dying Light's game settings for your specific system configuration is through GeForce Experience, an invaluable tool for all GeForce GTX users. In addition to optimising over 200 games, the free GeForce Experience application can automatically update drivers and profiles, record and stream gameplay with ShadowPlay, and can wirelessly stream PC games, including Dying Light, to NVIDIA SHIELD devices.
Taking into account your GPU and CPU, as well as many additional factors, GeForce Experience’s game recommendations can be applied with a single click, and are updated over time should developer patches and NVIDIA drivers improve performance further still. This one-click solution is perfect for gamers who wish to play instead of fiddling, and for those with little experience in configuring settings for an optimal experience.
Now Playing: The Definitive Dying Light Experience
If you're looking for a visual feast full of wondrous scenes, Dying Light's the wrong game for you. Its grain-filtered, chromatic-aberrated, grimy, post-apocalyptic visuals do their utmost to convey the horrendous events of the game and the protagonist's murky existence, in addition to his failing grasp on his own humanity. And while the highest visual settings may be capable of bringing high-end systems to their knees, there's enough flexibility to find the perfect balance between image quality and performance on older systems.
As for the game itself, we've greatly enjoyed our time slaughtering zombies, and look forward to bashing more skulls later today with friends in the drop-in, drop-out online co-op and versus multiplayer. If that sounds good to you, too, you can get Dying Light on Steam and from other authorised sellers.


