A build log can be a great way to show your process while building a PC. Actually, it's a great way to show your process while building anything really. What is the proper way to create a build log though? Everyone has their own way about doing it; there is no one structure to follow. But perhaps we can help guide you in a sensible way to format it.
In this guide we'll be using the Red Harbinger Cross desk as an example build. If you would like to see more of the Cross Desk be sure to head over to the GeForce Garage and check out Lee Harrington's walk-through of modding your chassis.
Now let's get going.
Aside from actually taking the time to write up what you've been doing, the biggest component is taking a quality photo of your project. Not just one either, you can never have enough photos. It's always possible to delete pictures from a certain stage of the project, but you can't go back and retake them. Especially if you've painted or cut something out.
A quality photo can be simplified to just two things; lighting and point of interest. Modern day cases have moved to the all-black look which makes taking pictures of them hard. Introducing a separate light that you can position can really help bring out the detail in your pictures. Angles play a big part in pictures too. Your viewers won't have the opportunity to walk around and be able to see your project first hand so keep this in mind while taking your pictures. Try to keep your point of interest in the center of the frame and in proper focus.
BONUS: Time-Lapse

While you're working on the build, another cool idea is to set up a camera for time-lapse recording to capture whole processes. Watch the the complete Cross Desk hardware installation in the time-lapse video below. (NOTE: May be slow to load).

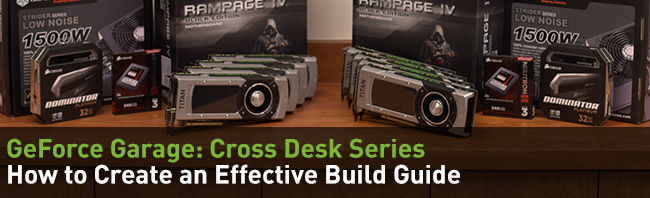
Lay out your idea for your build, including the parts list Below is an example first post.
Now this build isn't your typical PC, we'll be bringing in experts from around the United States to come in and work on this as a group. The top minds in the industry, from watercooling, custom wiring and sleeving, to a full blown LED light show. We'll start slow and work our way through this build one step at a time, so let's take a look at the hardware.
First and foremost, the biggest component is the desk. This is a custom made Red Harbinger standing Cross Desk. It's been raised to standing height, and has custom back and leg panels.
The beastly gear going inside of this desk:
- 8x GeForce GTX TITAN BLACK GPUs, divided across two complete computers
- 2x Intel i7 4960x CPUs
- 2x ASUS Rampage IV Black Edition Motherboards
- 2x Corsair Dominator Platinum 32 GB RAM Kits
- 2x Corsair Neutron GTX 240 GB SSDs
- 2x EK CoolStream RAD XTX 360 Radiators
- 2x EK CoolStream RAD XT 480 Radiators
- 8x EK EK-FC780 GTX Ti GPU Blocks
- 2x EK EK-Supremacy CPU Blocks
- 2x EK EK-FC Terminal QUAD Parallel GPU Links
- 4x EK EK-DCP 4.0 PWM X-RES Water Pump / Reservoir Combo.
- 15x Scythe GentleTyphoon 120mm Case Fans
- 2x Silverstone ST-1500 PSUs
- 4x FrozenQ Liquid Fusion 400mm Reservoirs


Typically, most builders take pictures of all their gear like the pictures above, but then take close ups of each part, too. This isn’t necessary and only lengthens your log; readers should get the idea with the group shots. In other words, try not to flood your first post with a million pictures of the same stuff, just with slightly different angles or close ups.
By all means, take multiple shots while you have your stuff on view, because you can't go back and take them again once you start modding, but from that set select the best one or two.
Usually this is where we would end the first post, keeping it concise and to the point - if your first post includes all your gear and keeps going ‘til you’re half way done with the project, it'll be overwhelming and people reading won't retain all the information. If you only post 4 photos, instead of 30, people will tend to spend more time taking in the effort that you're putting into your build.
After you're done with your initial post and have got some more work done on your project, it's time to update your thread. Up until the conclusion of your build these posts will all follow a similar format, a description of what you've done followed by pictures of the work in progress. Also, keep the focus on your build and don't veer off topic much. People want to see progress and photos.
Well a few things have changed since our last post. First the radiators we initially chose for the build were a bit too thick to be able to fit in 4-way SLI, as they blocked access to the ports. We've replaced the EK CoolStream XTX 360s with just the XT 360. The XTXs are a massive 64mm thick, and the XTs are only 47mm. Doesn't seem like just a few millimeters would make a difference, but when you're trying to put as much hardware in as we are, it does! After swapping out the radiators, we put the waterblocks on the Titan Blacks and started cutting and drilling to mock up the layout for watercooling.
We kept the old heatsinks in case we decide to upgrade down the road, so be gentle!
We transferred these thermal pads back onto the old heatsink since we won't need them with the waterblocks.
Here are the new thermal pads being put on, these are much thinner than the original ones.
After that we apply our thermal paste to the chip and slap on a new waterblock.
Half way done, these EK waterblocks look awesome!
Can't just leave our CPU out of the loop, so we put on matching waterblocks for that as well.
All the Scythe GentleTyphoons are installed. You can see the old radiators in the back, way too big!
Even our SLI waterblock matches. Always check your O-Rings before installing these!
We put in all the hardware to start mocking up placement for pumps and reservoirs.
This looks like a good spot, we've orientated them this way so they work as one unit.
Looks like it's time to start drilling! We'll be back with more once we've made a decent amount of holes.


The above is a good example of how you can post a decent amount of pictures and still make it engaging for people to read and be excited about. There are no repeating pictures of the same subject, unless something drastic has changed. There is also good progression happening with the build, as we aren't spending tons of time trying to find the 15 different ways the pump could be mounted in the desk. That would make for a lot of the same pictures.
Depending on how big your build is, your next few posts will more than likely follow the same format as the one above. As you log starts to get lengthy, go back to your first post and create an index with quick links to these follow up posts. This will keep the log organized and easy to follow.
But don't just only post progress updates. Be active in the community that the log is posted in. Check back regularly, answer people's questions, and invite suggestions on decision making. Engage the community. It will make it more fun and keep everyone interested.
Before you know it you'll be reaching the end of your project and it'll be time for the wrap up post!
So you've completed your build! It's up and running and you can sit back and relax knowing that it's finally done. It's time to wrap it up, and write your final post about your project. This post should include any final details of the build you haven't posted earlier and if you're sponsored by anyone be sure to give proper thanks and credit to who helped with what. This is also a great opportunity to take the time to get some really good photos. Clean up your build and get rid of any excess items/debris in the background so people can get a real good look at your handy work.
It seems it's that time where we must call this the end. It's been a long journey, even to just get this far. Huge thank you goes to all our sponsors, without them none of this would be possible:
- Red Harbinger
- Corsair
- EKWB
- ASUS
- Primochill
- Intel
At this point we've drilled all the holes and painted all the parts. It's time for us to install all that hardware!
We started with the radiators since we can't fit the other hardware until this badboys are in.
Installing the intense ASUS Rampage IV Black!
Corsair Dominator Platinums ready to go in.
It's almost like this RAM was made for this board. Perfect match!
Make sure you don't put stress on any joints when moving your Titan Blacks in place, last thing you want is a leak once you start filling it.
Even pressure and a watchful eye on all the PCI-E slots means these slid right into place.
The pumps screw in from the bottom, thanks to the holes we drilled out earlier.
Laying out the clips that will hold four massive 400mm FrozenQ reservoirs
Here they are, not fully inside their clips. They're foggy from being cleaned just before.
We put in fill ports in the wall to help transfer our tubing later on.
And here's an overhead shot of both systems installed and ready for the next step!”


With all the hardware dropped in, we'll be stopping the build log here. There's plenty more to be done to the Cross Desk but we have special videos planned for those steps. I hope at least a few of you out there have a better understanding on what a build log is and how to effectively write them. Like I've mentioned at the top of this article that everyone will have their own way about writing these, but from the few I have written and read, this format works best.
If you've enjoyed this build and want to see more of it, be sure to check back to GeForce Garage and check out the next video guide from Mike Landenburger of Lutro0 Customs where we'll be working on the sleeving for the desk!