Featured News
NVIDIA NVENC-XSPLIT GUIDE
ABOUT THIS GUIDE
The objective of this guide is to help you understand how to use the NVIDIA encoder, NVENC, in XSplit Broadcaster. We have simplified some of the concepts to make this accessible to a wider audience. If you think we can improve any part of this guide or find any issues or mistakes, please post below and we will be happy to update it.
BITRATE, RESOLUTION AND FRAMERATE
Encoding is all about compressing images. The smaller the size of the image, the less we must compress it and the more quality it keeps. While the same applies for framerate, a viewer can really notice a drop in FPS but not so much in resolution, so we will always try to stream at 60 FPS.
First, run a speed test to determine your upload speed (e.g.Speed Test). We want to use around 75% of your upload speed, as the game and other programs such as Discord will also fight for bandwidth.
Then, we will determine the resolution and FPS that we can use for such bitrate. Most streaming sites have recommendations (Twitch,Youtube) on what to use. These are ours:
| Upload Speed |
Bitrate |
Resolution |
Framerate |
| 3 Mbps |
2,500 |
1024x576 |
30 |
| 4 Mbps |
3,500 |
1280x720 |
30 |
| 6 Mbps |
5,000 |
1280x720 |
60 |
| 8-15 Mbps |
6,000 |
1920x1080 * |
60 |
| 15+ Mbps |
12,000 (Youtube) |
1920x1080 |
60 |
| 20+ Mbps |
15,000+ (Youtube) |
2560x1440 |
60 |
| 40+ Mbps |
30,000+ (Youtube) |
3840x2160 |
60 |
- Important Note for High Motion Content. If you are going to stream high motion scenes (i.e. Racing games, some Battle Royale games, etc.) we highly recommend reducing your resolution. High motion content cannot be compressed as much, and can suffer from more artifacting (encoding errors) that make your stream look “blocky”. If you reduce the resolution, you reduce the data being encoded, and the resulting viewer quality is higher. For example, for Fortnite, many streamers decide to stream at 1600x900 60 FPS.
- Important Note for New and Upcoming Streamers to Twitch. Transcoding allows a viewer to view your video on a different resolution, thus requiring a lower bandwidth. Twitch only offers guaranteed transcoding to Partners; non-partners may receive transcoding, but it is not guaranteed. This is important if your viewers are on mobile phones or their internet speed is not as fast. You may want to consider streaming at a lower bitrate and resolution to lower the bandwidth required to see your channel.
RECOMMENDED SETTINGS
These are our recommended settings for XSplit Broadcaster 3.7 and up. You’ll want to test and adjust these settings using a private account where you can verify you’re happy with the results.
If you want an easy, out of the box configuration, then do the following:
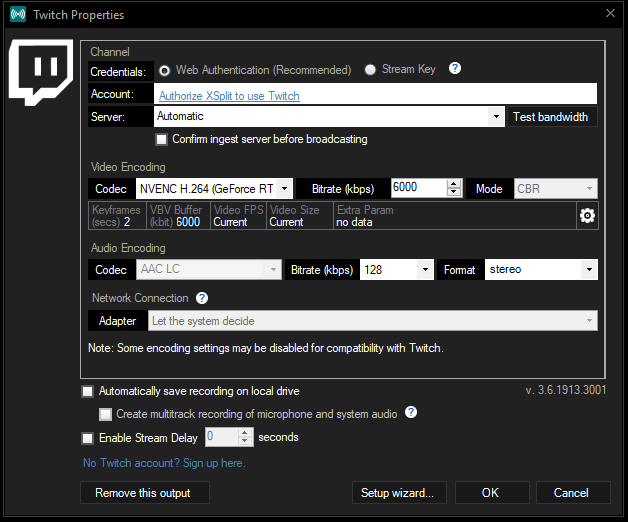
BROADCAST SETTINGS
- In the top menu, select Broadcast, then click on the Settings icon
- Under Video Encoding, adjust the following 2 settings:
- Codec: NVENC H.264
- Bitrate: Enter the Bitrate appropriate for your Upload Speed, as we discussed in the previous section
- Press OK to accept settings
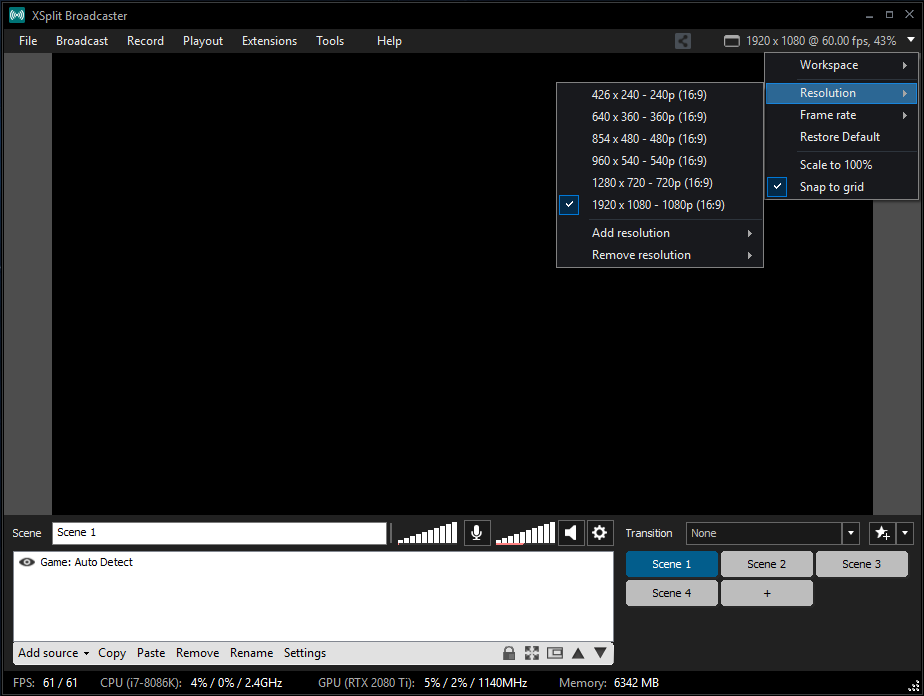
RESOLUTION AND FPS
- Select the Frame menu located on the top right corner
- Resolution: Enter the resolution appropriate for your Upload Speed and Bitrate (as shown above)
- Framerate: Enter the FPS appropriate for your Upload Speed and Bitrate (as shown above)
OTHER SETTINGS
There are 2 other things you want to configure to ensure a smooth stream:
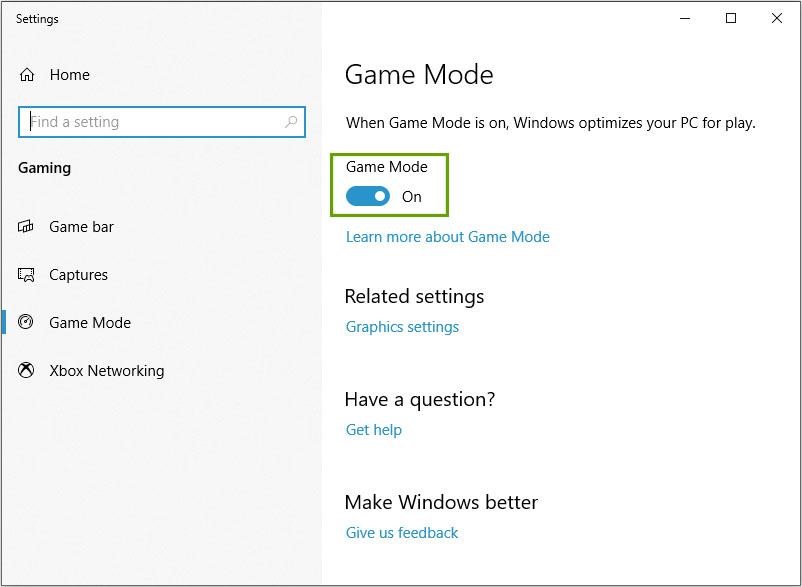
- Windows: Make sure you update to Windows 10 version 1903, and enable Game Mode. This version includes performance enhancements for streaming, as well as an updated Game Mode compatible with streaming.
- GPU Utilization: If your GPU utilization is above 95% Windows will start prioritizing the game over everything; this can, in some cases, make your stream lag. To solve this, OBS added an option in OBS 24.0.3 to prioritize OBS Studio over the Game. Just run OBS as Admin, and your stream will be silky smooth.
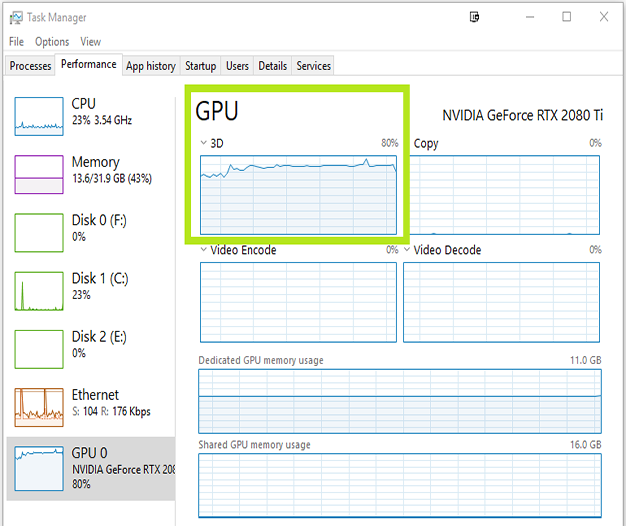
If for some reason you don't want to run OBS in Admin mode, you can also limit your GPU usage to be below the 95% threshold. To do this, you can:
- Cap FPS in-game, run the game in Borderless Windowed mode, reduce game graphics or resolution, or turn V-Sync on.
- Run all assets at 1080p. To do that, double click on the source in OBS and under Resolution select Custom and specify a resolution equal or under 1080p.
And there you have it! We hope this helps you improve your stream quality and reach your goals. Leave us a comment if this worked for you or if you’d like us to update the guide with other info. Happy streaming!
ADVANCED SETTINGS
XSplit 3.7 added advanced settings for NVENC. If you want to mess around with more of the settings, here are our in-depth recommendations.
BROADCAST SETTINGS
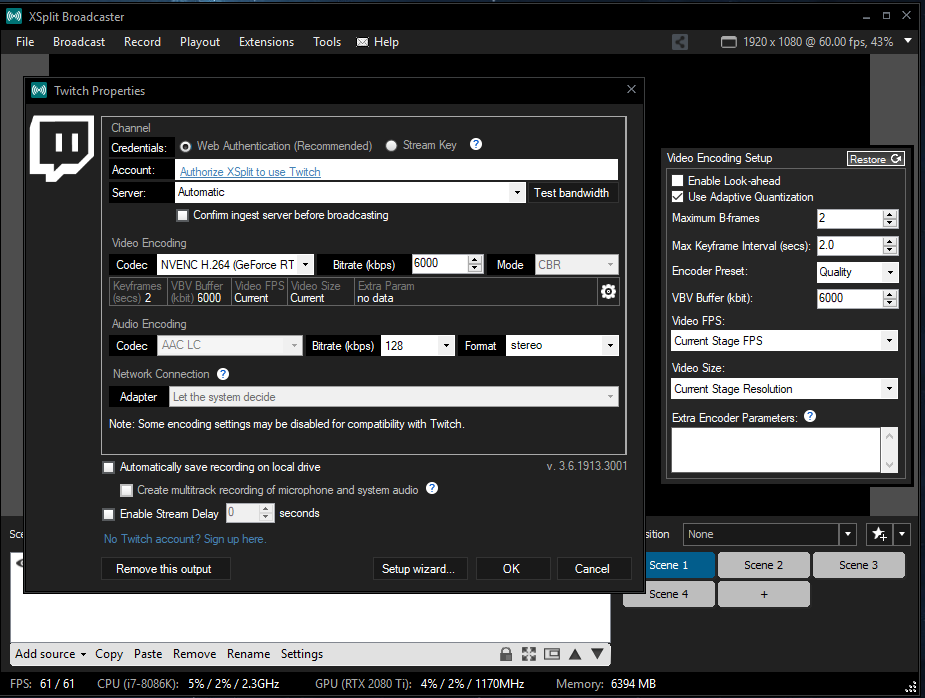
In the top menu, click on Broadcast, then the Settings icon. Under Video Encoding, adjust these two settings:
- Codec: NVENC H.264.
- Bitrate: Enter the Bitrate appropriate for your Upload Speed, as we discussed in the previous section.
Click on the Settings wheel under “Mode: CBR” to enter the Video Encoding Setup menu:
- Enable Look-ahead: Unchecked for most content, checked for low-motion games. This allows the encoder to dynamically select the number of B-Frames, between 0 and the number of B-Frames you specify. B-frames are great because they increase image quality, but they consume a lot of your available bitrate, so they reduce quality on high-motion content. Look-ahead enables the best of both worlds, but struggles with high-motion content as it needs to change too often. This feature is CUDA accelerated; toggle this off if your GPU utilization is high to ensure a smooth stream.
- Use Adaptive Quantization: Checked. This enables the Rate Distortion Optimization in the encoder, which greatly optimizes the way you use bitrate, improving image quality on movement.
- Max B-Frames: Set to 2. For low-motion content (i.e. adventure games such as Tomb Raider) you can increase this to 4. B-Frames increase image quality but consume bitrate, which decrease image quality on movement. If you see pixelation or artifacting on your stream you may want to reduce this.
- Max Keyframe Interval: Set to 2. Streaming platforms may limit what you can select here, and most require a setting of 2.
- Encoder Preset: Select Max Quality. This determines how much load we put on the encoder to get more quality. NVENC is incredibly efficient, so most users can select the maximum setting. If you get encoder overload issues, change this back to Quality. Max Quality and Quality differ in that Max Quality uses 2-pass encoding.
- VBV Buffer: This buffer is used when you are using Variable Bitrate, which most sites discourage for streaming. Therefore, make this number the same about as your Bitrate.
- Video FPS: Allows you to set a different FPS for streaming and recording. Our recommendation is to use the same FPS for both, so just leave the default setting of Current Stage FPS.
- Video Size: Allows you to set a different Resolution for streaming and recording. Our recommendation is to use the same FPS for both, so just leave the default setting of Current Stage Resolution.
RESOLUTION AND FPS
- Click on the Frame menu in top right corner.
- Resolution: Enter the resolution appropriate for your Upload Speed and Bitrate, as we discussed in the previous section. Remember that you can add new resolutions in case the one that you are interested in is not shown in the list (i.e. 1600x900). TO do that, just click on Add Resolution, and select one of the additional options or select Custom Resolution to enter your own. Just remember to keep the same aspect ratio as your desktop and game resolution!
- Framerate: Enter the FPS appropriate for your Upload Speed and Bitrate, same as above.
