x
... loading movie ...
The objective of this guide is to help you understand how to use the NVIDIA encoder, NvEnc, in OBS. We have simplified some of the concepts to make this accessible to a wider audience. If you think we can improve any part of this guide or find any issues or mistakes, please post below and we will be happy to update it.
Encoding is all about compressing images. The smaller the size of the image, the less we must compress it and the more quality it keeps. While the same applies for framerate, a viewer can really notice a drop in FPS but not so much in resolution, so we will always try to stream at 60 FPS.
First, run a speed test to determine your upload speed (e.g. Speed Test). We want to use around 75% of your upload speed, as the game and other programs such as Discord will also fight for bandwidth.
Then, we will determine the resolution and FPS that we can use for such bitrate. Most streaming sites have recommendations (Twitch, Youtube) on what to use. These are ours:
| Upload Speed |
Bitrate |
Resolution |
Framerate |
| 3 Mbps |
2,500 |
1024x576 |
30 |
| 4 Mbps |
3,500 |
1280x720 |
30 |
| 6 Mbps |
5,000 |
1280x720 |
60 |
| 8-15 Mbps |
6,000 |
1920x1080 * |
60 |
| 15+ Mbps |
12,000 (Youtube) |
1920x1080 |
60 |
| 20+ Mbps |
15,000+ (Youtube) |
2560x1440 |
60 |
| 40+ Mbps |
30,000+ (Youtube) |
3840x2160 |
60 |
* Important Note for High Motion Content. If you are going to stream high motion scenes (i.e. Racing games, some Battle Royale games, etc.) we highly recommend reducing your resolution. High motion content cannot be compressed as much, and can suffer from more artifacting (encoding errors) that make your stream look “blocky”. If you reduce the resolution, you reduce the data being encoded, and the resulting viewer quality is higher. For example, for Fortnite, many streamers decide to stream at 1600x900 60 FPS.
** Important Note for New and Upcoming Streamers to Twitch. Transcoding allows a viewer to view your video on a different resolution, thus requiring a lower bandwidth. Twitch only offers guaranteed transcoding to Partners; non-partners may receive transcoding, but it is not guaranteed. This is important if your viewers are on mobile phones or their internet speed is not as fast. You may want to consider streaming at a lower bitrate and resolution to lower the bandwidth required to see your channel.
If you want an easy, out of the box configuration, then do the following:
There are 2 other things you want to configure to ensure a smooth stream:
And there you have it! We hope this helps you improve your stream quality and reach your goals. Leave us a comment if this worked for you or if you’d like us to update the guide with other info. Happy streaming!
If you want to mess around with all settings, here are our in-depth recommendations.
Streaming Settings
Recording Settings

NvEnc is NVIDIA’s encoder. It’s a physical section of our GPUs that is dedicated to encoding only. This means that your GPU can operate normally regardless of whether you use this region to stream or record. Other encoders, such as x264, use your CPU to encode, which takes resources away from other programs such as your game. That’s why using NvEnc allows you to play games at a higher framerate and avoid stuttering, giving you and your viewers a better experience.
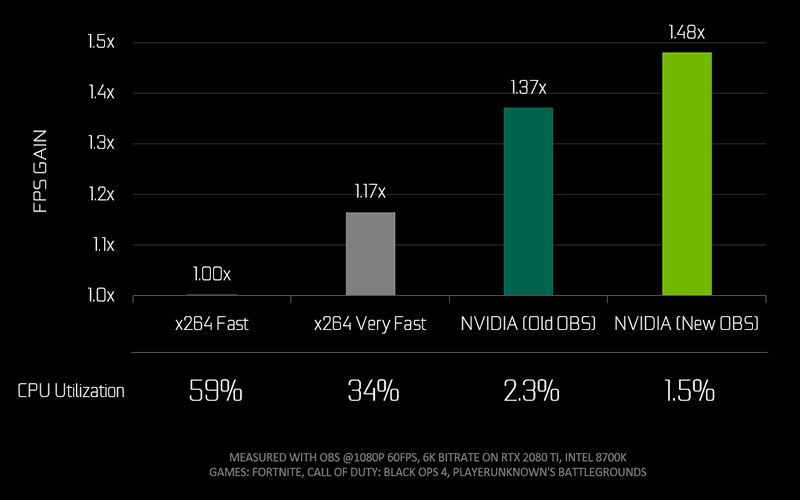
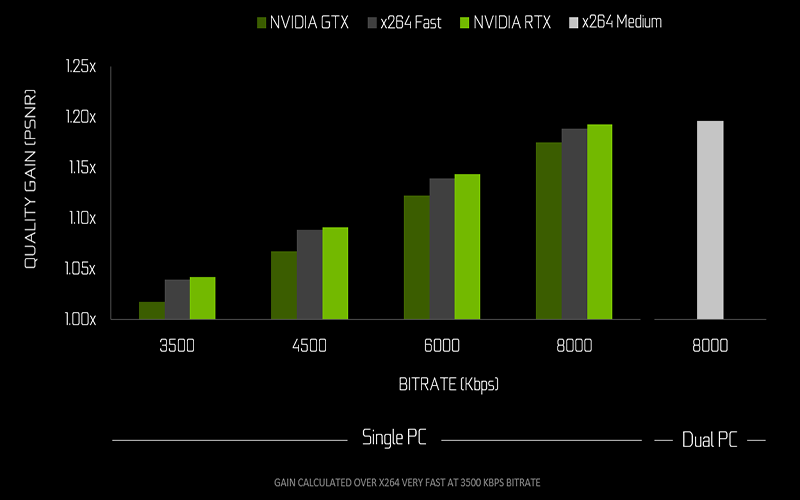
In the last two GPU generations we have made great improvements to NvEnc, helping deliver best-in-class output quality. NvEnc in the GTX 10-series GPUs provides superior quality than x264 Very Fast, the most commonly used x264 preset. And in the new RTX 20-series, NvEnc performs better than x264 Fast and on par with x264 Medium, a preset that requires an expensive dual PC setup.
One thing that is great about NvEnc on the RTX 20-series is that all GPUs have the same NvEnc with the same performance and quality, from the RTX 2060 to the RTX 2080 Ti. NvEnc also benefits from our own NVIDIA Video Codec SDK, an advanced set of tools that help improve the encoded quality and that we constantly update to help you get the best out of your NVIDIA card.
Finally, if you are using an NVIDIA GPU you have access to GeForce Experience’s Game Filters, which allow you to further improve the image quality of your viewers via software by enhancing color, adding sharpness, or introducing cool effects.
We have collaborated with OBS to improve support for NVIDIA GeForce GPUs. The new OBS Studio, version 23.0, will leverage the NVIDIA Video Codec SDK, which will greatly improve performance and reduce the FPS impact of streaming and recording. We have also tweaked some of the background settings of NvEnc to improve quality, especially for the RTX 20-Series GPUs.
Streaming can be very complicated, but it’s particularly hard to debug. There are many things at play when you stream, so we are going to try to provide you some help on how to identify what is going wrong and how to fix it.
Components
Streaming uses the following components:
If something is failing, we want to first identify what component may be failing, so we don’t go crazy trying to fix something that was never broken in the first place. Typically, this means that the first test you should do is a Speed Test to make sure that you don’t have internet problems in your local internet or your connection. Second, make sure the platform hasn’t issued an alert that they are down or are experiencing problems. Then based on what error you get, you start looking at one thing or another in your PC.
How to check what’s happening to the encode
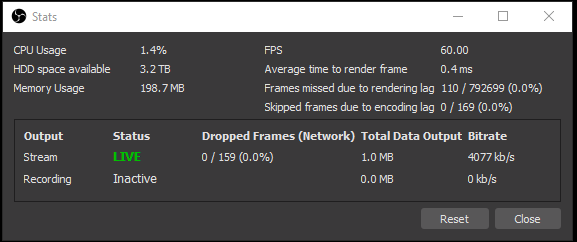
OBS Studio includes a very useful tool: the Stats Window. To bring it up, click on View > Stats. This window will show you Lagged and Skipped frames, Dropped frames, and Encode FPS.
Common Error Types
Stream is missing FPS. For FPS issues, OBS includes an FPS counter at the bottom right of the program. If you have FPS issues make sure that both your content and OBS are running at or above your desired FPS. If your content is the problem, lower the game settings so you get more FPS. If OBS is losing FPS, try the GPU Overloads solutions below. If neither of these are the issue, the problem is likely on the network.
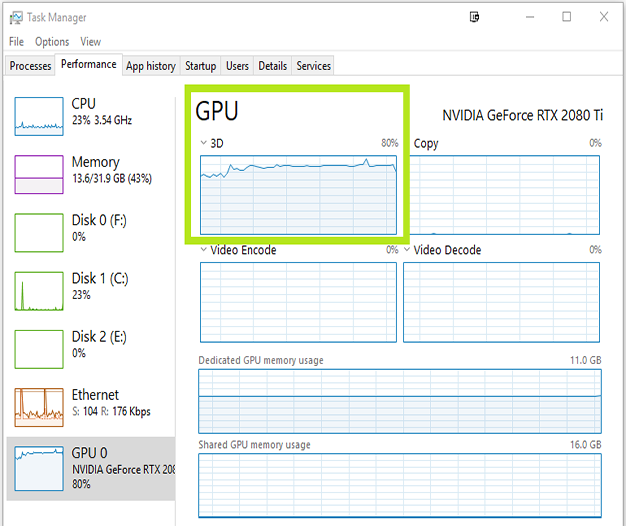
GPU Overloads. To identify this issue, open the Windows Task Manager, go to the Performance tab and click on your GPU. You will be able to see the load on each of the sections of the GPU. If the Video Encode section is above 90% you may be getting encoder overload issues. This is caused by Windows, as it de-prioritizes OBS to give more resources to the game. To fix it, we recommend trying each of these in order until your GPU load is below 90%:
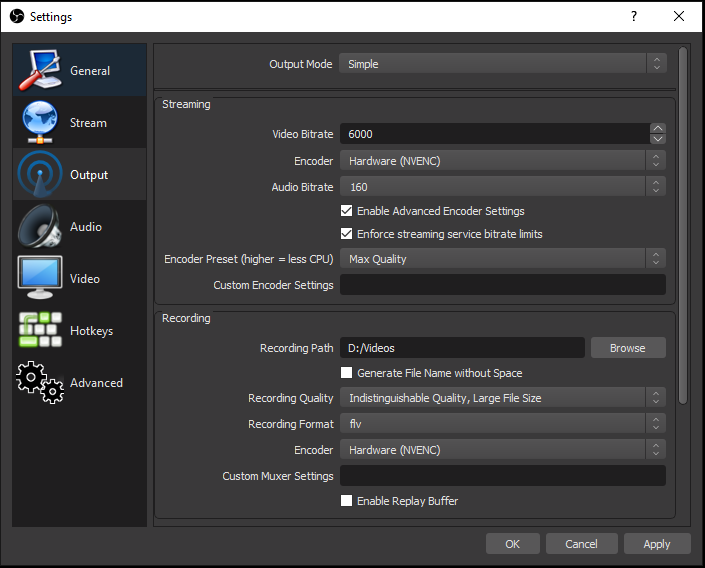
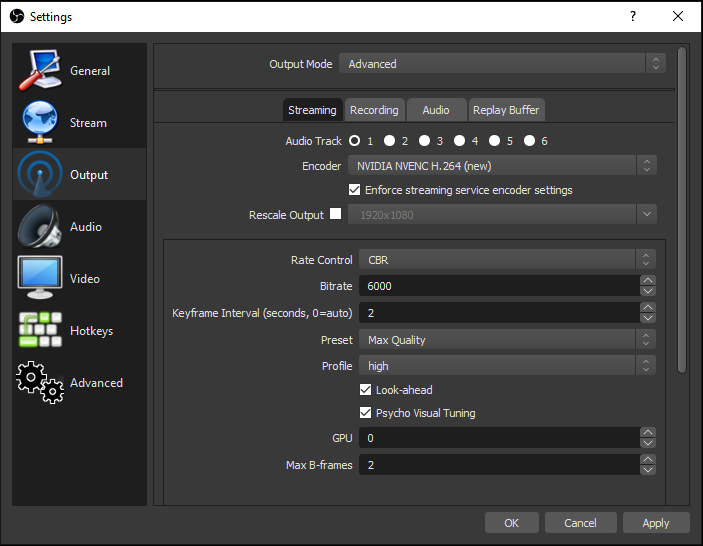
In some cases, turning the features Look-Ahead and Psycho Visual Tuning off may help alleviate this problem. To do so, go to Settings > Output, and change the Output mode to Advanced. Then uncheck these 2 options.
Encoder Overloads. You can identify this by seeing an error message in the bottom bar of OBS that tells you that the encoder is overloading. This is extremely rare when using NvEnc. To identify this issue, open the Windows Task Manager, go to the Performance tab and click on your GPU. The Video Encode section (second graph on the left) tells you the encoder load. If it’s above 95% you may be hitting this issue. There are 2 settings that can help resolve this:
Image looks very washed out. The most likely issue is trying to push too much quality with not enough bitrate. Consider reducing the resolution, and frame rate (if needed), and try again. If quality improves, then adjust until you find your sweet spot.