x
... loading movie ...

Welcome to Part 2 of DIY: SLI! Previously we took a good look at each of the major system components, selected those that were right for our needs and budget, took everything out of their boxes, then assembled our system from the ground up. If you'd like to review the last issue, you can find it here. Now that our machine is up and running, we're going to be concentrating on the software side of things.
Software-focused, kicking off with looking through the BIOS, installing our operating system, choosing the right GeForce graphics drivers, learning about the NVIDIA Control Panel and how to tweak it for our benefit, installing some useful programs, and wrapping everything up by going over some good benchmarking practices to guarantee we'll have comparable results between different settings and components.

The BIOS (Basic Input/Output System) is the foundational piece of software stored on a small chip on the motherboard which controls how your system boots up, how your system's components interact with each other, and also how you interact with the system itself. High-end motherboards, like the ASUS Maximus VI Extreme, also expose various parameters to the user which allows them to finely tune how the system behaves: unnecessary devices can be disabled, core components like the CPU and RAM can be modified to run at higher speeds than normal, fans can have their rotation speeds altered, and much more. Access to controls like these are invaluable to enthusiast overclockers and tweakers, but caution must be exercised - if incorrectly changed, these settings can cause permanent damage to your hardware. Quite simply: if you don't know what something does, leave it alone!
Gaining access to the BIOS requires you press a specific key, which is typically shown on your screen when the system is first started up. For the Maximus VI Extreme, the BIOS can be entered by pressing the Delete or F2 button when the ASUS ROG logo (red/white stylised eye, like the one in the top-left corner of the image below) appears in the centre. You may need to press the key multiple times since your keyboard and mouse are still being detected by the BIOS, but once it's done with its preliminary self-test, you'll be brought to a screen that looks like this:
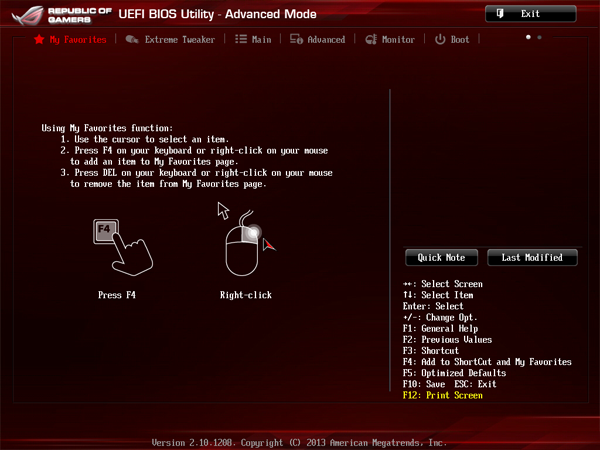
Newer motherboards use a UEFI BIOS - most of the details aren't worth going on about, however one thing that's definitely worth mentioning is that these interfaces allow you to use your mouse to manipulate items on-screen, like changing the value of something. Previously this all had to be done with the keyboard, and to some degree (at least with the Maximus VI Extreme) that's still true.
Let's get familiar with the layout here before we proceed. The page we're currently on is "My Favourites," as shown by the fact that its name is in red at the top of the screen. We can move to other pages by using the left and right arrow keys on our motherboard, and their contents are as follows:
Using the arrow keys, navigate to the "Boot" page and scroll down towards the bottom where you'll see a section labeled "Boot Option Priorities." In it you'll see something like this:
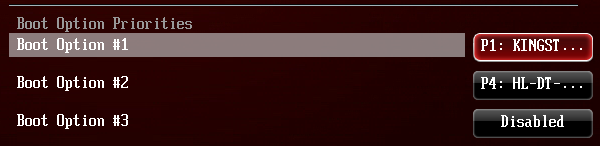
Right now one of our Kingston 3K SSDs is set as the primary boot device. While that's fine for when it has an operating system (OS) installed on it, we need to set it so our system boots to the disc in our optical drive first. To set this, click on the bubble to the right of "Boot Option #1" and a window like this will pop up:
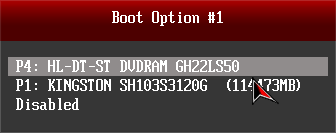
Select your optical drive by clicking it with your mouse cursor, or by highlighting it using the arrow keys and pressing Enter. The boot priority of the other boot options may automatically change to accommodate the new order.
When you're finished making changes or simply looking around, click the "Exit" button in the top-right corner to bring up this page.
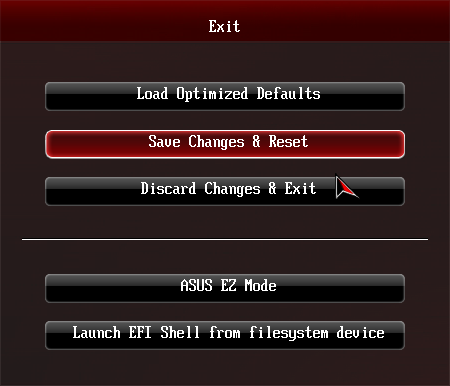
If you ever need to reset the BIOS to its original settings, click the top button, "Load Optimised Defaults." This will not restart your system, but any changes you've made up to this point will be lost.
To apply any changes you've made, press the button below it, "Save Changes & Reset." Clicking this button will first bring up a window with a list of all the pending changes, which you have to accept or decline before any settings will be modified. Accepting the changes will restart your system, while declining will return you to this menu. Use the arrow keys to flip to other pages if you'd like to revert or alter any changes.
"Discard Changes & Exit" will ignore any new settings you've selected, will not apply them at the next reboot, and allows the system to boot up as it normally would.
A simpler layout of the BIOS is available with the "ASUS EZ" mode, which you can seamlessly switch back and forth from, but you may find its simplicity a bit too restrictive. The button below this one is not something we'll need to use or worry about.

It should be noted right away that any build that has more than 4 GB of memory total (system memory plus graphics memory) will explicitly require a 64-bit operating system. A 32-bit OS cannot detect that much and will have issues. Additionally, Windows 7 does not recognise USB 3.0 devices or ports by default, so you will be required to plug your USB mouse/keyboard into the USB 2.0 slots on the rear or front of your case until you have installed the necessary software.
The process for installing a modern operating system like Windows 7 or Windows 8 is pretty straightforward and mostly automated, but there are some excellent guides on the Internet that will guide you through the whole thing and even teach you a few tricks to get it running optimally. We'll be covering some of the same points mentioned in the below guides in case you don't want to read one of them all the way through.
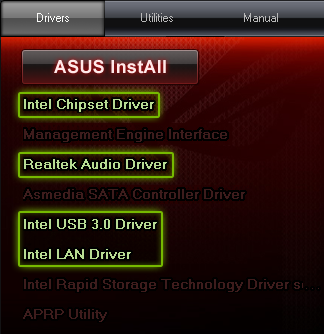
The ASUS Maximus VI Extreme's support CD is broken into several categories, but there's only one section we technically need anything from, and that's "Drivers." From that we need to install the drivers highlighted below. Please restart your system after installing each item.
There are some useful programs in the "Utilities" category, but they aren't essential, so you can remove the disc from your optical drive if you don't see anything you're interested in. By now your system is likely to be talking with Microsoft servers to find updates - and there will probably be a lot of them. This would also be a good time to activate your Windows license with Microsoft. To do this, right-click on "My Computer" and click "Properties." At the bottom of the new window will be a link to activate your product, which you can do online or over the phone if there is a conflict (like if you've used the same serial key to install the OS on a previous machine).
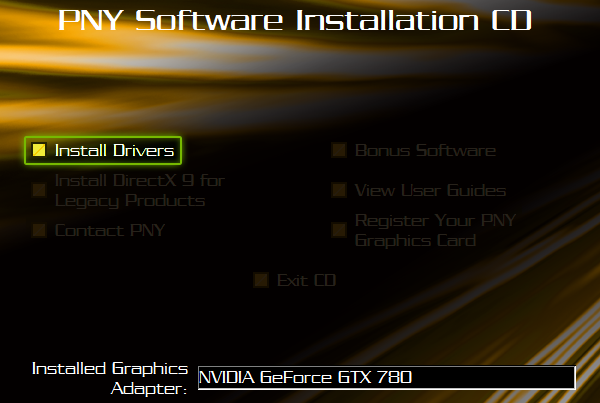
You've probably noticed that the text and images on your screen don't look too good, and that's because there currently isn't a graphics driver telling the OS how to recognize and use the graphics cards, so it defaults to displaying at a very low resolution and using a small number of colors. A driver CD should have been included with each of your graphics cards. For the PNY GTX 780s we received, the GeForce driver included was Release 320.11, a driver specifically made to support the GTX 780 when it was first launched. Like before, restart your system when the installation has completed.
In a few moments we'll discuss how to find the most recent drivers for your system and then take a look around in the NVIDIA Control Panel, but we have a few tweaks to make to our OS first.
Note: Many SSDs either have TRIM-style capabilities that work automatically, or have software applications that perform the function for you. Please research your specific SSD model before proceeding further with TRIM.
To check if Windows 7/8 is using the TRIM command, first open the Command Prompt. Windows 7 users can do this by opening the Start menu, clicking "Run," typing "cmd" (without quotes) into the text field, and pressing Enter. Windows 8 users can open the Command Prompt from the Apps screen by finding the "Windows System" section, and then "Command Prompt" within that. Type "fsutil behavior query disabledeletenotify" (without quotes) into the Command Prompt and press enter.
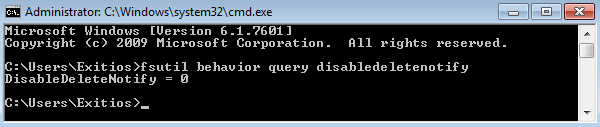
The OS will respond in one of two ways: "DisableDeleteNotify = 0," indicating that TRIM is enabled, or "DisableDeleteNotify = 1," indicating that it is not. To enable TRIM, type "fsutil behavior set disabledeletenotify 0" (without quotes) into the Command Prompt and press Enter.
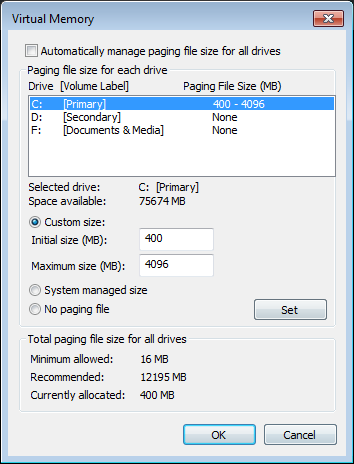
For Windows 7 users: open the Start menu, right-click on Computer, click Properties, click "Advanced system settings" on the left side, click the Advanced tab, press the "Settings..." button, click the Advanced tab, then finally press the "Change..." button.
For Windows 8 users: open the Start menu, click on Control Panel, click "System and Maintenance," click System, click "Advanced system settings" on the left side, click the Advanced tab, in the Performance section, press the "Settings..." button, click Settings, and under Virtual Memory, press the "Change..." button.
Uncheck the box that says "Automatically manage paging file size for all drives," then set all but your primary SSD to have a paging file. For that drive, set a custom size with a minimum of 400 MB and a maximum between 2048 MB and 4096 MB. When finished, press OK for each of the three windows, and restart when prompted for the changes to apply.
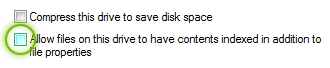
To disable indexing for a specific drive: open the Start menu, click on Computer, right-click the drive you'd like to disable the service for, and click "Properties." Uncheck the box at the bottom of the information screen like below, click Apply, apply the changes to all subfolders and files, then hit OK when it's done.
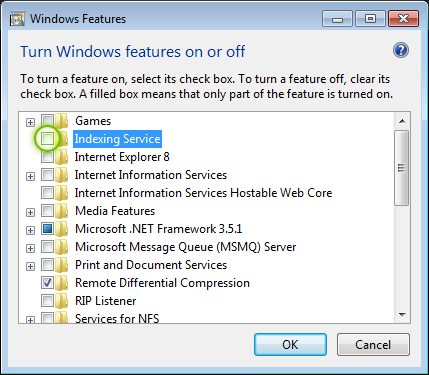
To disable search indexing entirely: open the Start menu, click on "Control Panel," click the "Uninstall a Program" link or "Programs and Features" icon, and in the top-left corner there will be "Turn Windows features on or off." Click this link and a window will pop up with a series of checkboxes. "Indexing Service" is second from the top, and all you have to do is uncheck the box and hit OK. You can also disable other features you may not need, like Windows's built-in games or media center.

By now we already have a graphics driver installed thanks to the CD that was bundled with our GTX 780s, and it does a good job of supporting recent games. However, unlike other device drivers which don't tend to change much, graphics drivers are constantly evolving. They have to be routinely updated to support new hardware (that is, new graphics cards), they are frequently modified to play brand-new games, and optimised so that less recent games play better than before.
Staying up to date with the current driver versions might be a bit confusing since there seems to be two different types: WHQL and Beta. Although the version numbers might not be the same, these are still technically the same type of driver. WHQL stands for Windows Hardware Quality Labs, and when a driver has "WHQL" in its name, it means that Microsoft has tested, verified, and certified it for being compatible on current Windows operating systems and on a wide range of system configurations. Beta drivers, on the other hand, have not undergone this sort of testing and are, in essence, experimental. Releasing these drivers allows NVIDIA to gather massive amounts of performance and behavioural feedback from their users, which they use to further improve on the driver. This is to say that Beta drivers may have issues that are still being worked out, so if you'd rather play it safe, WHQL drivers will do nicely.
There are two ways you can find the latest GeForce graphics drivers: by visiting GeForce.co.uk's driver section and using the manual search or automatic detection, or by downloading and installing GeForce Experience and allowing it to do this (and more!) automatically for you. Even if you elected to search for drivers on your own, after you've loaded up with the latest driver it's highly recommended you check out GeForce Experience - not for your drivers, but for your games.
For a gamer, there are fewer things more frustrating than having to constantly fiddle with the graphics settings in a game to keep it running smoothly with a good level of image quality. There are usually tons of different options with obscure names, and without knowing what they do or how they affect performance it's easy to see why some would rather settle for using defaults like "Medium" or "High", and simply get on with playing. GeForce Experience can detect your system's hardware, your monitor's resolution, and your installed games to then find the optimal settings for each one of them. All you have to do is press a button and it takes care of the rest.
In addition to enhancing games with a single click, GeForce Experience also improves and expands your experience with games when playing. In-game, GeForce ShadowPlay’s revolutionary gameplay capture technology has enabled gamers to capture and upload over 3,000,000 million videos since its launch last October. Unlike traditional software capture applications, ShadowPlay utilises H.264 encoder chips built into every GeForce GTX 600 and 700 Series desktop GPU to capture gameplay on a hardware level, minimising the performance impact associated with gameplay capture. Furthermore, gameplay recording has minimal impact on hard disk usage, recorded H.264 files are considerably smaller than those of other software solutions, and said files are automatically compatible with YouTube’s upload service, removing the need to reencode and compress before distribution to the masses.
Of particular note is the DVR-like Shadow Mode, which constantly records up to 20 minutes of gameplay to a buffer, ready to be saved to disk upon the press of a user-defined hotkey. With this innovative addition, any “did you see that?!” moments can be instantly saved to disk, and all the boring bits discarded. Previous capture solutions required continuous recording, filling hard drives with hours of unwanted footage; of course, should you wish to record continually, ShadowPlay caters to your needs with a traditional Manual recording mode, too. And as with Shadow recordings, the performance impact is minimal, file sizes are lower than those of many software solutions, and the recordings are ready for instant upload to video sharing sites.
If you prefer to share in real-time, you can also stream gameplay to Twitch, directly through GeForce Experience using ShadowPlay’s capture technology. This easy-to-use, free, one-click Twitch.tv solution ‘just works’, without the requirement for additional hardware or software. And unlike other solutions, the game’s framerate isn’t capped to the framerate of the stream, keeping gameplay silky-smooth for the streamer. You can even add a cam overlay to your stream, giving your broadcasts that personal touch.
After you've installed your graphics drivers and rebooted your system, when you first log on to Windows you'll see a notification bubble pop up indicating that your system is ready to use SLI. We need to enable it before we can use it, so let's open up the NVIDIA Control Panel by right-clicking on the desktop and clicking "NVIDIA Control Panel."
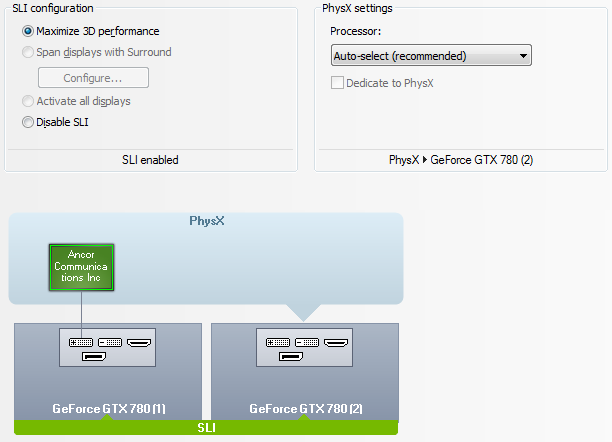
On the left you'll see an area with a few different categories: 3D Settings, Display, and Video. In the "3D Settings" category, click on "Configure SLI, Surround, PhysX." Under the "SLI configuration" section, click the radio button that says "Maximise 3D performance." The PhysX section can be left alone. Click Apply (it will alert you if any programs need to be closed) and the screen will blank or flash for a moment before returning to normal.
More advanced users may prefer adjusting the visual settings of a game on their own, and inside quot;Manage 3D Settings" is where it's done. In here, there are two tabs: global settings and application settings. Global settings affect how just about every program and game will look and run, but this is a heavy-handed approach that can lead to some games and programs running sluggishly or even crashing. If you're serious about fine-tuning performance and visual quality for a game, it's best to do it through its application profile. There's still the matter of decoding what all of the different settings do, and you can read a breakdown of each one here.

Gamers and performance enthusiasts can put a lot of stress on their systems, for long stretches of time, so keeping an eye on all of the core components is almost a necessity. Programs specially dedicated to tracking things like temperatures, voltages, and processor usage can offer excellent insight into how your system is coping with your needs. The programs listed below are all available for free.
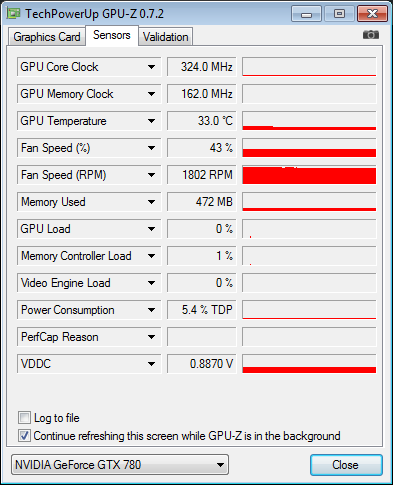
GPU-Z is a tool that can relay all sorts of information about your graphics card like temperatures, voltages, usage figures, clock speeds, and specifications. It can even log its readings to a file so you can play a game and later see specifically what sort of strain your GPU endured.
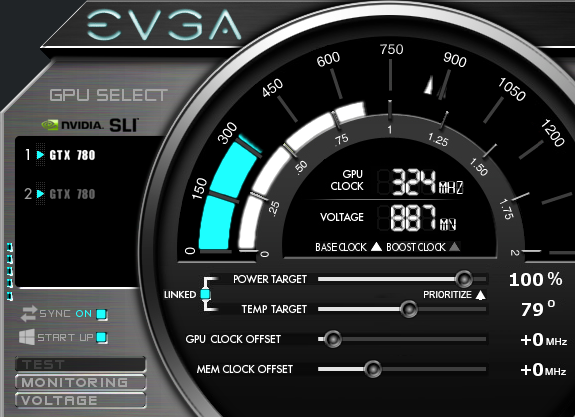
EVGA Precision X is a GPU monitoring and overclocking suite maintained by EVGA, although the application works on NVIDIA GeForce boards from any manufacturer. Like GPU-Z, it can save a running log with all sorts of performance metrics for your GPUs and displays real-time graphs with the same information, but it can also display certain values in your taskbar and even on an overlay (a kind of heads-up display) so you can watch your GPU's statistics in real time while playing a full-screen game. Precision X also offers overclocking controls for your graphics cards, which is not recommended for novice users, but there are some handy fan speed controls we'll cover momentarily.
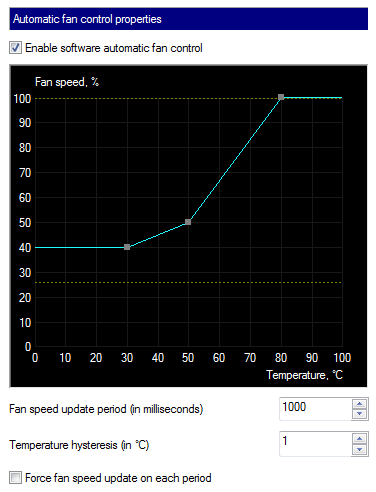
Both Precision X and similar applications allow you to adjust the fan speeds on your graphics cards in a few different ways: you can let them be controlled automatically, run at a constant speed (which can be difficult to find useful - if the fan speed is set too low then the GPUs can overheat, but high fan speeds can be distractingly loud), or you can opt to create your own fan speed curve. Using plots on a chart you can coordinate precisely what the fan speed should be when the GPU reaches a certain temperature, meaning the fans can be as loud or as quiet as you want them to be and when.
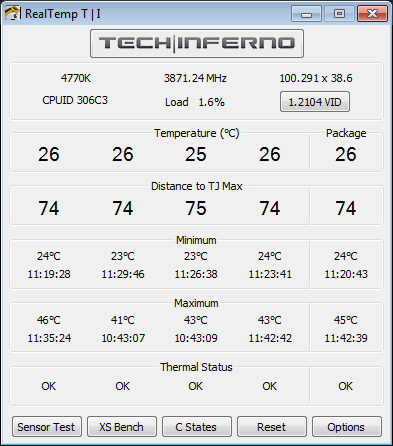
RealTemp is a lightweight tool designed to monitor CPU temperatures, specifically most of Intel's modern processors, including Haswell-based processors (the ones in the same family as the i7-4770K). It reports multiple temperature readings (current, minimum, and maximum) from each core directly to its main window and also your taskbar for easier observation.
Some programs exist purely to see how well your system runs when given an extreme amount of work, and a few of them even have you competing with users from all around the world to see whose system is faster. These programs are called "benchmarks" or "stress tests." These programs are meant to determine your computer's stability and performance under controlled but highly demanding conditions. By noting the results of the test - whether it's a success or a failure, and in what sense - you can effectively measure and track your progress as you make adjustments to various settings. For instance, these programs would be excellent for testing how well one GPU's performance by itself would compare to two GPUs using SLI. Before we jump into testing procedures and start testing our system, let's take a look at some of the free benchmarks and tech demos available on the web.
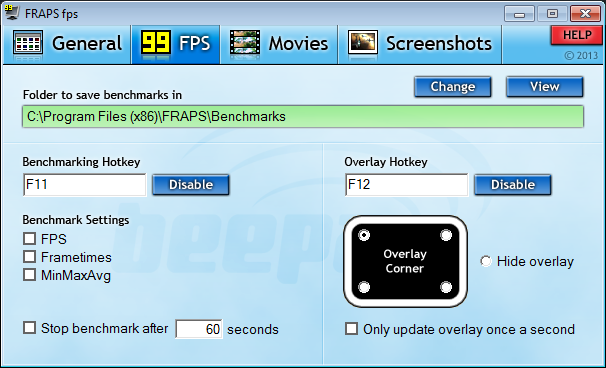
Although it's not a benchmark, FRAPS is a very popular application amongst the gamer and enthusiast crowd because of its ability to display any game's frame rate in the corner of your screen, in either real-time or over a period of time. It is also commonly used to capture video and audio of gameplay, but unlike GeForce Experience's ShadowPlay feature, no compression is done on the fly so the files are typically extremely large (several GB per minute of footage) and it can cause a noticeable performance loss.
The latest 3DMark stands in a long line of popular benchmarks from Futuremark, many of which feature online leaderboards and ranking systems to give users an idea of how powerful their systems are compared to others. Although there is a free version that anyone is able to use, it's very limited - there is only one "medium quality"-like testing preset available, test results can only be viewed online, and many of the useful features are exclusive to the paid versions that start at ~£20.
3DMark 11 is another product from Futuremark, and although it's older than the current 3DMark suite, it's still quite stressful for modern PCs despite the freeware version also having virtually no customisable features. Advanced versions can be purchased for approximately £15 which offer full control over graphics settings, the tests that can be run, test looping, offline results, and more.

Unigine's Valley is the most recent benchmark from the popular developer, and is unique in the sense that it also features an open, fully explorable world. Although paid versions exist, there is not as much incentive to purchase them since the free edition provides full access to all of Valley's graphics presets and includes fully customisable graphics settings for when those aren't good enough. Comparing results with other users can be difficult, however - not just because of that, but because there is no online leaderboard or ranking system like there is with Futuremark products, so screenshots of your results have to be shared instead.

Heaven benchmark is slightly older offering from Unigine, but it's no less stressful than Valley thanks to its complex graphics engine, free access to customizable graphics settings, and range of selectable presets. It also lacks online ranking, but its popularity typically leads to forums and other communities building their own leaderboards to maintain friendly competition.

NVIDIA produces some awesome demonstrations to show off what the latest hardware and technologies can do. No, they're not meant to push your hardware to the jagged edge or pit users' systems against one another, but they do suggest how games may look in the near future.
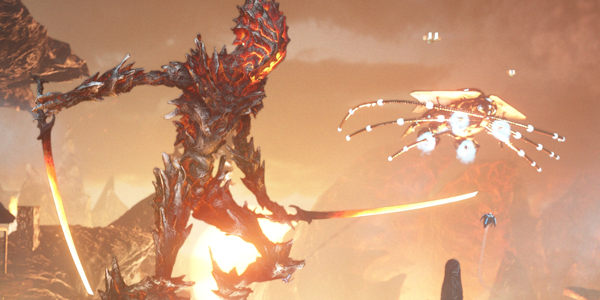
FaceWorks is the latest demo, released for the GTX TITAN, and it shows the incredible level of detail needed to display a human face realistically. There are three different environments that cast dynamic and complex lights and shadows, the skin's properties can be adjusted, and the actor's expression can be changed in real time.

A New Dawn is the revival of a classic NVIDIA demo that's more than a decade old, overhauled with the latest features and technologies to show us a fairy named Dawn and the lush environment around her in immaculate detail. Apart from Dawn's realistic skin, one of the major features here is how hair is rendered. Simple as may seem, hair is extraordinarily difficult to display in a believable way - it has to shine, bend, and flow, and that's not easy when you have tens of thousands of strands for a single character.


Certainly you'll be anxious to start benching your system to see how your efforts have paid off - though understandable, it would be best to review some basic benchmarking practices first. These guidelines will ensure better consistency between test results and allow you to more confidently compare the differences between two testing conditions, like how much your frame rate is impacted by switching from FXAA to 8x multisample antialiasing (MSAA).
So, let's see how our system handles a few of today's stressful games and benchmarks. For our procedure we will run each benchmark three times and take the average frame rate (number of frames per second, or FPS), at 1920x1080 with the highest settings available, and we'll be comparing how using one graphics card (single GPU, light green) performs against two graphics cards (SLI, dark green).
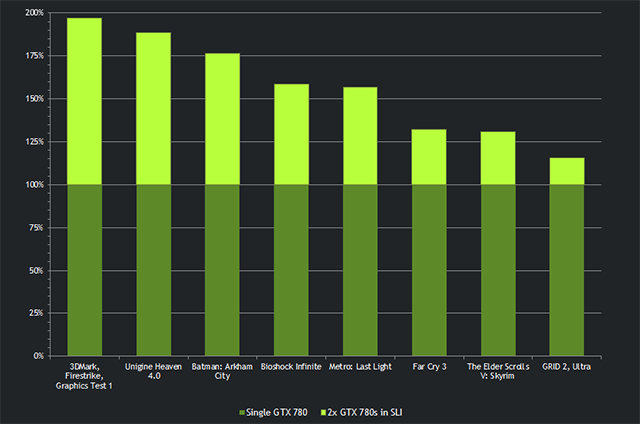
From these results we can see that some games are able to use SLI more effectively than others. GRID 2, for example, does not see much benefit from SLI because of how much it relies on the CPU for various tasks. Meanwhile, Unigine's Valley and Heaven benchmarks and games like Metro: Last Light and Bioshock Infinite enjoy great performance gains with SLI because they are so visually intense. Each game and application is different in how well it can take advantage of SLI, and using these guidelines, you should be able to get a very good idea of how your own favorite games can use it.
Need some ideas on what to test? Here are a few good places to get started:
Performance - See how much faster one is than the other.
Performance and Image Quality - Test how these differences affect performance as well as the overall look.

We have covered an incredible amount of content over the course of this guide, but now it's time for you to set off into the world and use your newfound knowledge to conquer new territories. Whether you've been inspired to be the next big name in PC modding circles, are eager to learn about overclocking, or simply can't wait to play the next AAA game the way it was meant to be played, you and your new high-powered gaming PC in excellent shape.
The gaming and hardware worlds are always changing, so be sure to check back here at GeForce.co.uk regularly for all sorts of news about graphics drivers, new products, your favourite games, and all of the latest guides and promotions for gamers!