NVIDIA Broadcast App: Setup Guide
About NVIDIA Broadcast
NVIDIA Broadcast transforms any room into a home studio, upgrading standard webcams and microphones into premium, smart devices through the power of AI. Improve your livestream's video and audio quality with AI capabilities such as microphone noise and room echo removal, virtual background, auto-frame, and video noise removal. With dedicated AI processors called Tensor Cores on NVIDIA RTX GPUs, AI networks can run high-quality effects in real time.
- Download: https://www.nvidia.com/en-ph/geforce/broadcasting/broadcast-app/
- FAQ: https://www.nvidia.com/en-ph/geforce/broadcasting/broadcast-app/faq/
- Help us train the AI networks: https://www.nvidia.com/en-us/geforce/forums/broadcasting/18/
Requirements
| GPU | NVIDIA GeForce RTX™ 2060, Quadro RTX™ 3000, TITAN RTX™, RTX Spark, or higher |
| RAM | 8 GB RAM or higher |
| CPU | Recommended: Intel Core i5 8600, AMD Ryzen 5 2600, or higher |
| Driver | Windows: NVIDIA Studio Driver 572.61, Game Ready Driver 572.61, NVIDIA RTX Enterprise Driver 572.61, and above. Windows on Arm: NVIDIA Studio Driver 617.42, Game Ready Driver 617.42, NVIDIA RTX Enterprise Driver 617.42, and above. |
| Operating System | Windows 10 64-bit, Windows 11 64-bit, Windows on Arm |
| Connection | Internet connectivity during installation |
Quick-Start Guide
NVIDIA Broadcast creates virtual devices on your Windows PC that take your microphone, speaker, or webcam output and apply an AI effect to it, enhancing them in different ways. You want to select this virtual device (called NVIDIA Broadcast) in your live streaming or video conferencing apps.
Installation:
- Download the app.
- Install it. During the installation, the app will download the necessary files for your system. The download requires ~3 GB of additional storage so make sure you have good connectivity and enough storage space.
Setup:
- Set up NVIDIA Broadcast:
a. Open the NVIDIA Broadcast app.
b. Navigate to each device and select the input device at the top.
c. Select the effect you want to apply.
i. You may combine multiple effects.
ii. We recommend turning on only the effects you need to avoid consuming unnecessary GPU resources.
iii. To check GPU usage for the effects you’ve enabled, enable the GPU Utilization indicator in “settings”.

d. For some effects you can adjust the settings of the effect with the sliders or options under it
2. Review your Windows Sound Settings
a. Go to Windows Settings > System > Sound and make sure your headset or speakers are set as the Output device. You don’t want NVIDIA Broadcast Speakers as default, as you would filter out all system sounds.
b. You may select the NVIDIA Broadcast Microphone as input. This way you don’t need to configure it per app. In this case, make sure you select your actual microphone in the NVIDIA Broadcast app.
3. Configure your live-streaming or video conferencing apps:
a. Open the app that you want to use
b. Go to Settings, then navigate to the Audio and Video sections
c. Select the NVIDIA Broadcast devices:
i. Microphone (NVIDIA Broadcast)
ii. Speaker (NVIDIA Broadcast)
iii. Camera (NVIDIA Broadcast)
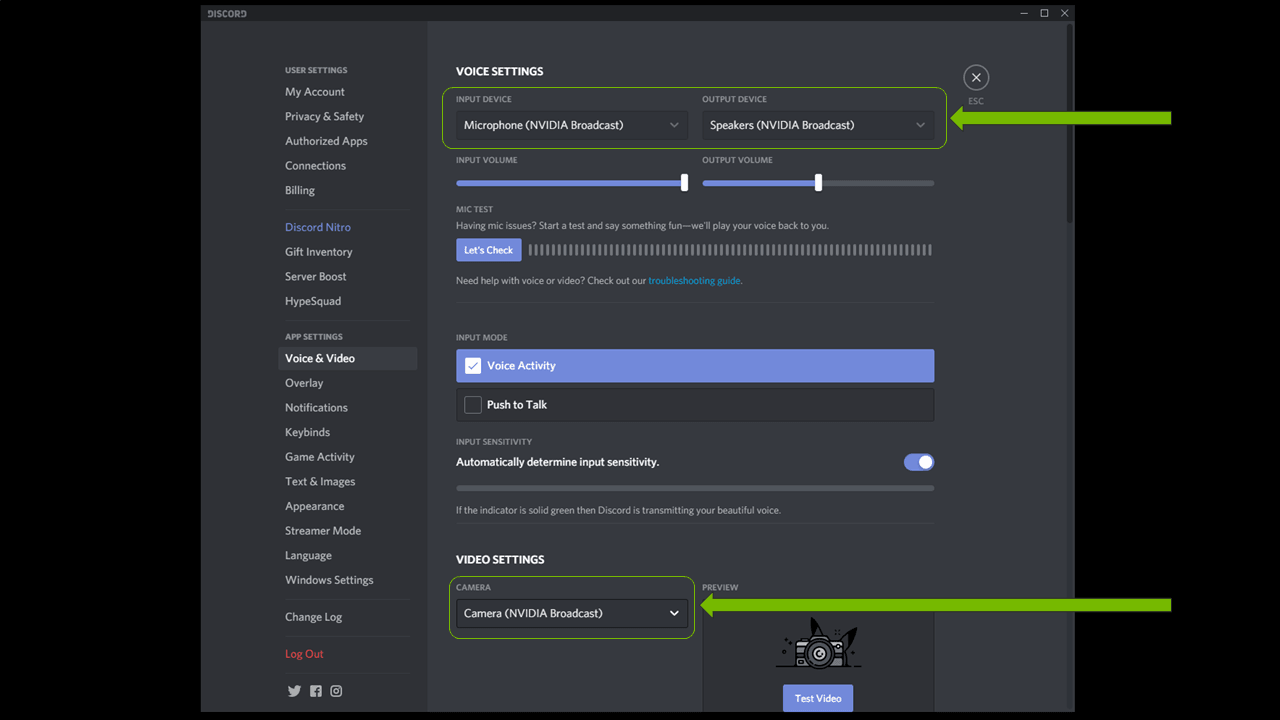
For more information on how to configure a specific app, click here.
You are good to go!
Advanced Streaming Settings:
- About Multi-Effects: You may combine AI effects per device.
- Running more than one effect increases the app's GPU usage.
- Not all effects can be combined. For example, Studio Voice cannot be combined with microphone background noise reduction.
- Avoid issues with third-party filters: Applications can sometimes apply effects, such as noise canceling, similar to those in NVIDIA Broadcast. Applying an effect twice will often result in the effect not working correctly. We recommend disabling such effects in your app and drivers.
- Keyboard Shortcuts: You can control when camera, mic, and speaker effects are enabled or disabled by assigning keyboard shortcuts. Go to Settings to enable Keyboard Shortcuts and edit their keyboard mapping. Each time you press a shortcut, it enables or disables the last selection. Optionally, Elgato Stream Deck users can leverage their devices to control the Keyboard Shortcuts. Download and install the plugin from the Elgato Marketplace here, then follow the instructions.
- Changing Resolution. To adjust the camera resolution, do so in NVIDIA Broadcast. In your streaming/video conferencing app, leave settings at default or match your NVIDIA Broadcast settings. If you change your webcam resolution in NVIDIA Broadcast, you will need to reload the camera in your app (turn it off and on, then adjust the resolution if it’s not set to Auto).
- If you connect/disconnect microphone/speakers often: If you change your microphone/speakers often (i.e you plug and unplug them), you can select (Default device) as your inputs in NVIDIA Broadcast. This will automatically use any microphone/speaker that Windows detects as the new default as inputs, so you don’t have to keep configuring them every time.
- Set NVIDIA Broadcast as the default device in Windows Sound settings: You can set NVIDIA Broadcast as your default Microphone in Windows so you don’t have to change it in every application. If you opt to do this, make sure that in NVIDIA Broadcast you select your actual microphone. Do NOT do this for Speakers, as you would start filtering all audio coming through your device, such as videos and music.
- Wide display mode: NVIDIA Broadcast now supports two sizes - a vertically oriented display, ideal for users who want an app with a small footprint for easy access, or a wider display mode for easier navigation and larger video previews.
- To expand or collapse the app view, click on the expand/contract button on the top window bar.


How to Test
NVIDIA Broadcast has a test feature embedded in the app:
- To test your microphone, record yourself speaking with background noise. You can now play the file and turn the effect on and off, or adjust the strength, to see how the effect changes the audio.
- To test your speakers, we have included several recordings that you can listen to while turning the effect on and off to see the change. You can also adjust the effect strength.
- To test your webcam, just use the preview window.
- The preview window has a new “before/after” feature. This lets you compare the raw camera output with NVIDIA Broadcast output with AI effects applied. To enable, click on the side-by-side icon in the camera preview window
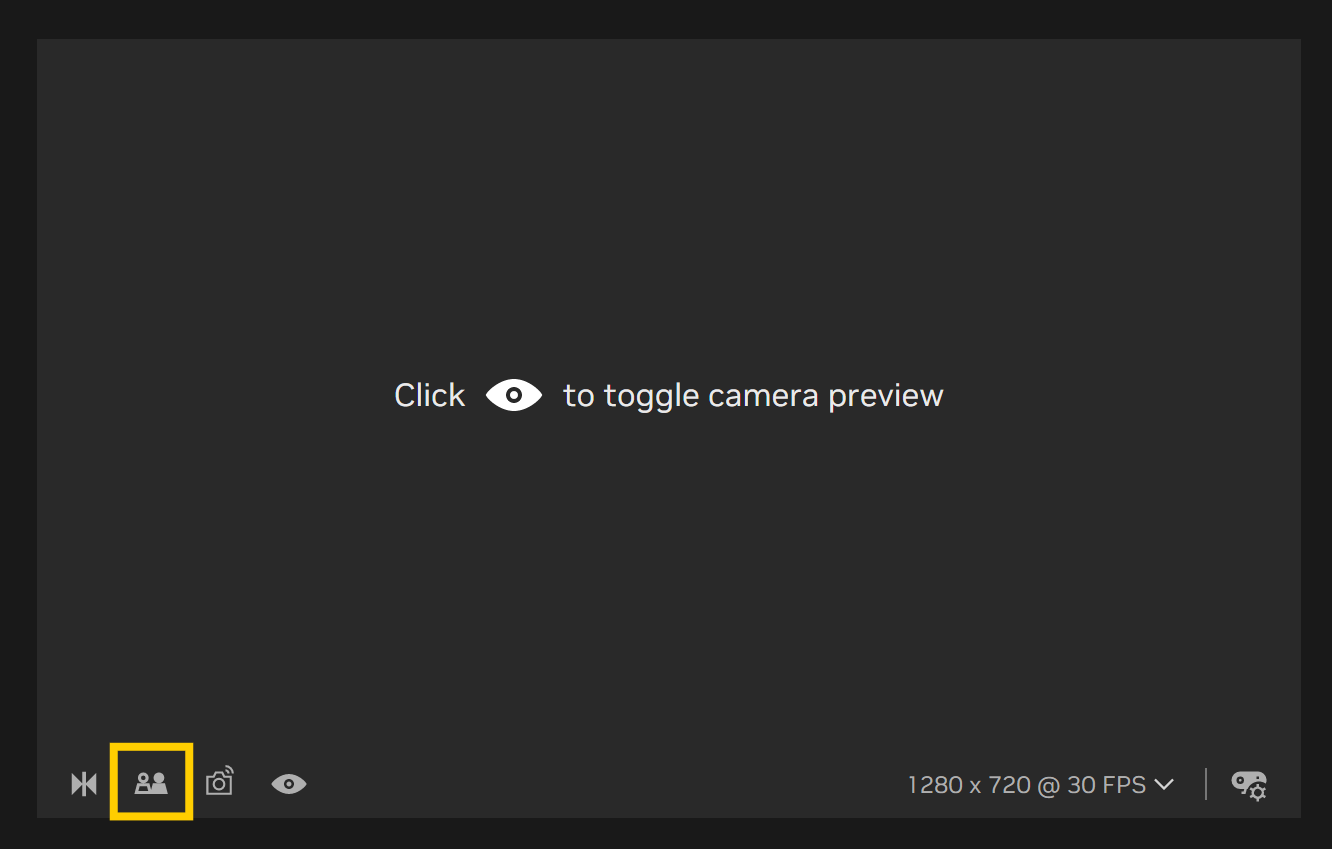
- Note: Make sure you disable this feature before broadcasting or joining video calls, or your audience will also see the side by side video.
How to Use File Processor
File Processor lets you apply supported NVIDIA Broadcast audio and video effects to recorded media files, the same AI technology used in live mode, applied offline. Some effects run at higher quality than real-time mode when processing files, providing the best possible output.
Supported formats: .mp4, .m4a, .mp3, .wav Supported codecs: H.264 (8-bit), AAC. Supported audio channels: 2

How to use:
- Open NVIDIA Broadcast and navigate to the Files tab.
- Add one or more files by browsing, adding a folder, or dragging and dropping.
- Choose compatible audio and video effects.
- Select an output location.
- Process the file.
- Follow progress. When complete, preview or open the output file.
Note: Live processing and file processing cannot be active at the same time. If you start file processing while live effects are active, NVIDIA Broadcast will ask you to confirm the switch. Your saved live setup returns when file processing is no longer active.
How to Control NVIDIA Broadcast With an AI Agent
NVIDIA Broadcast includes a local MCP server (Model Context Protocol) that lets a compatible AI agent control Broadcast using natural-language requests. It runs on the same Windows PC as Broadcast and does not require an API key.
This means your AI assistant can enable and disable your current effects, switch devices, and even process files, all through a simple conversation.
Connect your agent:
- Start NVIDIA Broadcast
- Open Settings > AI Agent Resources

3. Copy the connection information for your preferred transport:
Option A - Streamable HTTP (recommended)
Copy the server URL shown under MCP server. In your agent’s MCP settings, add a custom server:
| Setting | Value |
| Name | NVIDIA Broadcast |
| Transport | Streamable HTTP (some clients label this simply HTTP) |
| Server URL | Paste the URL copied from Broadcast |
| Authentication | None |
Always copy the URL from the app—the port can change between sessions.
NVIDIA Broadcast must be running.
Option B - Stdio (for clients that don’t support Streamable HTTP)
Copy the stdio command shown under MCP server. In your agent’s MCP settings, register a stdio server:
{
"command": "C:\\Program Files\\NVIDIA Corporation\\NVIDIA Broadcast\\NvBroadcastMCP.exe"
}
The stdio bridge reads JSON-RPC from stdin and writes replies to stdout. NVIDIA Broadcast must be running.
4. Save or connect the server. Your client may ask you to approve requests that change effects, devices, or files.
Add the NVIDIA Broadcast skill
- In Settings > AI Agent Resources, select Open beside Skills.
- Add the nvidia-broadcast folder using your agent’s local-skill workflow.
The MCP connection works without the skill, but the skill helps the agent select the right tools and parameters.
What the MCP server can do:
- Effects: Read, explain, enable, disable, and tune available camera, microphone, and speaker effects. The exact effects depend on the installed build and supported GPU.
- Devices: List and switch cameras, microphones, and speakers; view camera modes; and change camera resolution or frame rate.
- Files: Apply supported camera and microphone effects to local .mp4, .m4a, .mp3, and .wav files, then report processing status and output location.
Try these prompts:
- “What NVIDIA Broadcast effects are currently enabled?”
- “Turn on microphone noise removal and blur my background to 70%.”
- “Explain the available microphone effects and recommend one for a video call.”
- “List my cameras, then switch to <camera name> at 1080p and 60 fps.”
- “Process C:\path\to\my\videos\clip.mp4 with video noise removal and Studio Voice.”
If it does not connect:
- Confirm NVIDIA Broadcast is running and has finished initializing, then reopen Settings, copy the displayed URL again, and reconnect.
- If Broadcast has just started, wait up to 60 seconds for the MCP server to become ready.
- If the client reports an approval or permission request, review and approve it to continue.
Give us your Feedback!
RTX Video Super Resolution and Frame Generation, as well as Video Noise Removal, are currently in beta. Please share your feedback to help us keep improving.
- If you encounter any issues, please report them here.
- Help us train the AI network
How to Configure Your App to Use NVIDIA Broadcast Microphone, Webcam, or Speakers
OBS Studio
1. Go to Settings > Audio.
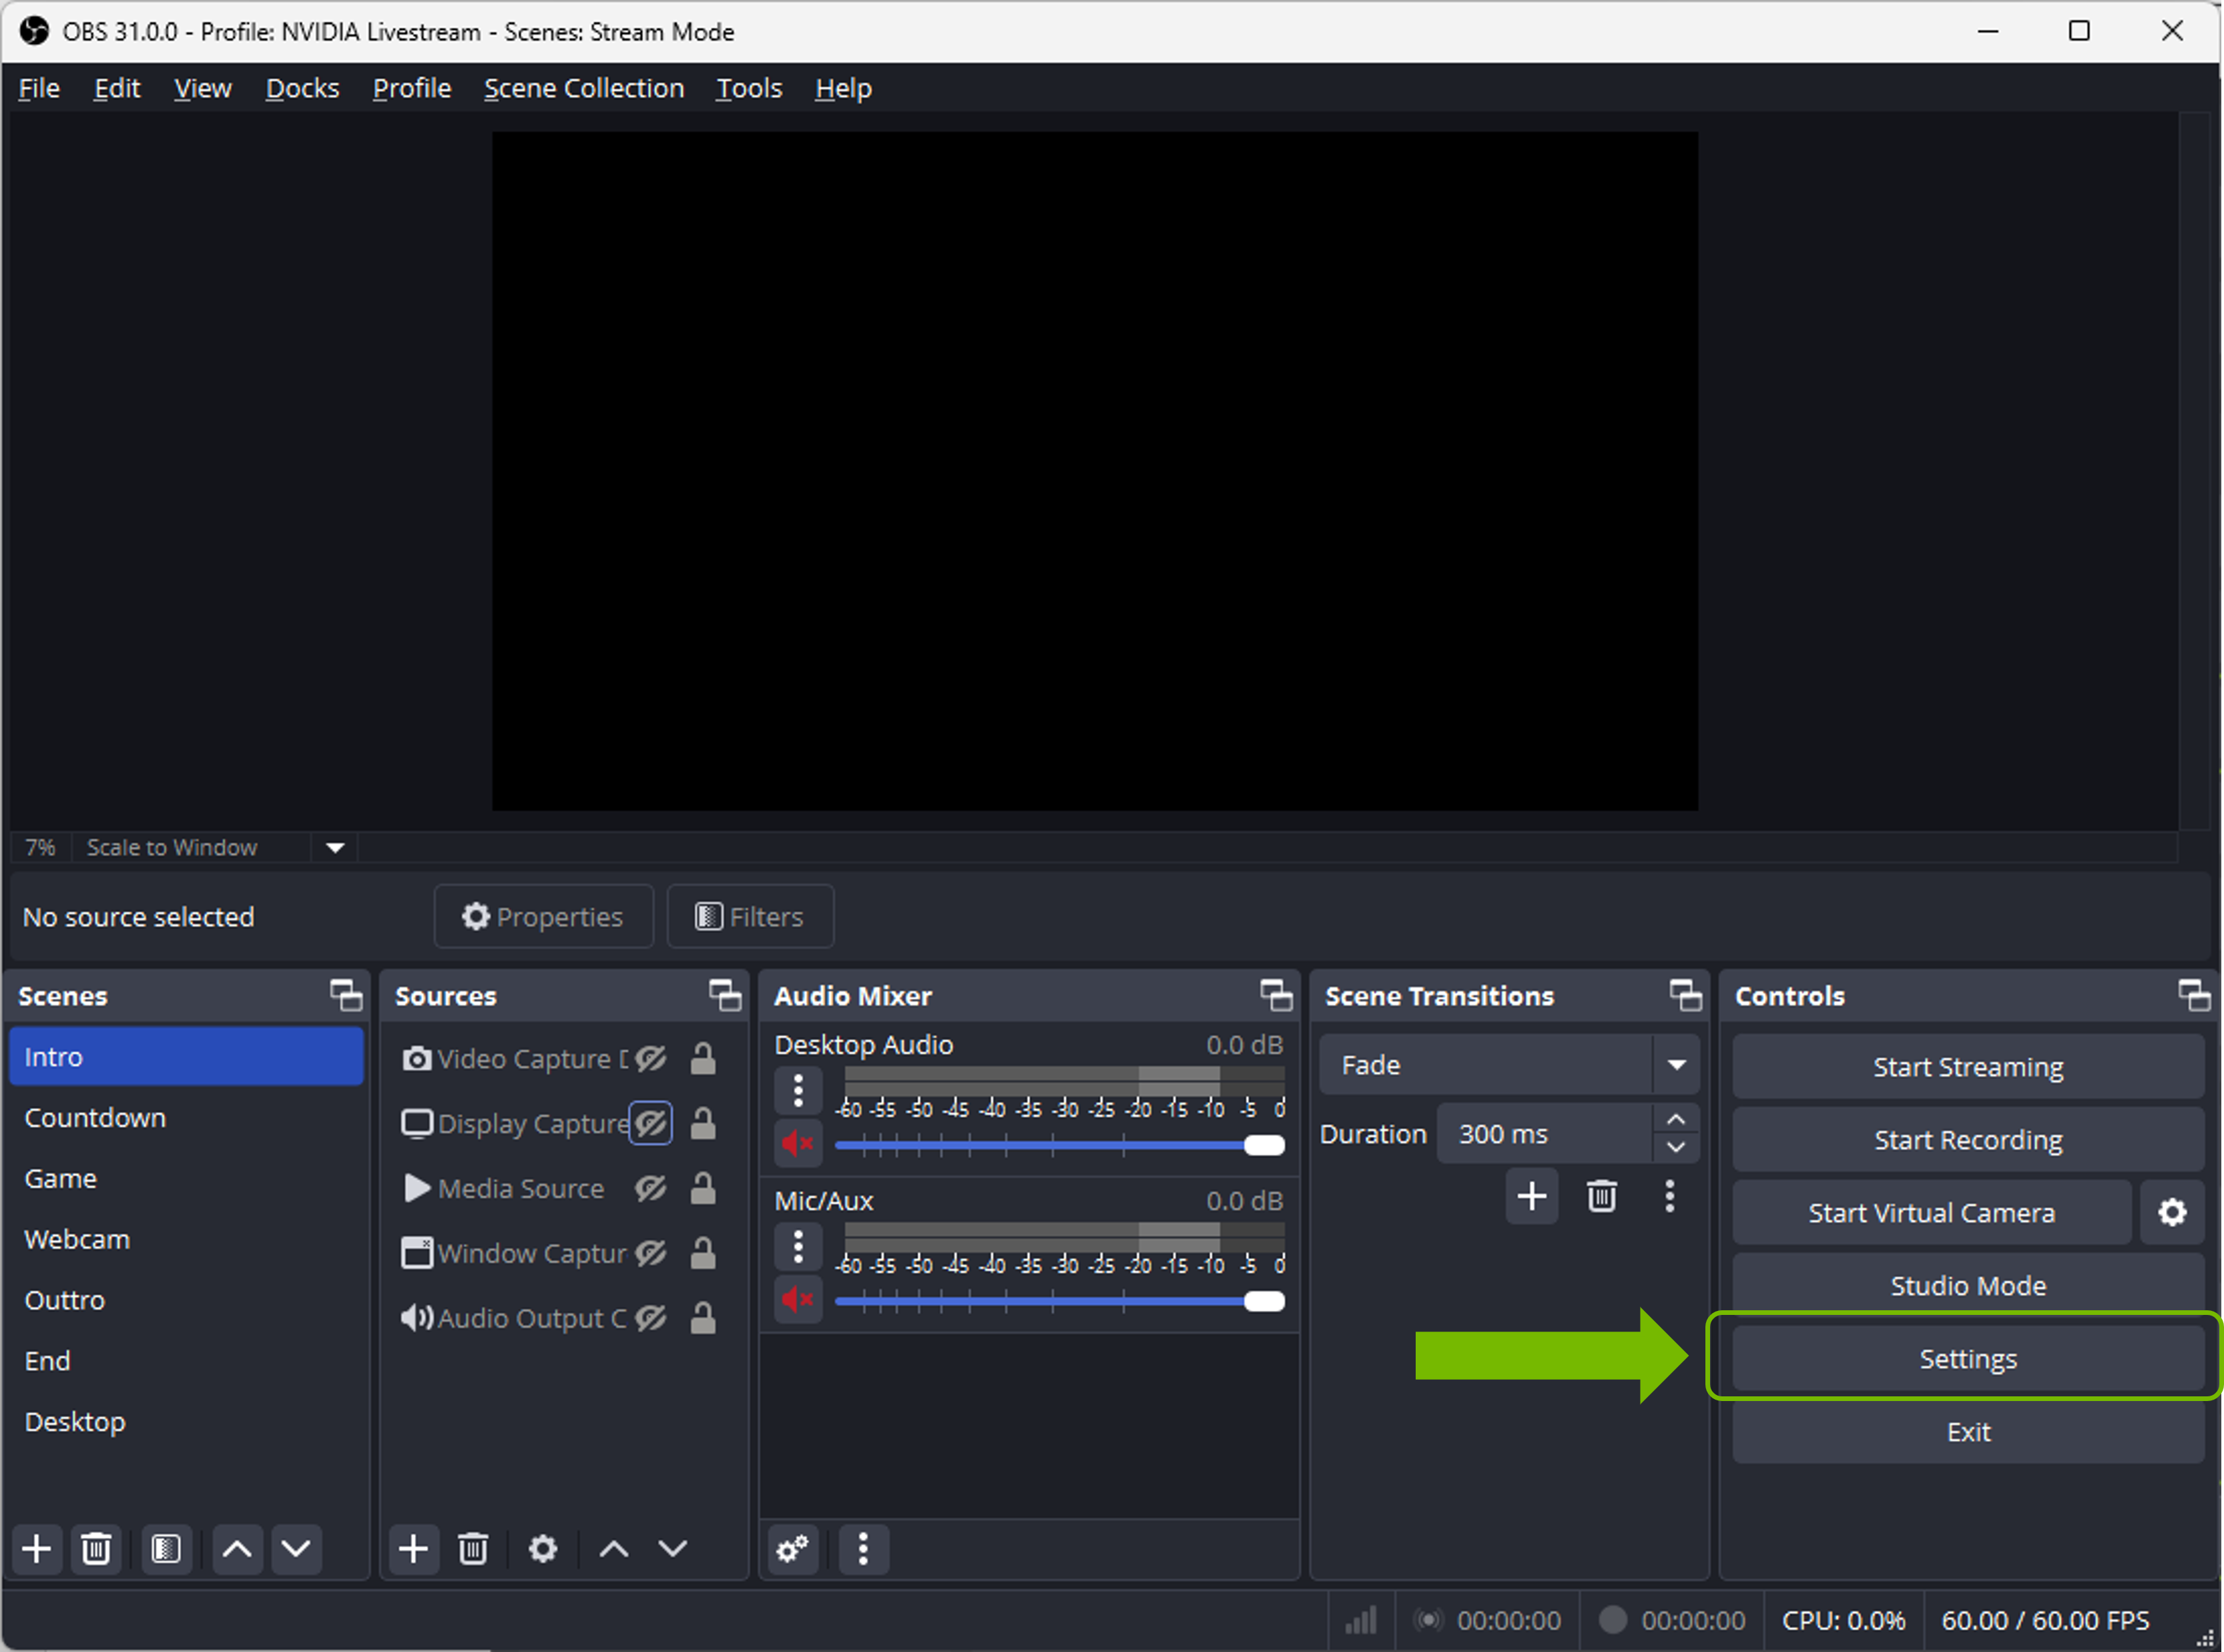
2. Select NVIDIA Broadcast as your device: Devices > Mic/Auxiliary Audio, select Microphone (NVIDIA Broadcast).
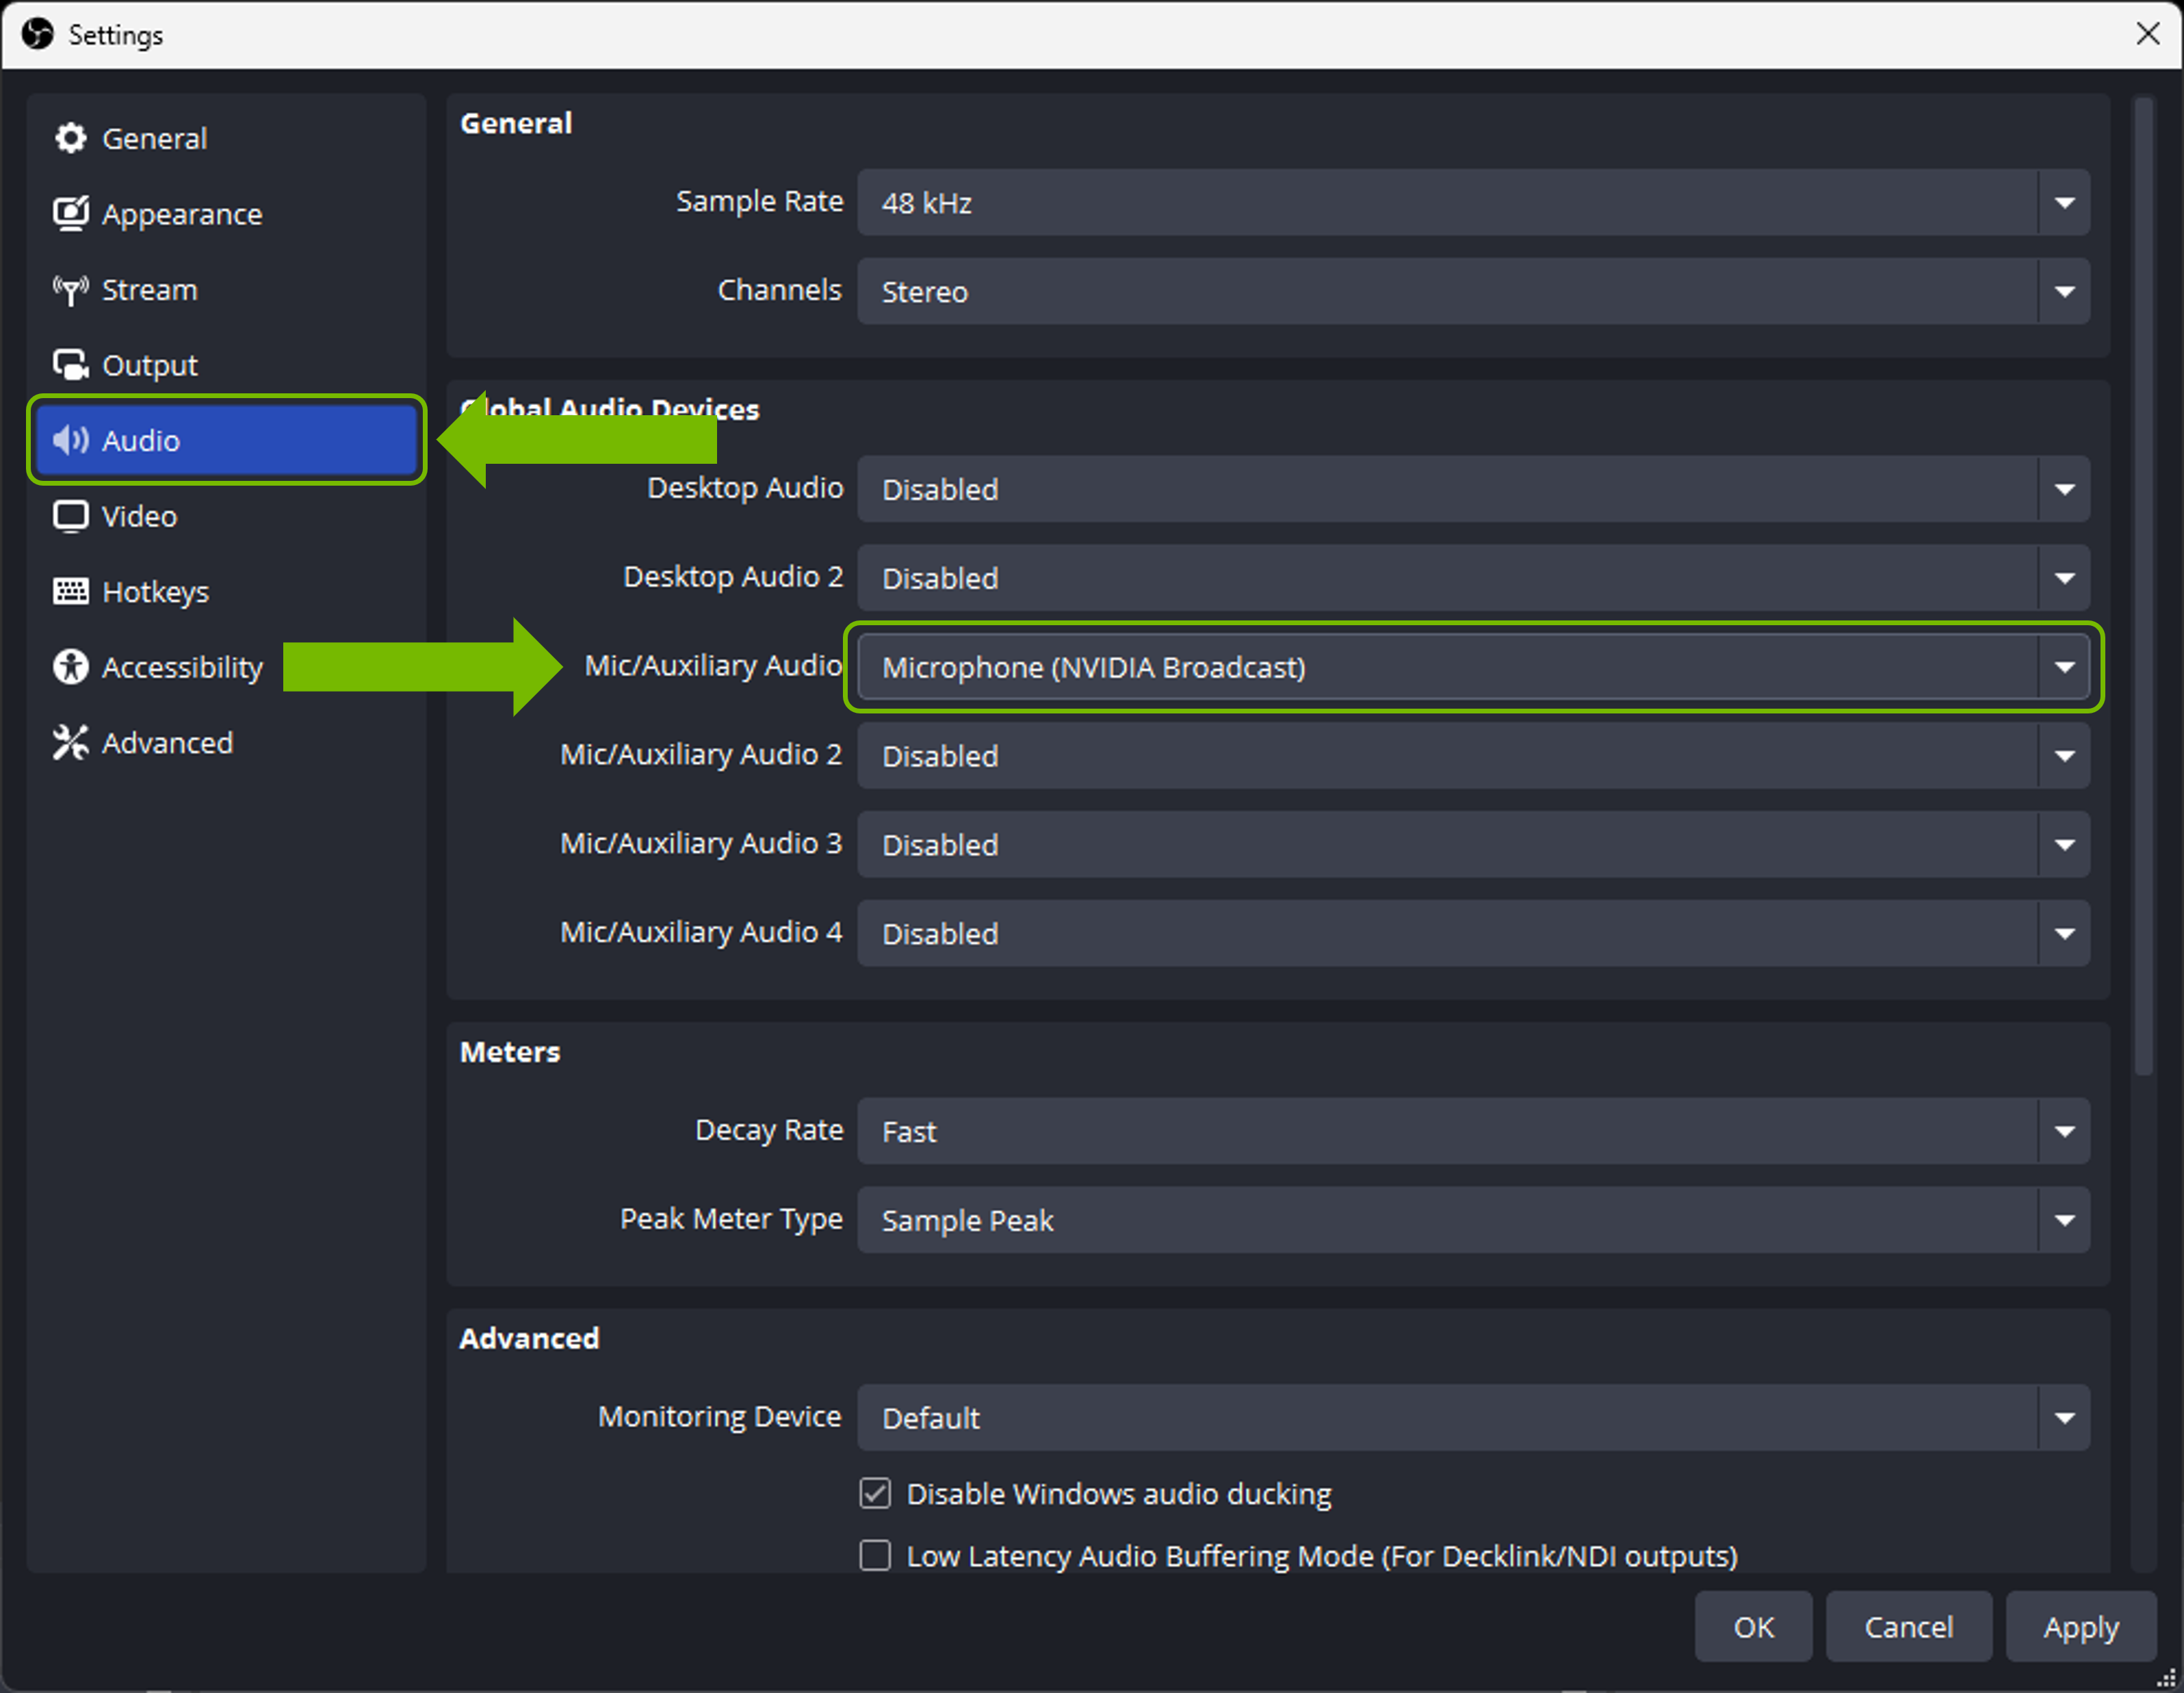
3. To select the NVIDIA Broadcast Camera, add a Video Capture Source to your scene, and select Camera (NVIDIA Broadcast). Leave all settings at default. To change the camera resolution, you must do so in NVIDIA Broadcast.
Discord
1. Go to Settings (cog wheel), and then select Voice and Video.
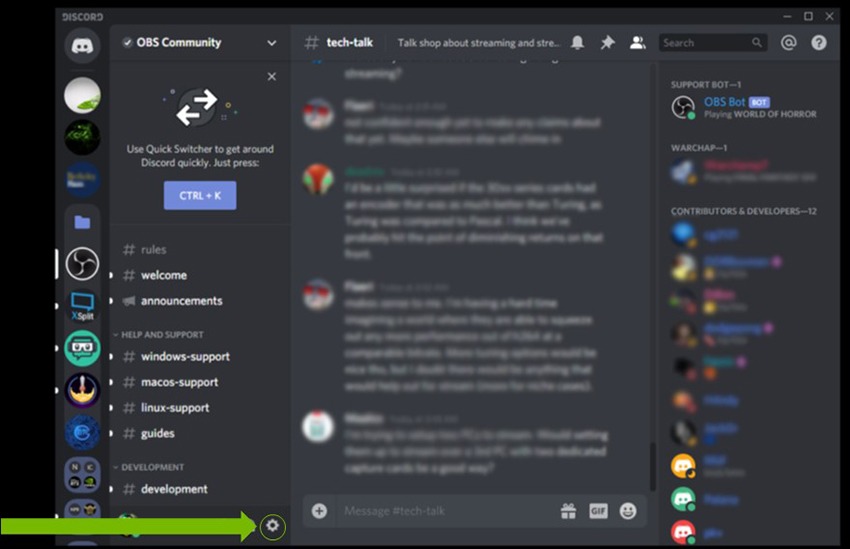
2. Select the NVIDIA Broadcast Microphone, Speaker and Camera as your Input and Output devices, and Camera.
3. For best quality, make sure that you disable any noise canceling/removal effects in Discord.

Microsoft Teams
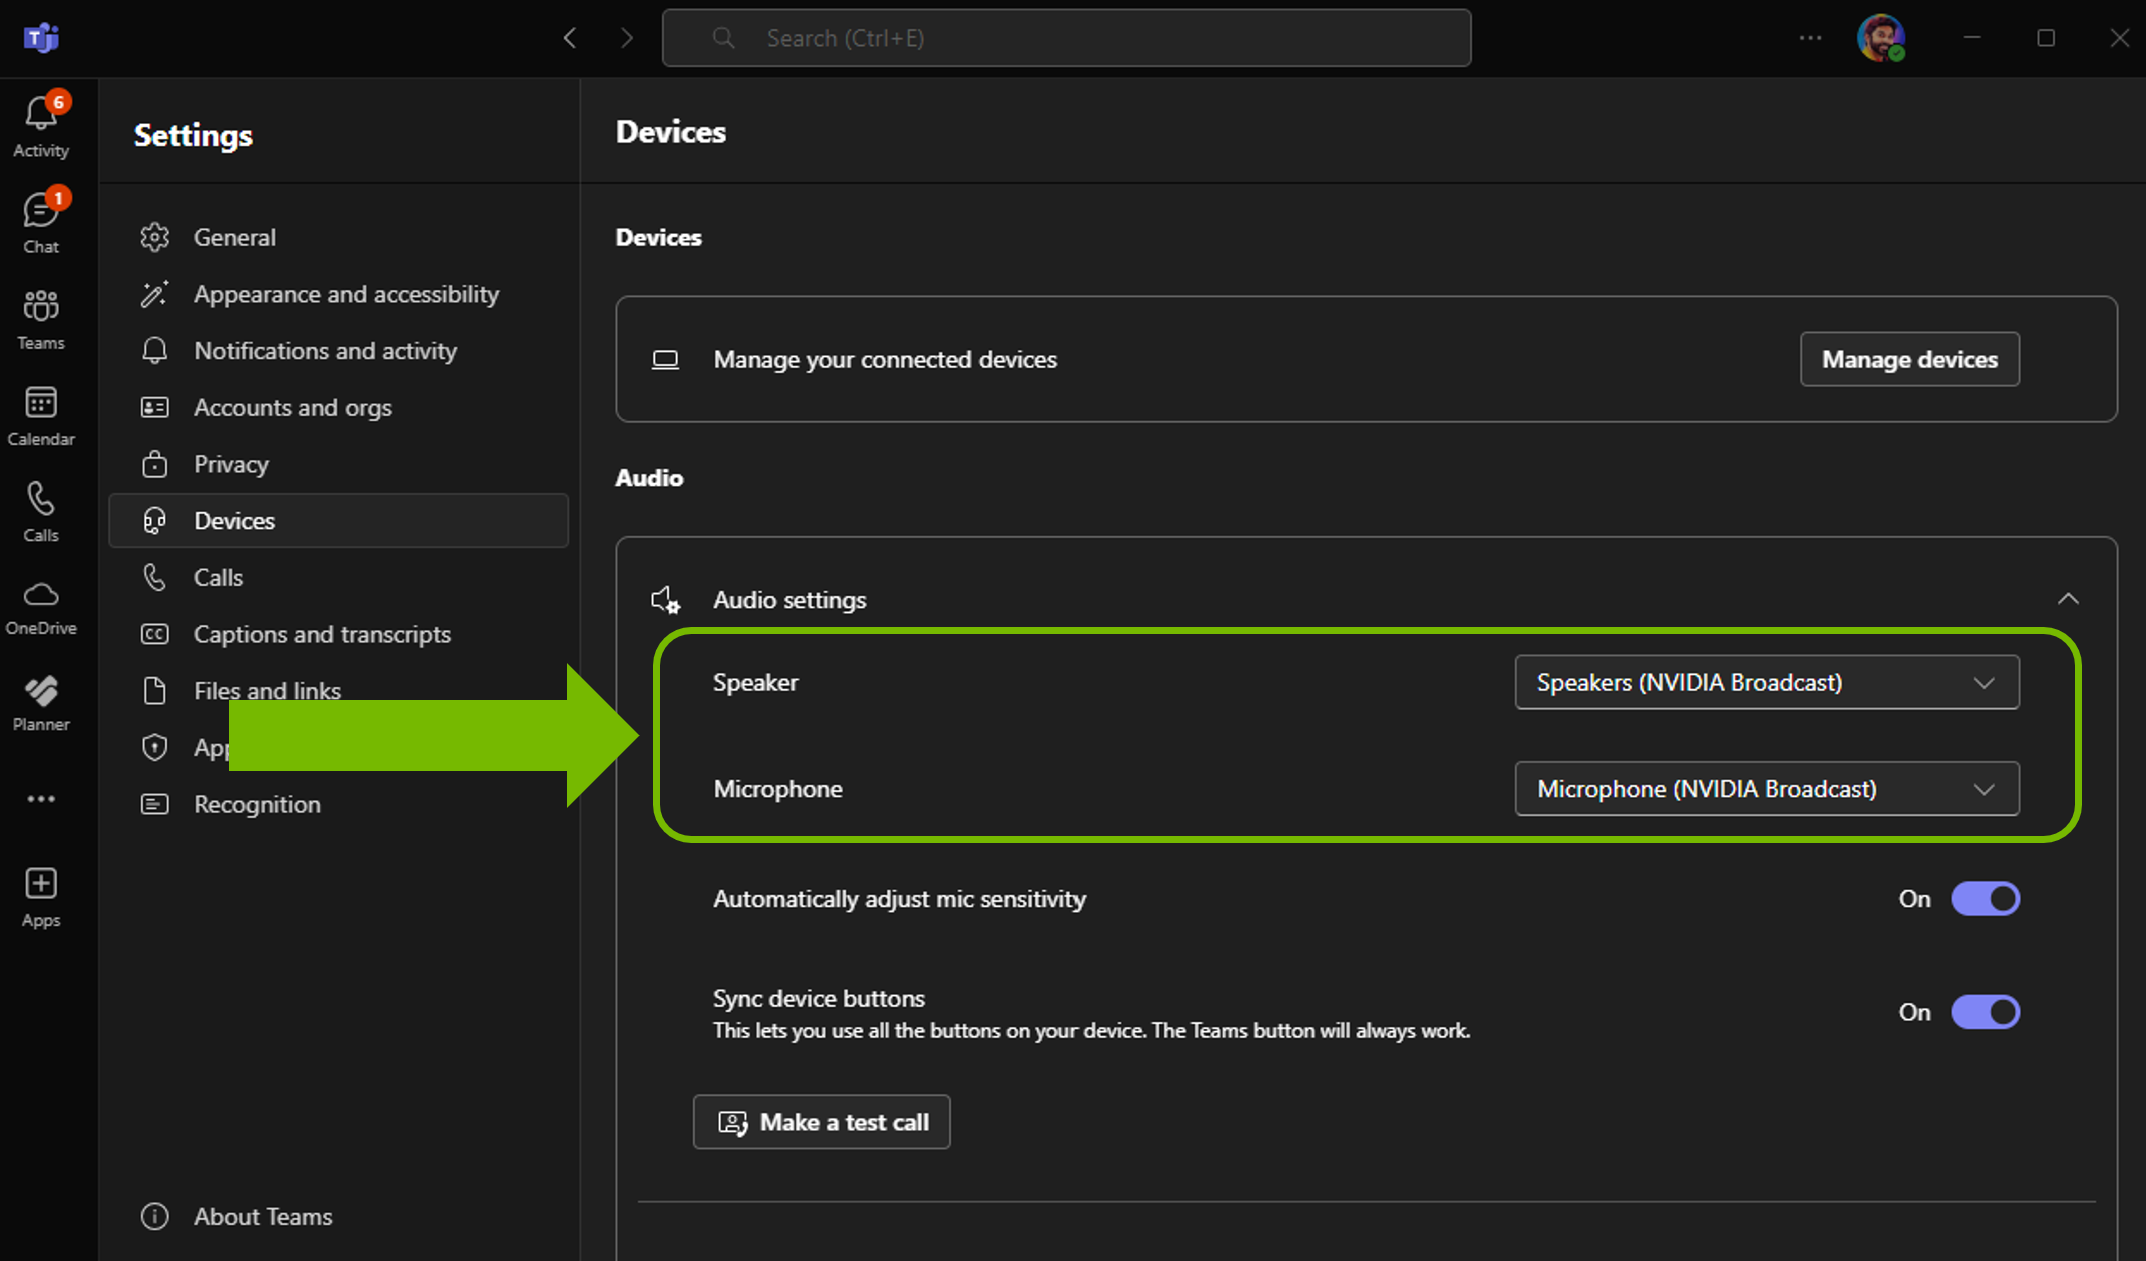
1. Click on Calls on the left menu
2. Go to Devices, under Audio devices select Custom Setup..
3. Configure NVIDIA Broadcast as your devices.
4. For best quality, make sure that you disable any noise canceling effects.
Zoom
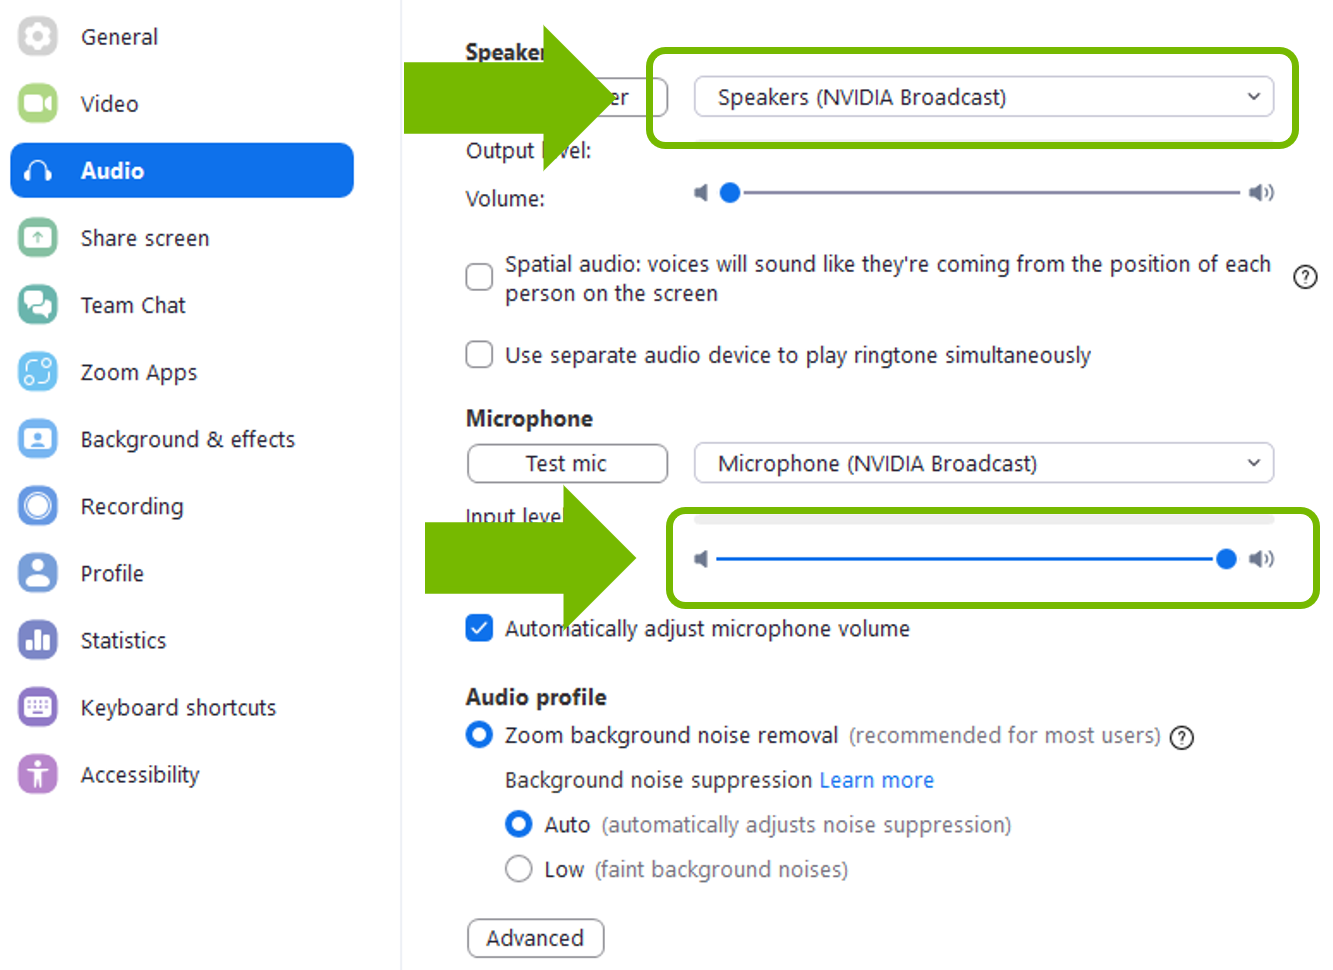
1. To configure the desktop application, go to Settings > Audio Settings.
2. Select NVIDIA Broadcast as your Speaker and Microphone device.
3. Go to Video and select Camera (NVIDIA Broadcast).
4. For the best quality, make sure that you disable or lower noise canceling effects.
You can also configure your devices within a meeting:
1. Click on the little arrow in the bottom left option.
2. Select the NVIDIA Broadcast Microphone and Speakers as your devices.
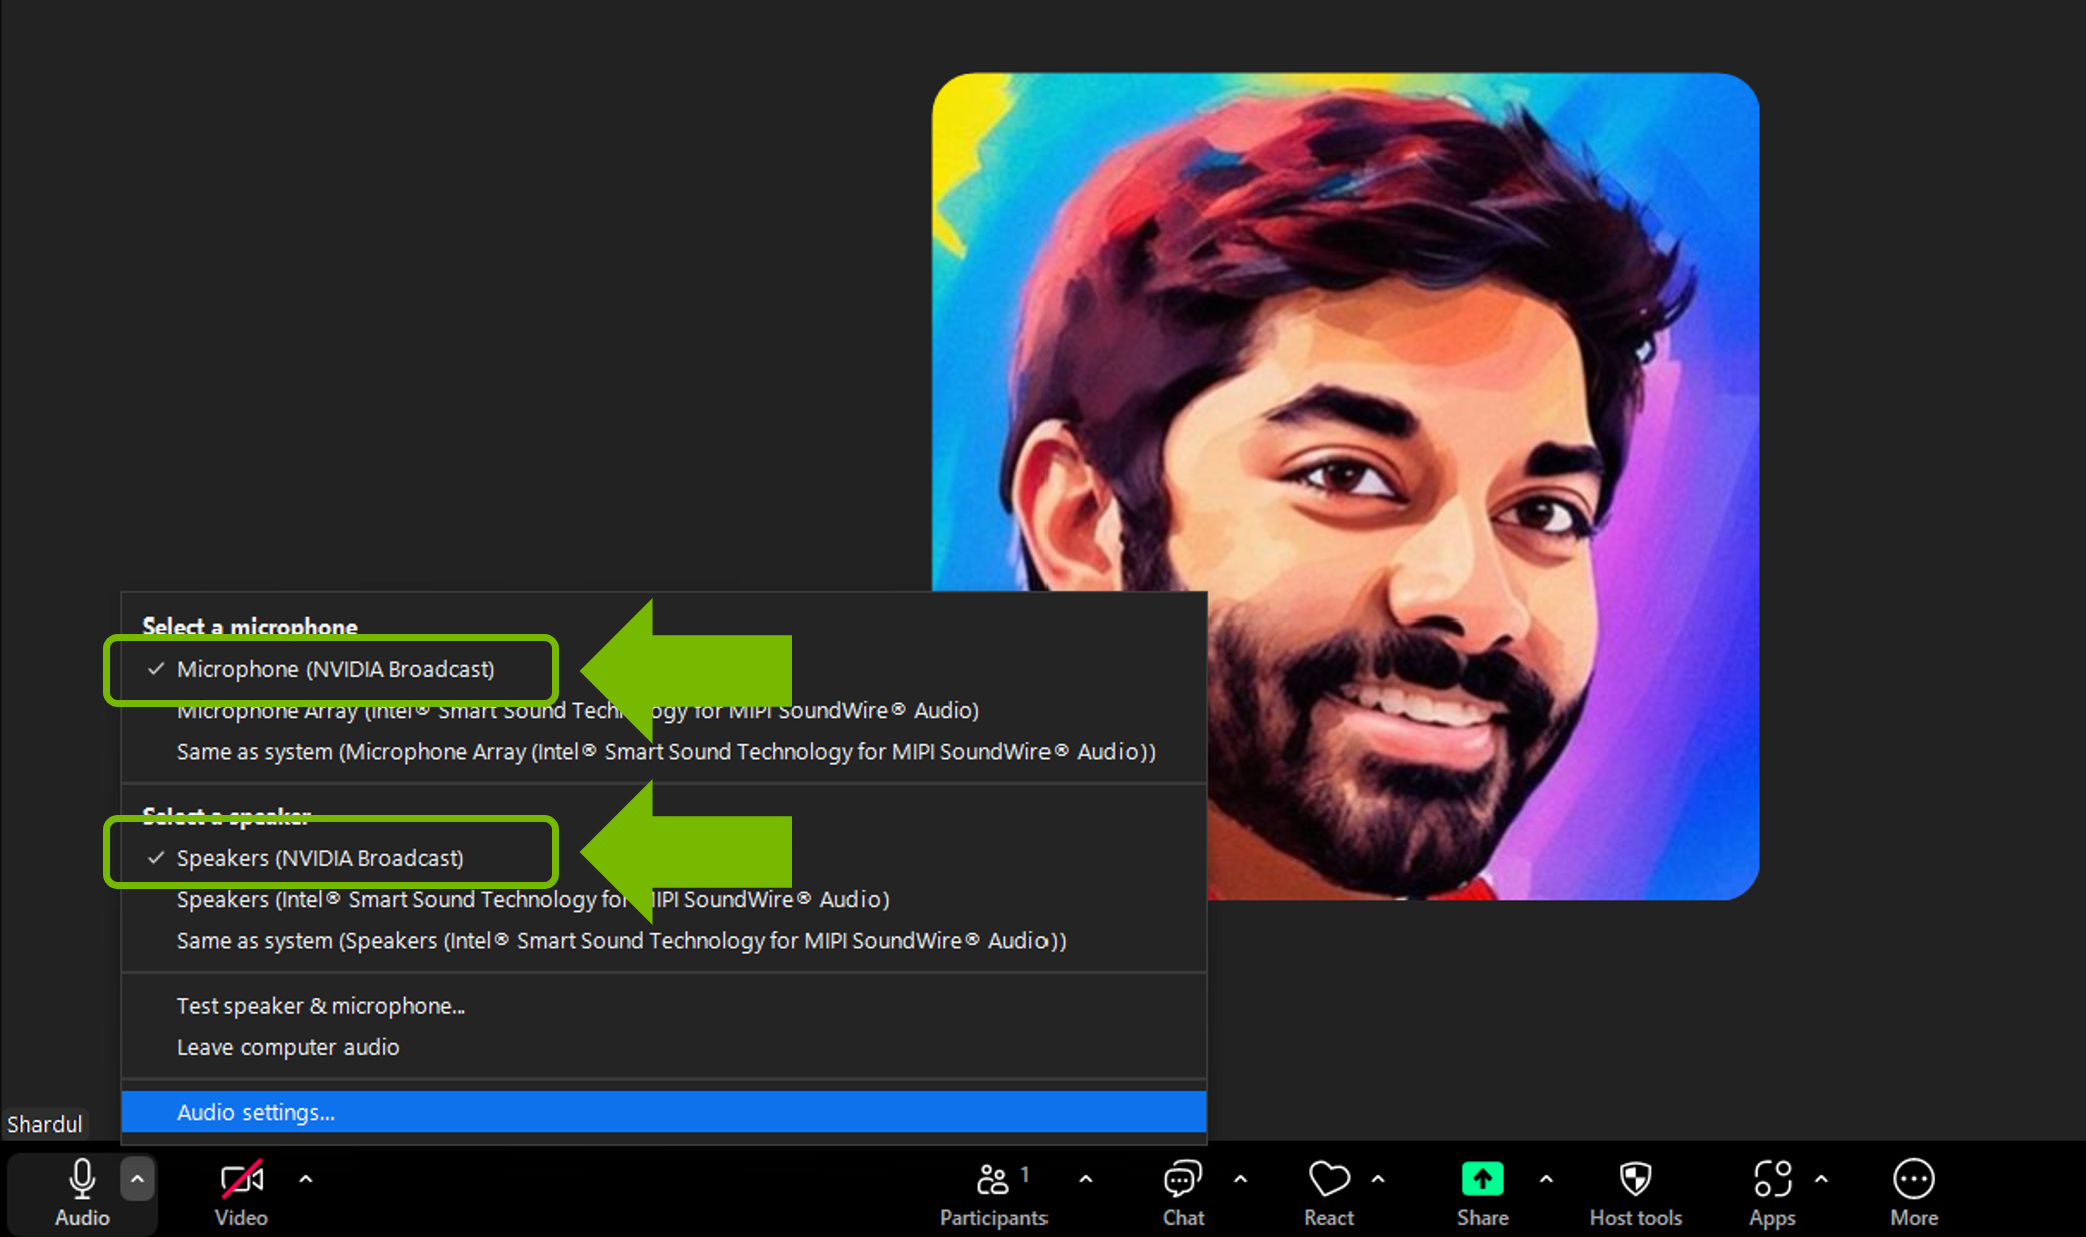
3. Repeat the same in the Video option (second on the bottom left) to select Camera (NVIDIA Broadcast).
StreamLabs
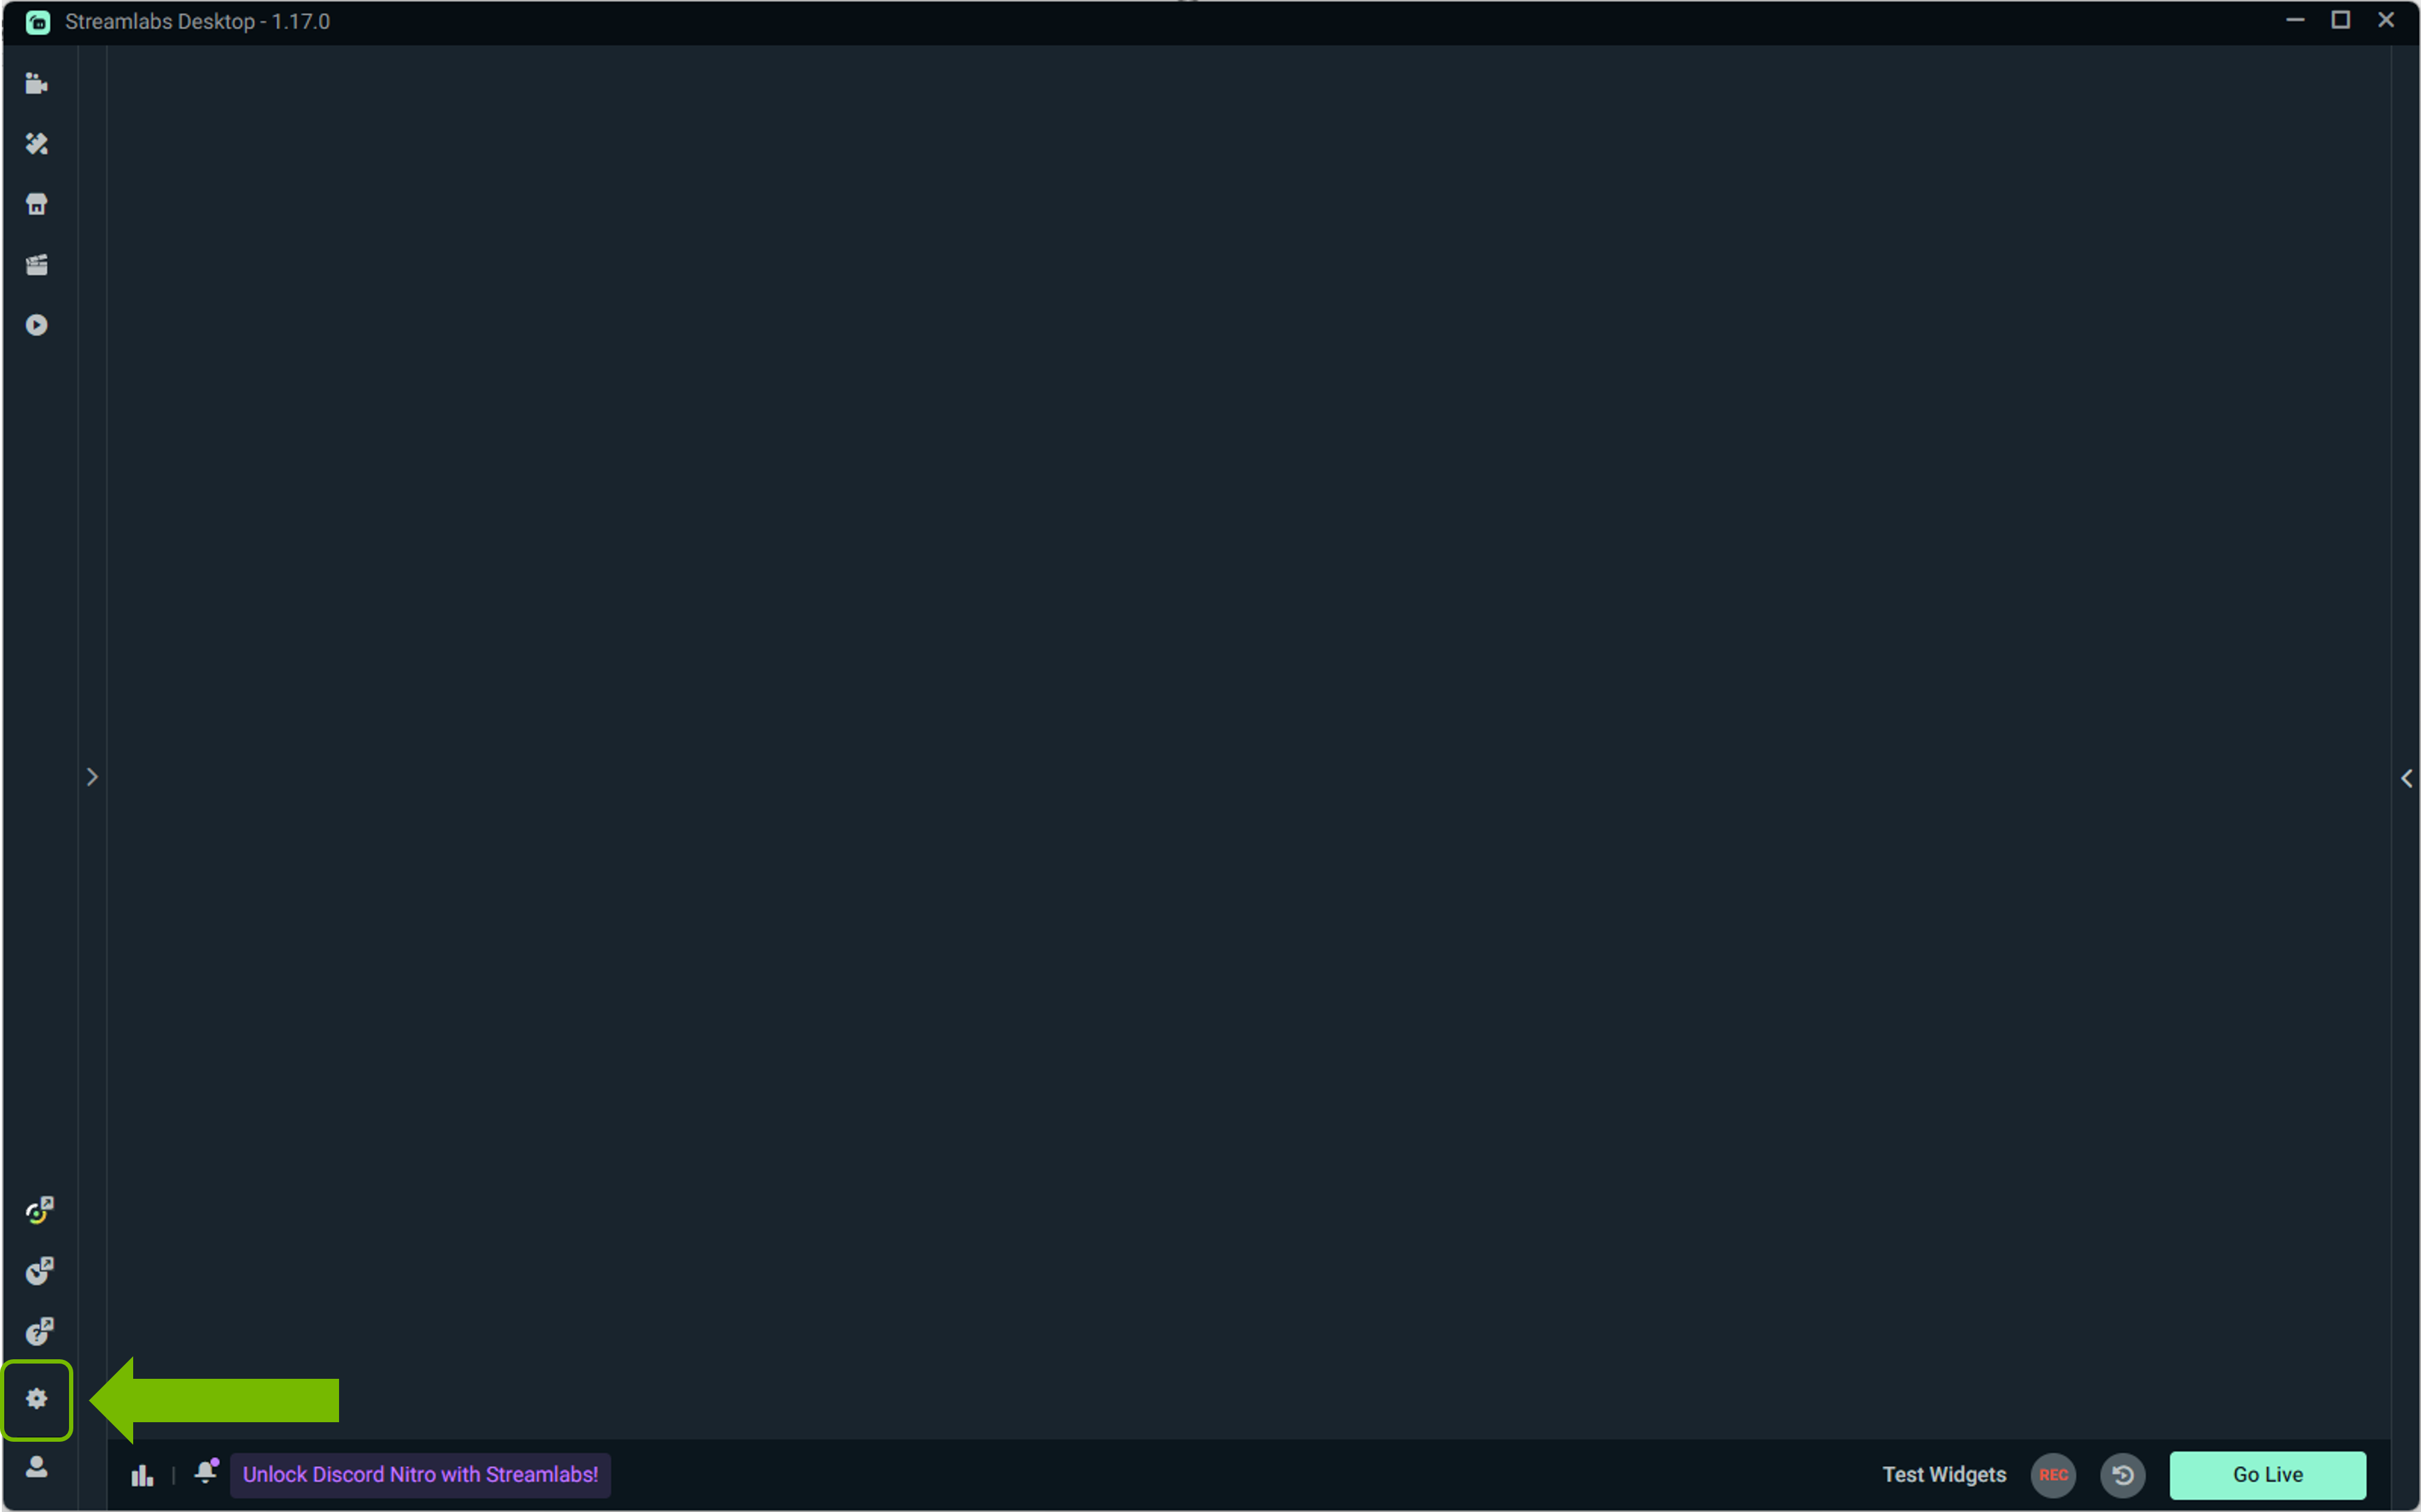
1. Go to Settings.
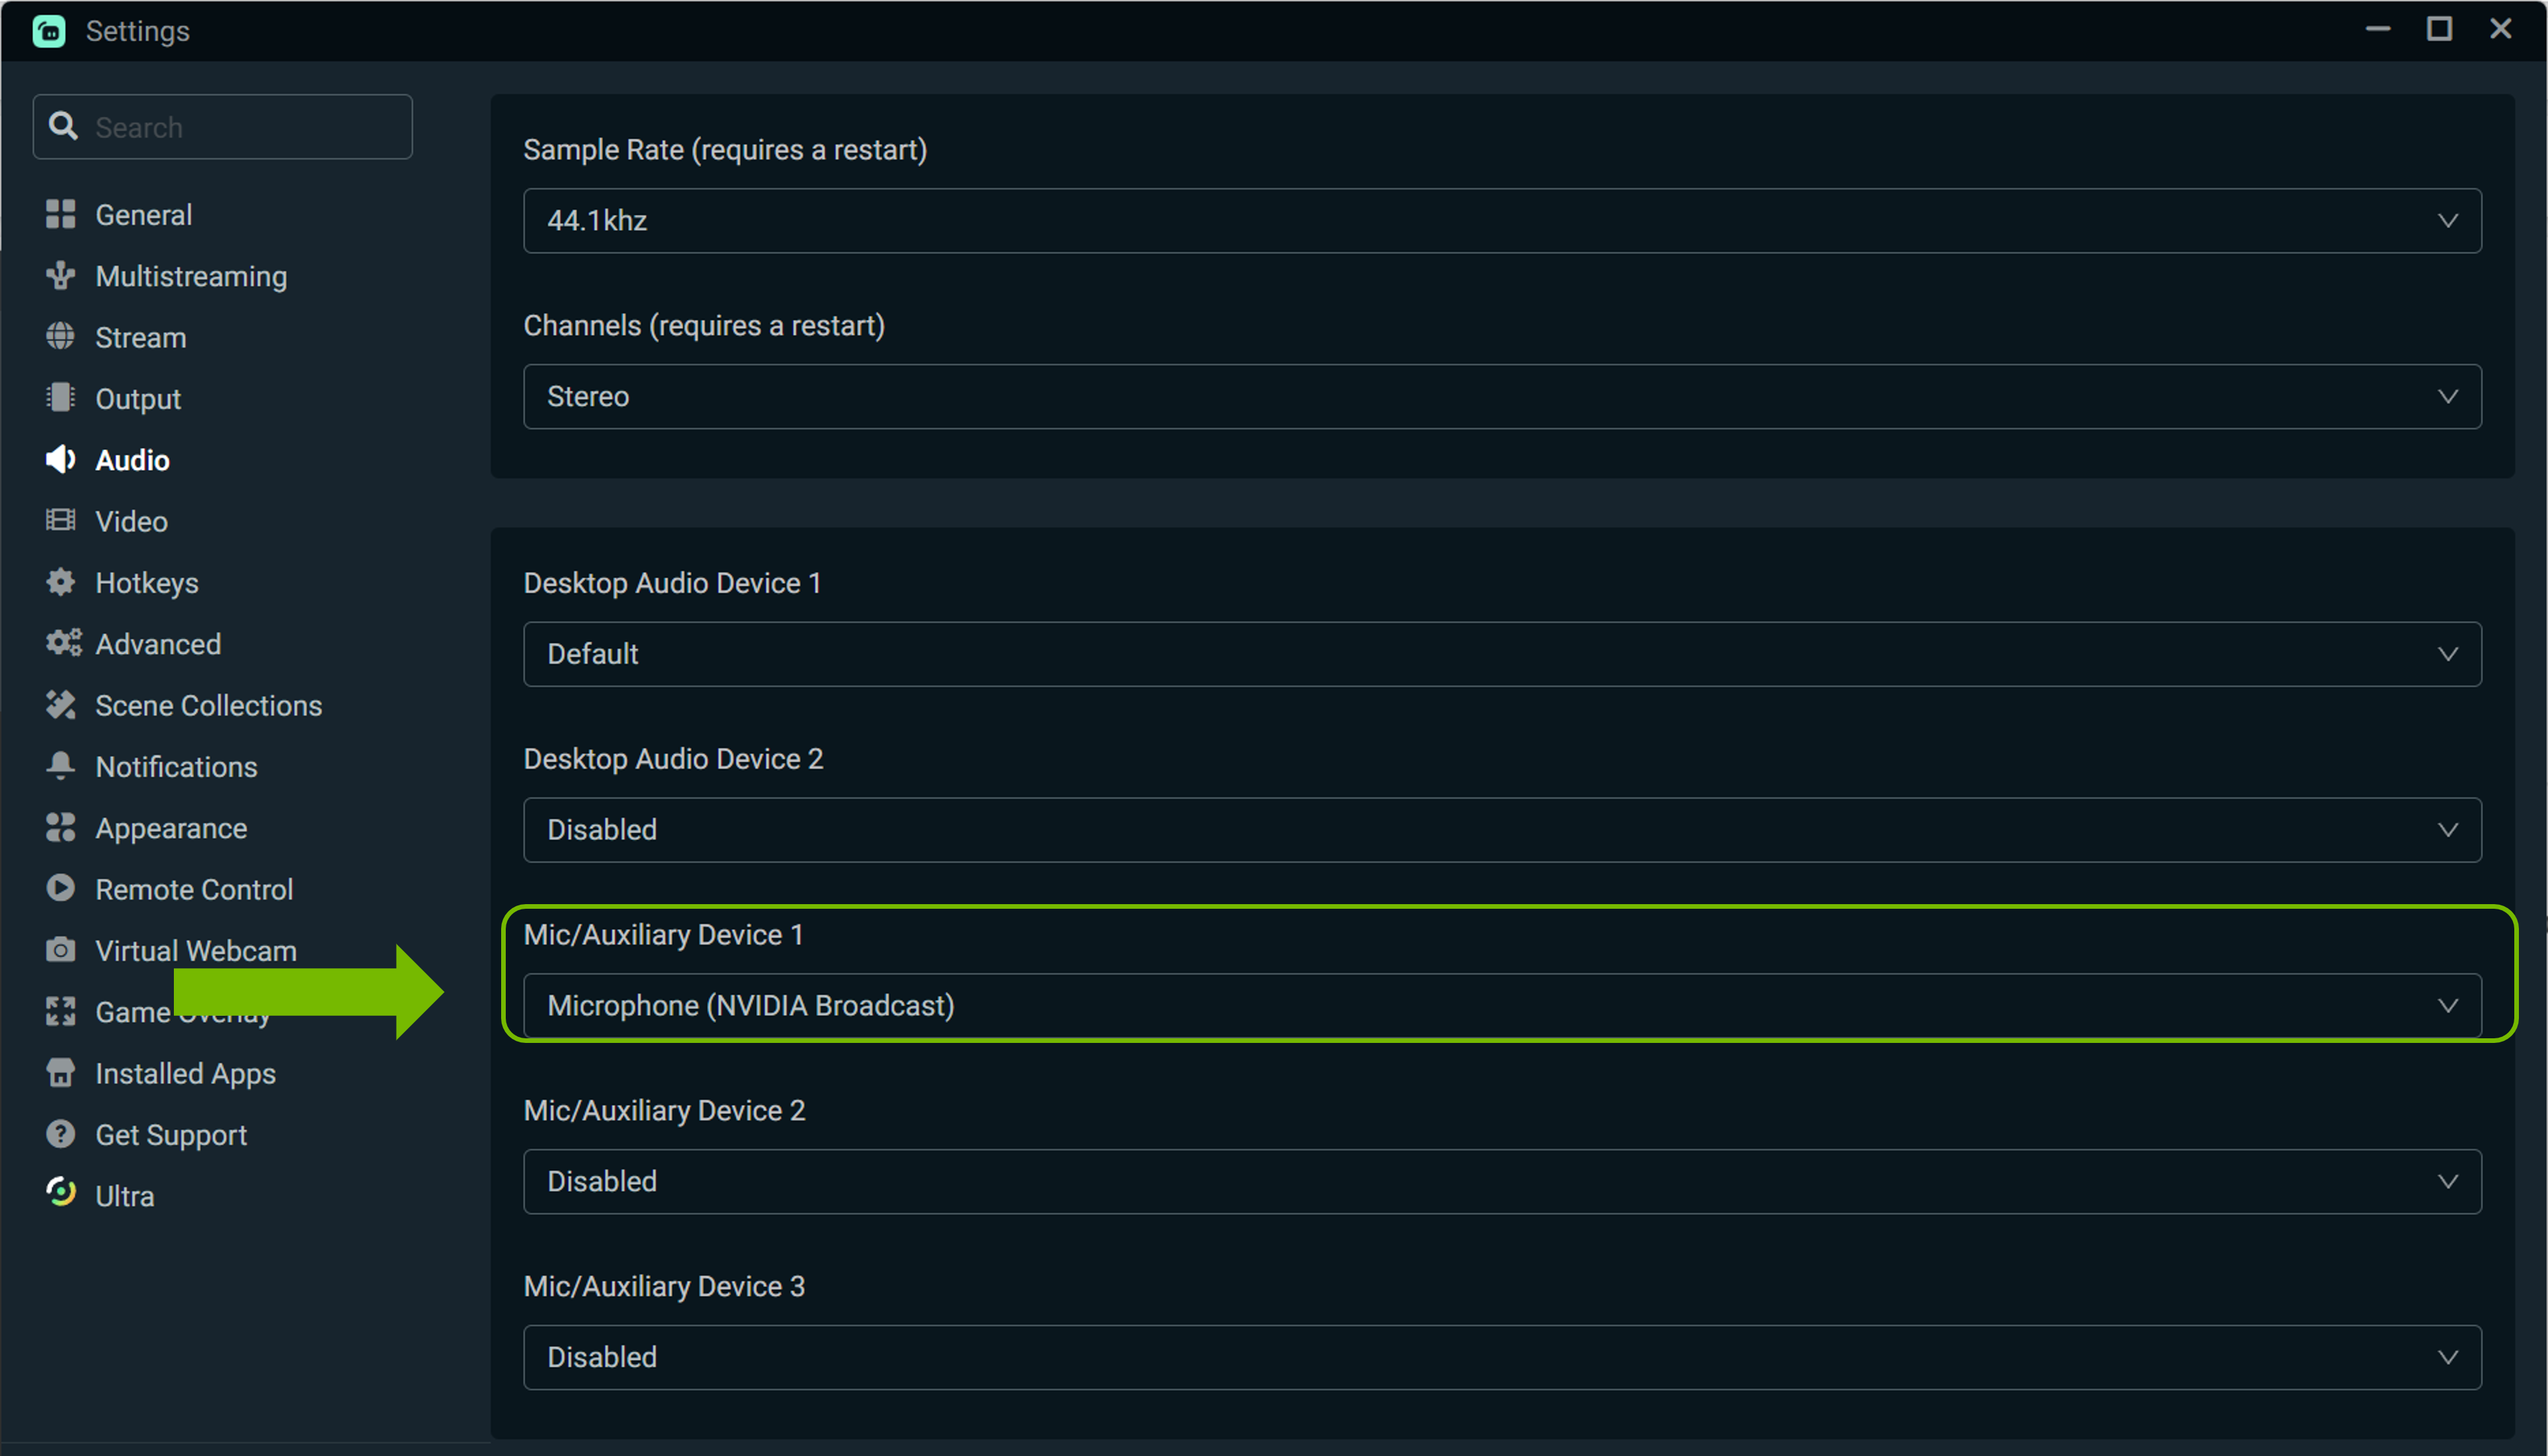
2. Go to Audio, and under Mic/Auxiliary Device 1, select Microphone (NVIDIA Broadcast).
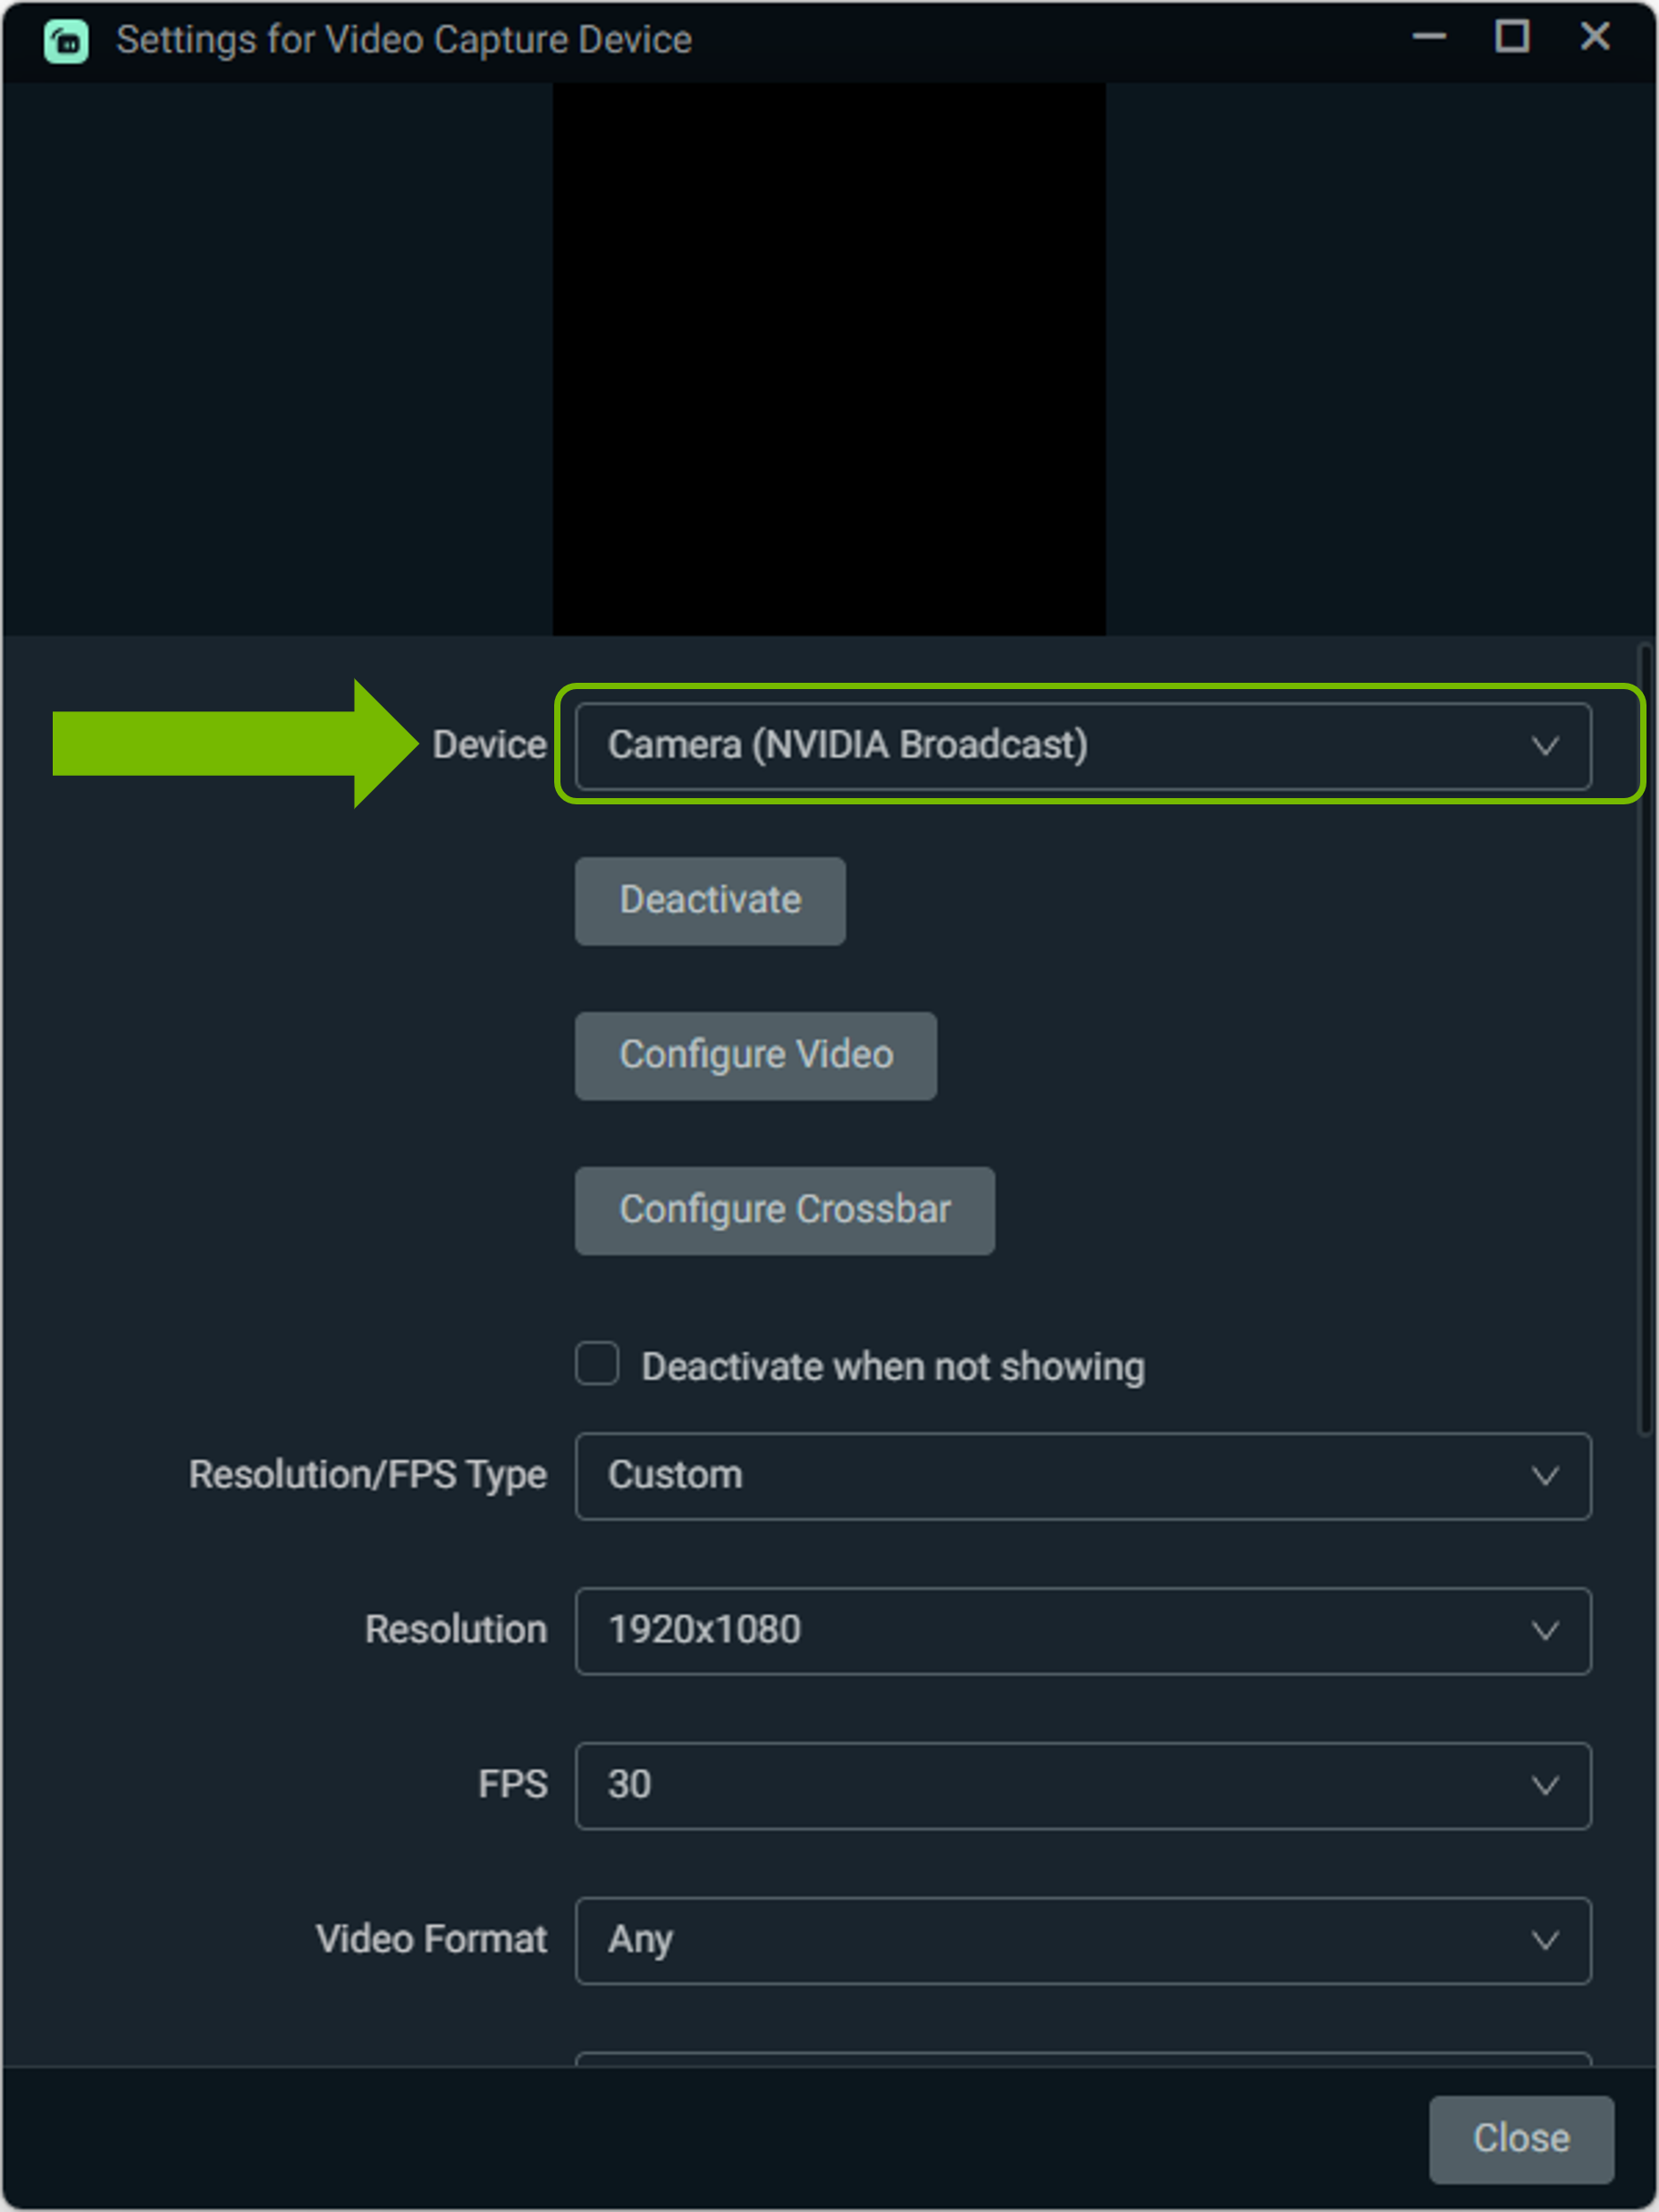
3. To select the NVIDIA Broadcast Camera, add a Video Capture Source to your scene, and select Camera (NVIDIA Broadcast). Leave all settings at default. If you wish to change the camera resolution, you must do so with NVIDIA Broadcast.
XSplit Broadcaster
1. Under File->Settings, select the “Audio” tab

2. Select NVIDIA Broadcast as your devices:
a. Under Audio Preview, select Speakers (NVIDIA Broadcast).
b. Under Microphone, select Microphone (NVIDIA Broadcast).
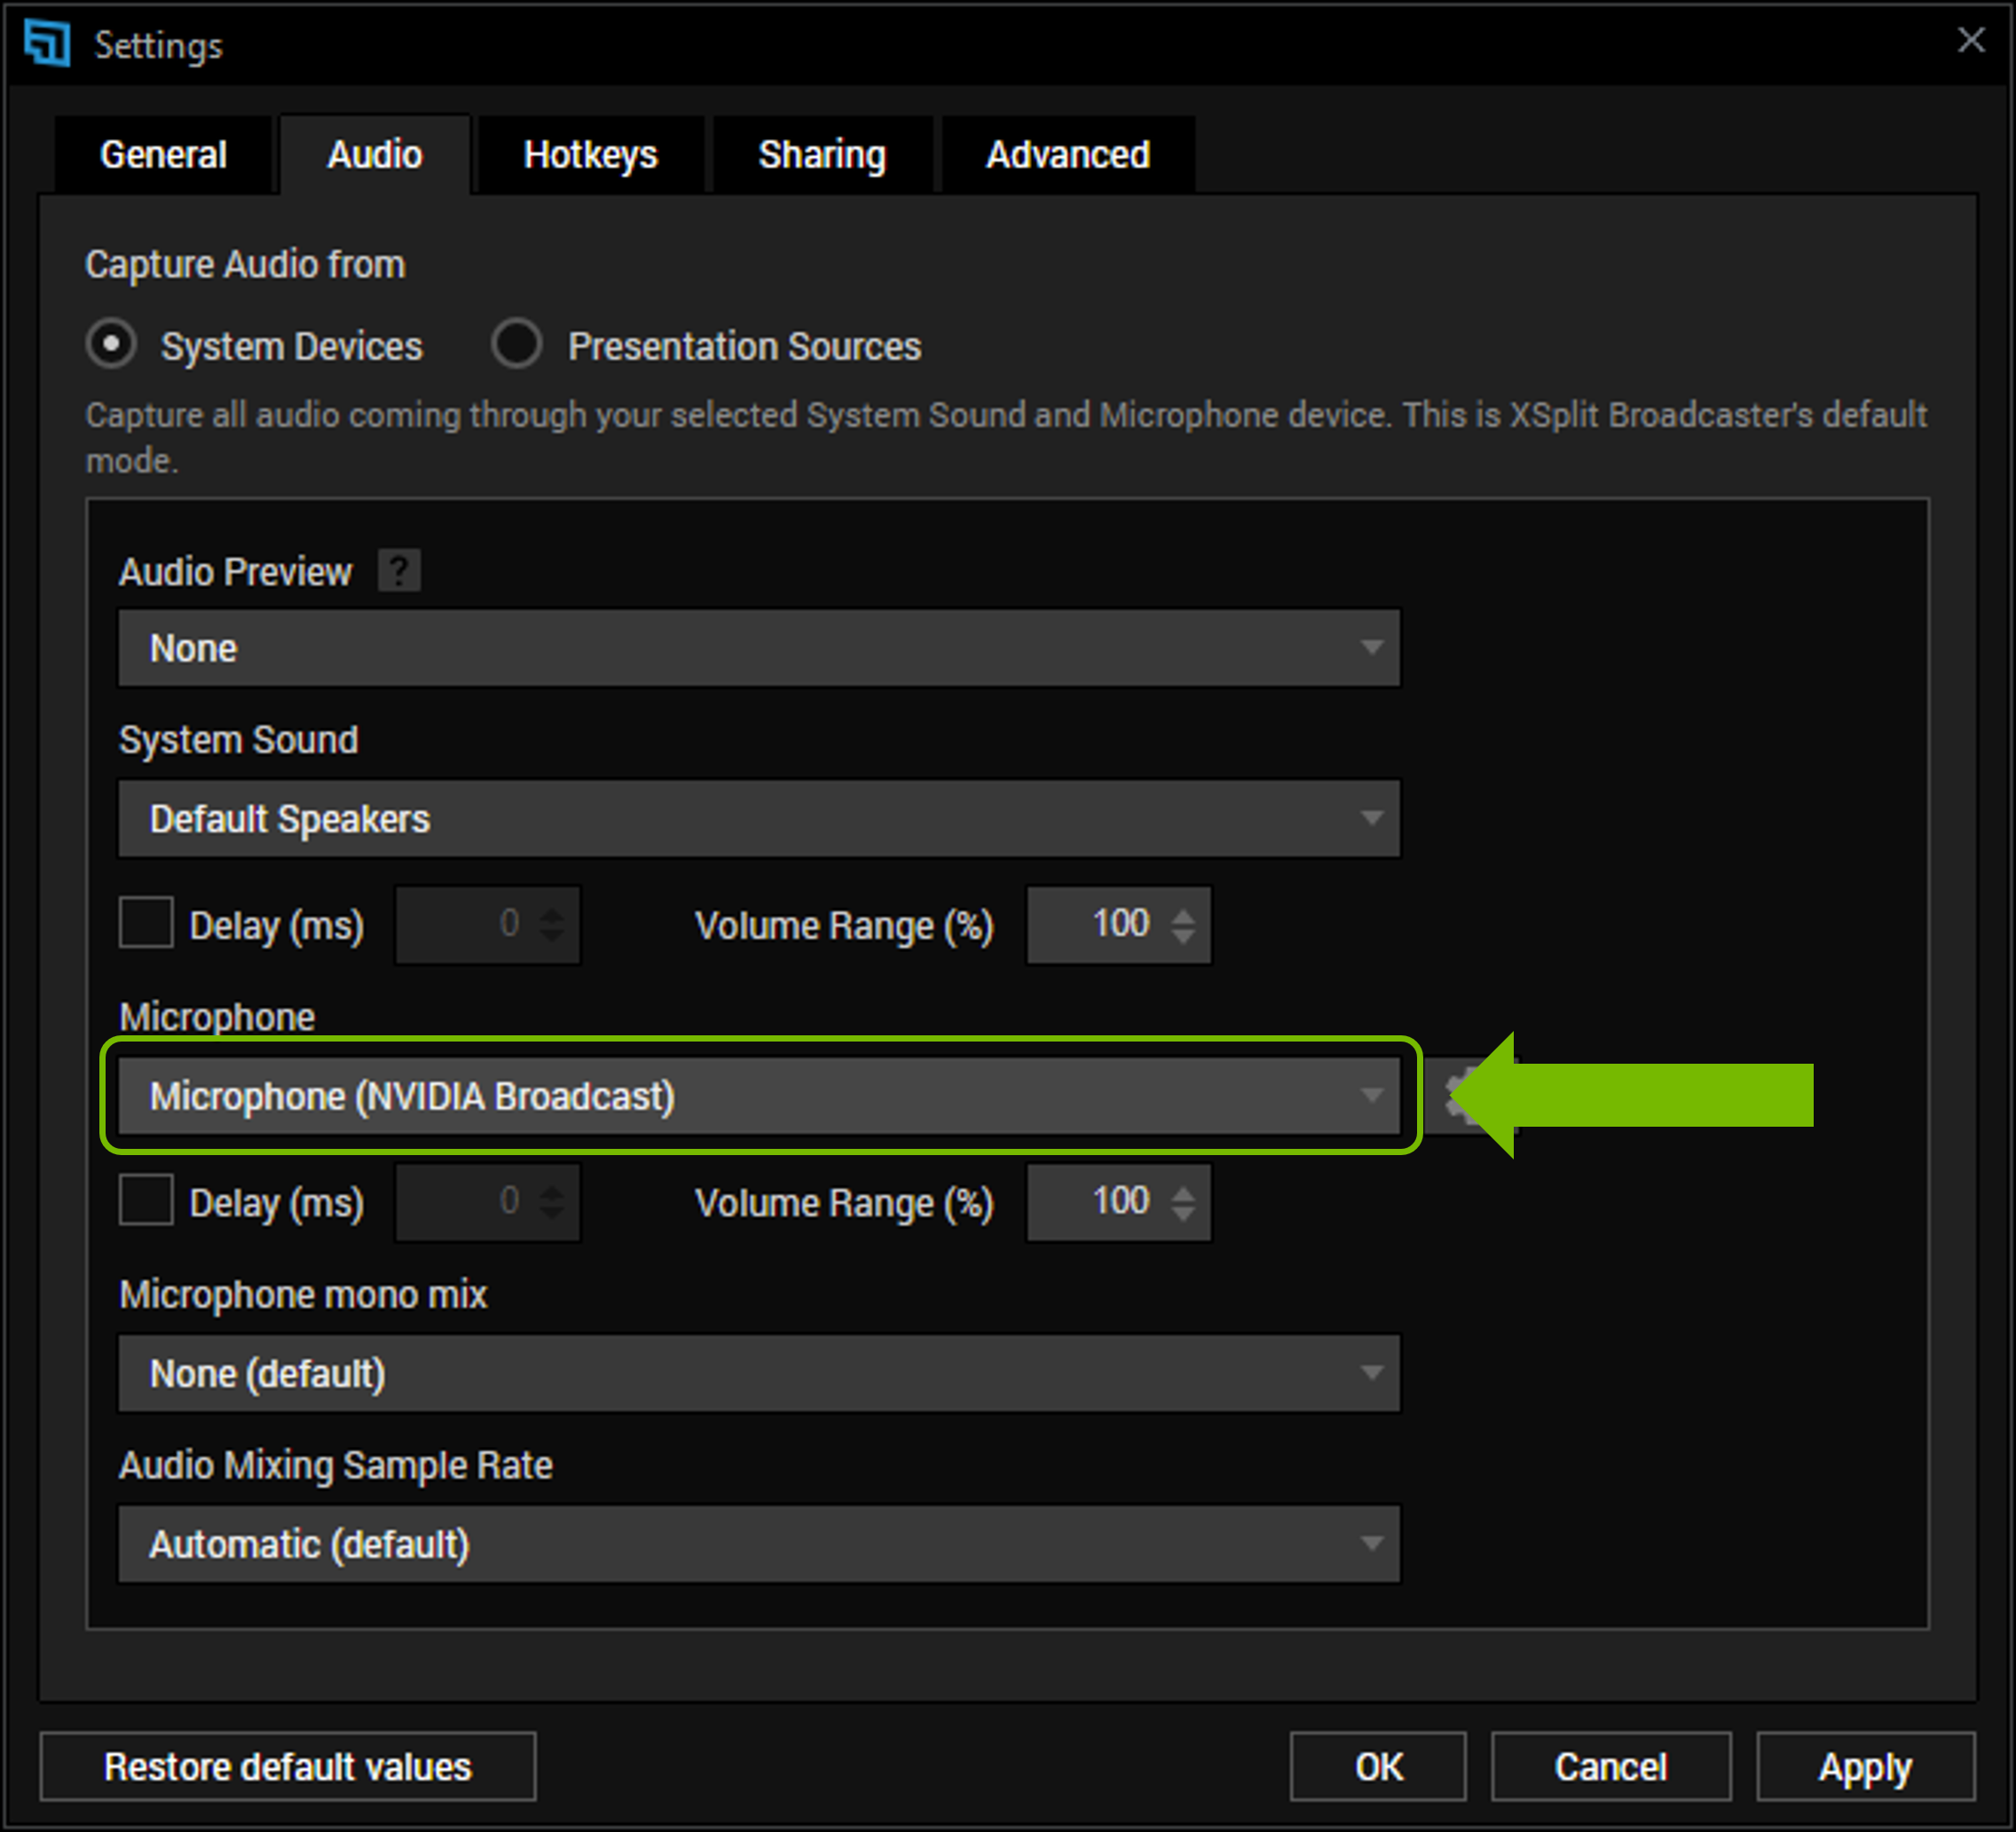
3. To select the NVIDIA Broadcast camera, add a Device Source to your scene, and select Camera (NVIDIA Broadcast).
WebEx
You can configure WebEx in 2 ways:
1. When you connect to the WebEx meeting you are asked how you want to connect to the meeting. Select Call Using Computer, and select NVIDIA Broadcast for your devices.
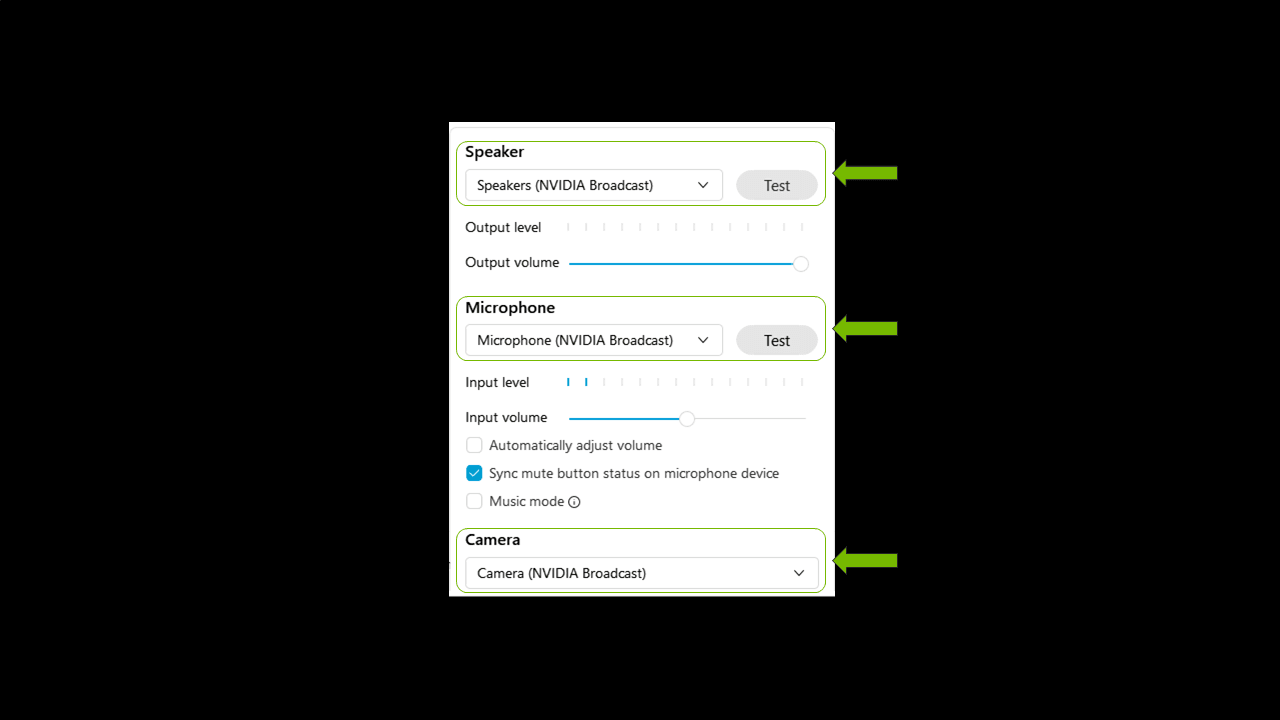
2. When you are already connected, you can change your settings by going to Audio > Audio and Video Connections.
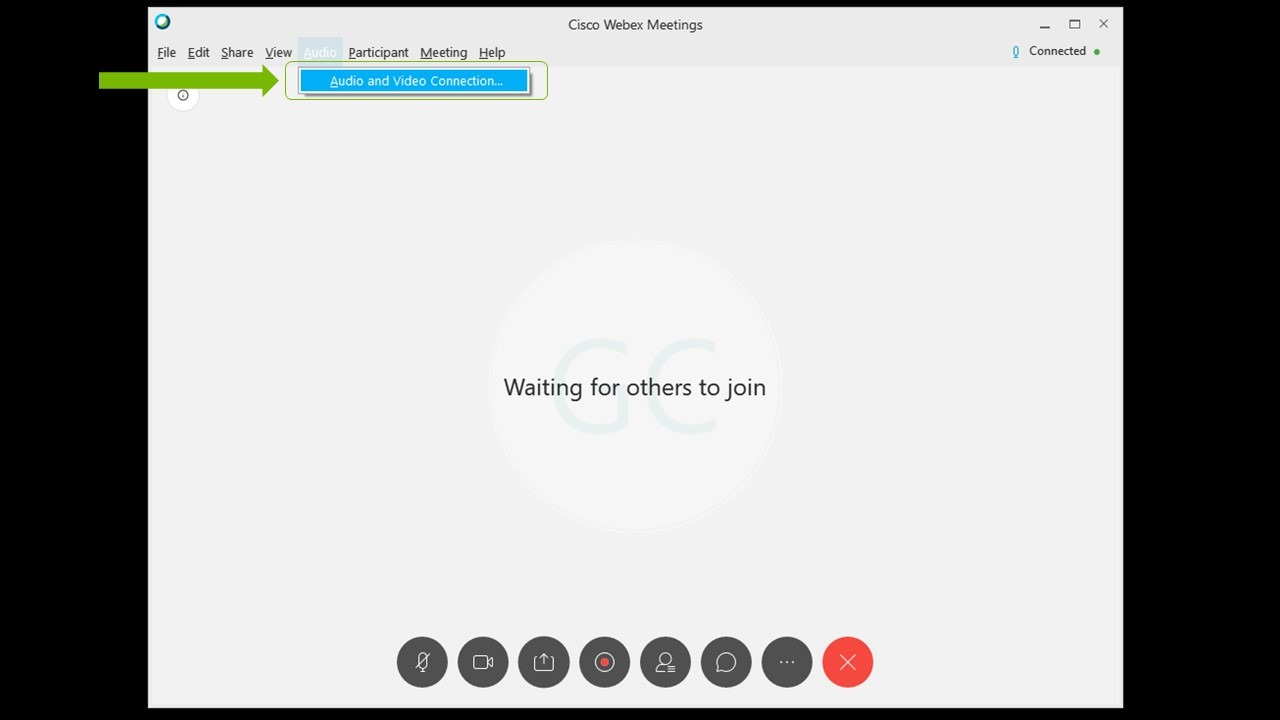
a. Then select Change Settings.
b. Configure your device settings to use NVIDIA Broadcast.
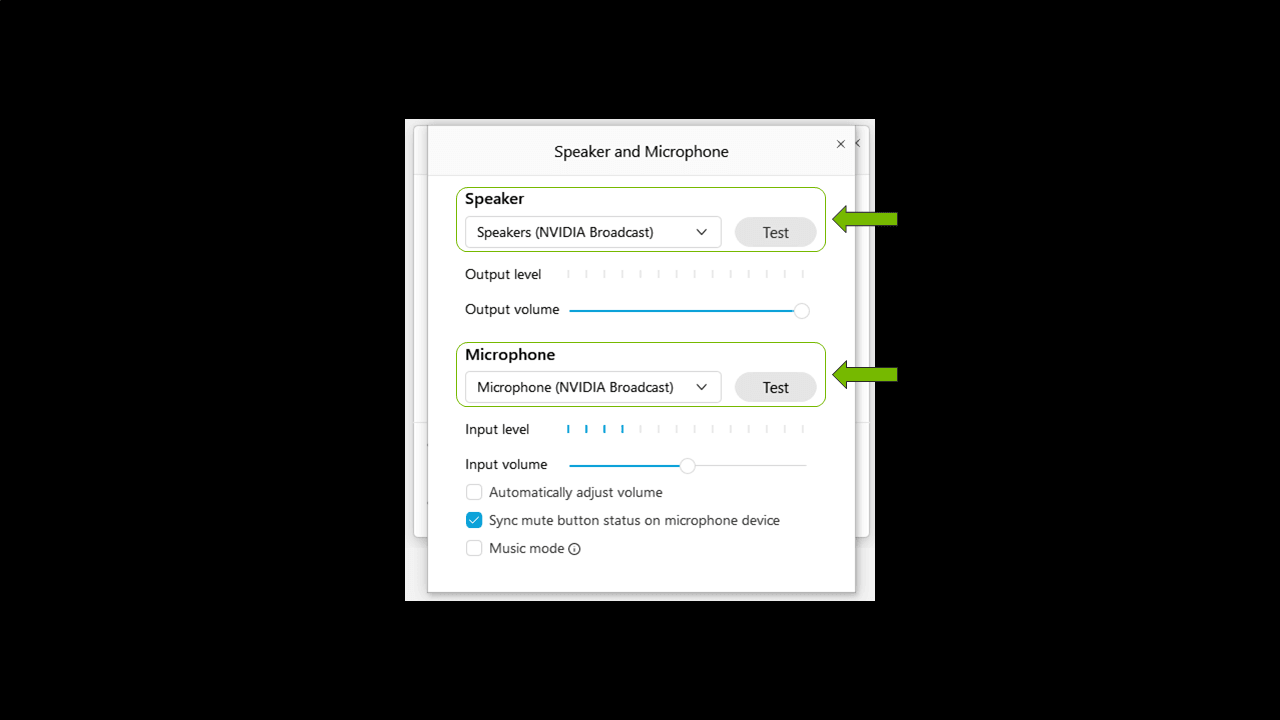
We recommend unchecking Automatically adjust volume and setting it manually.
Slack
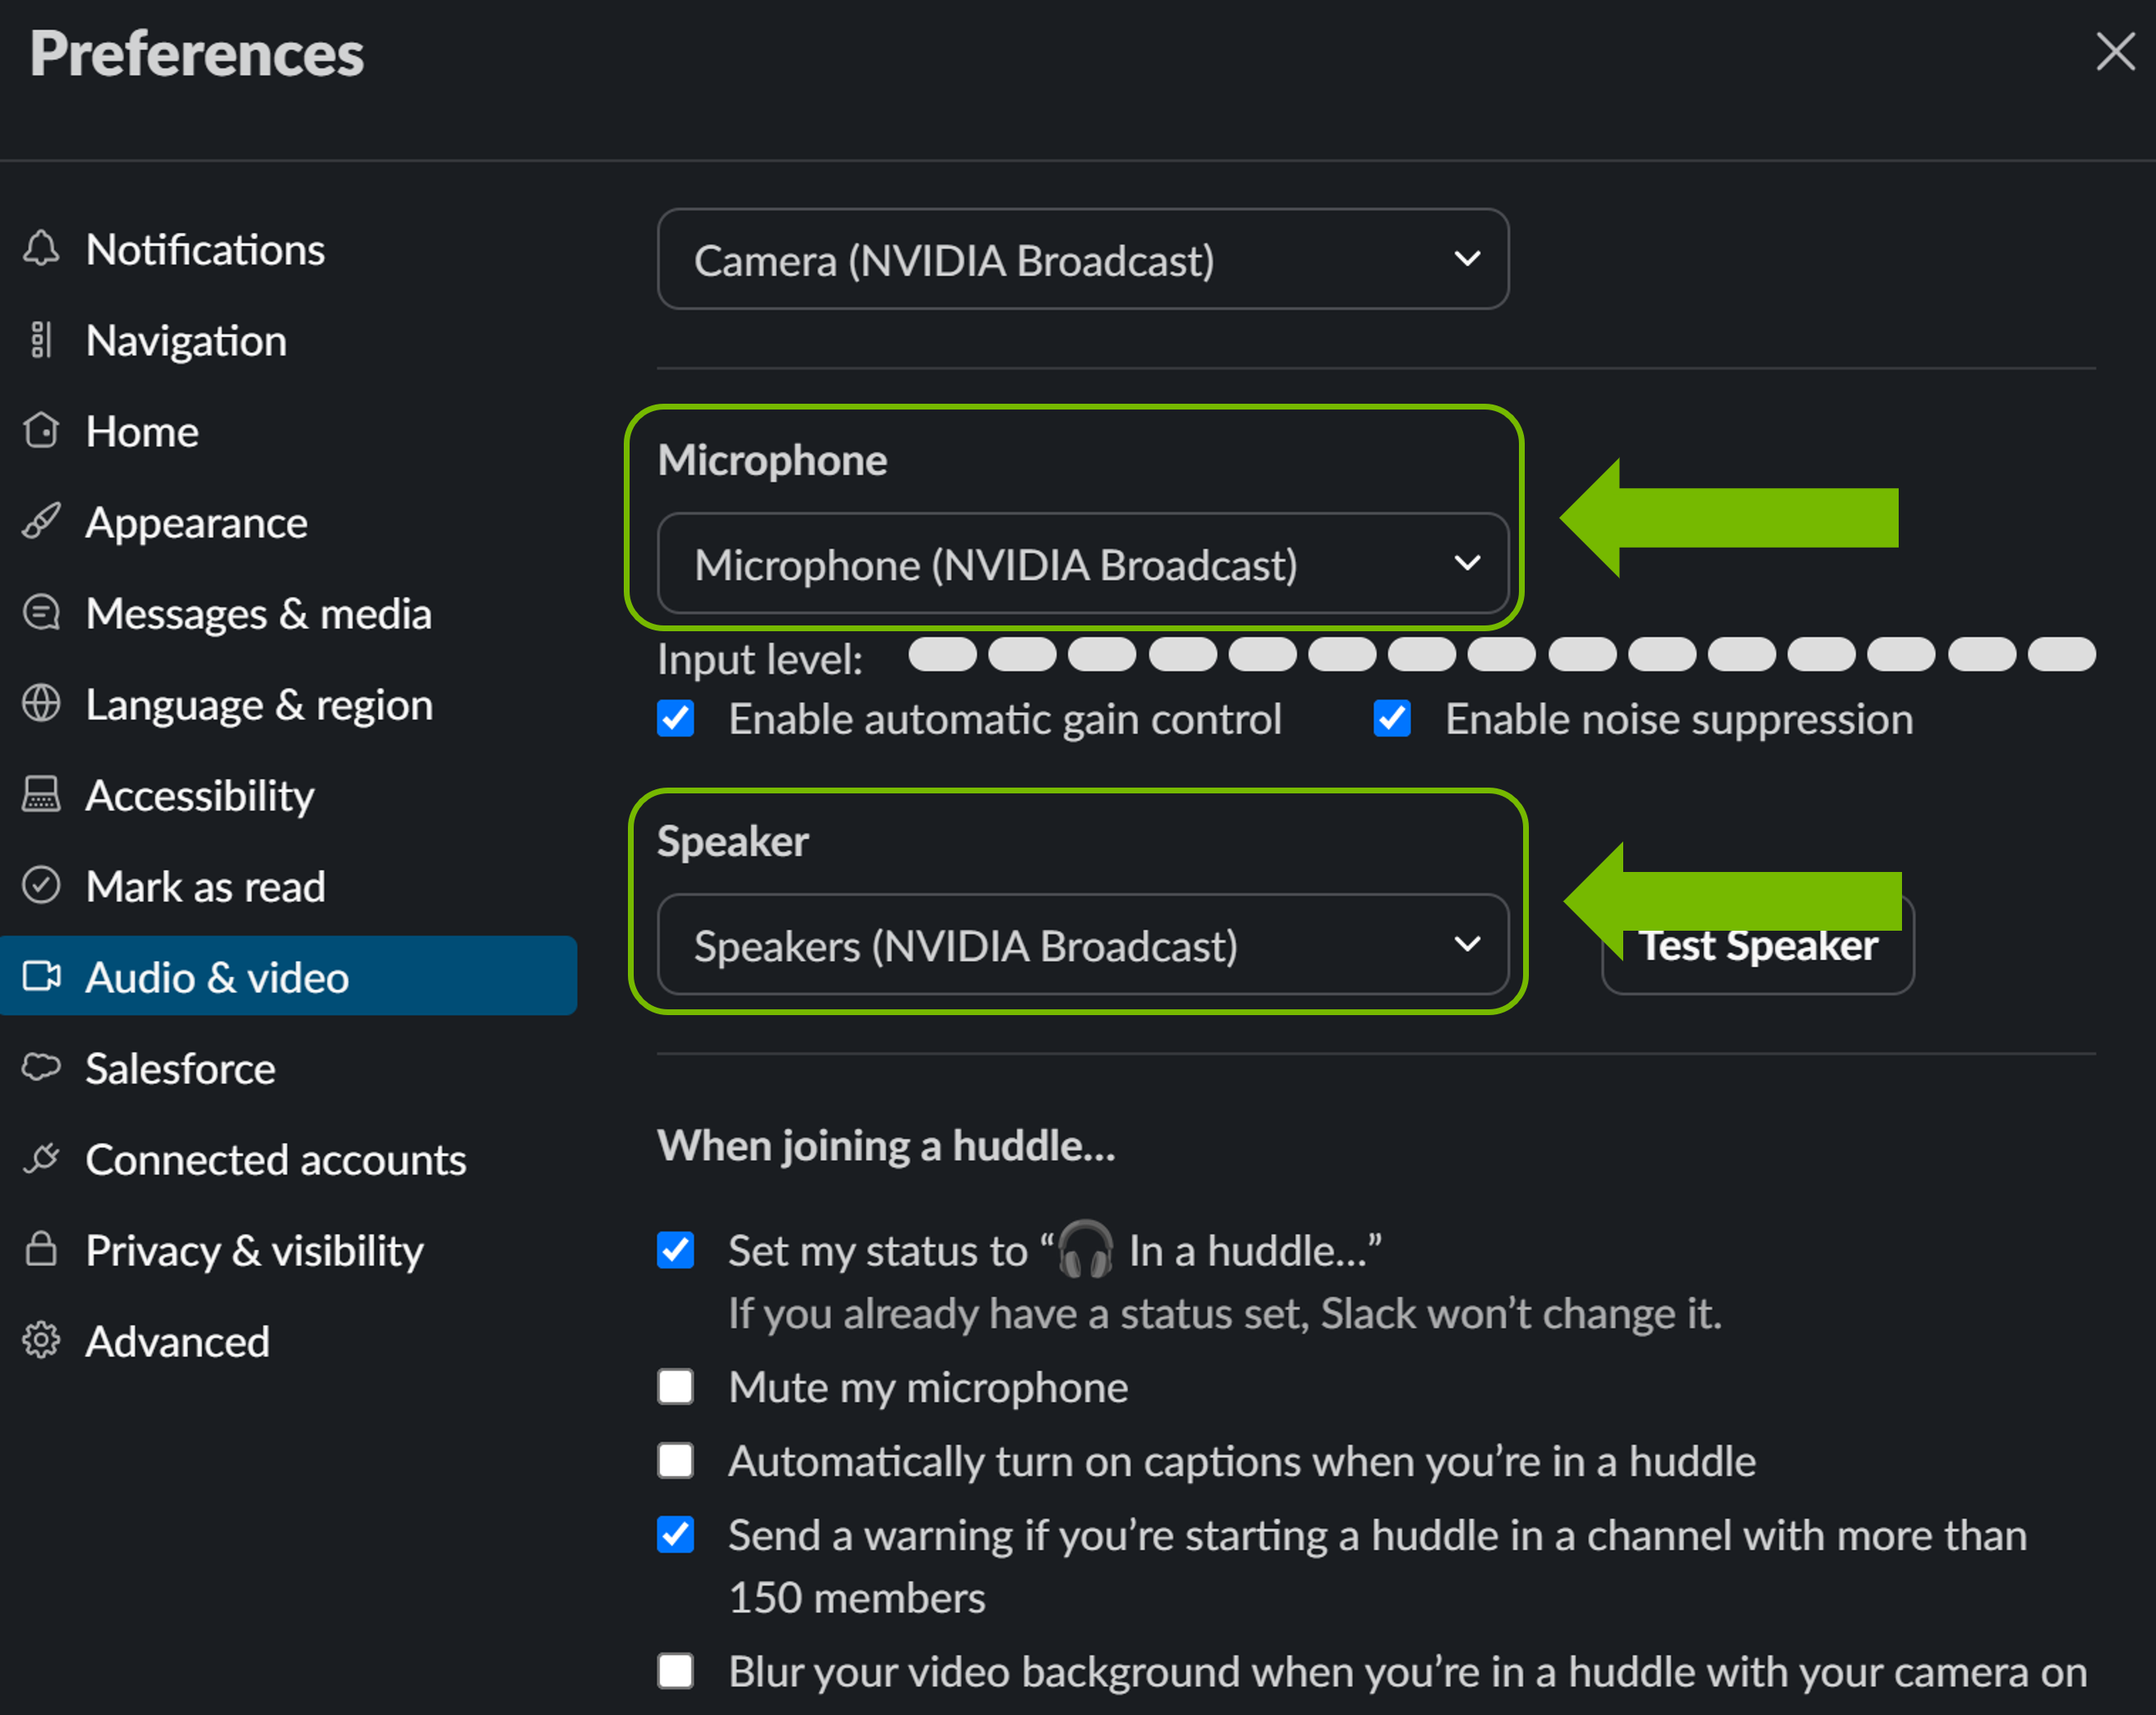
1. Click on your icon in the bottom left, then on Preferences.
2. Select audio and video
3. Then configure NVIDIA Broadcast as your devices.
Google Chrome
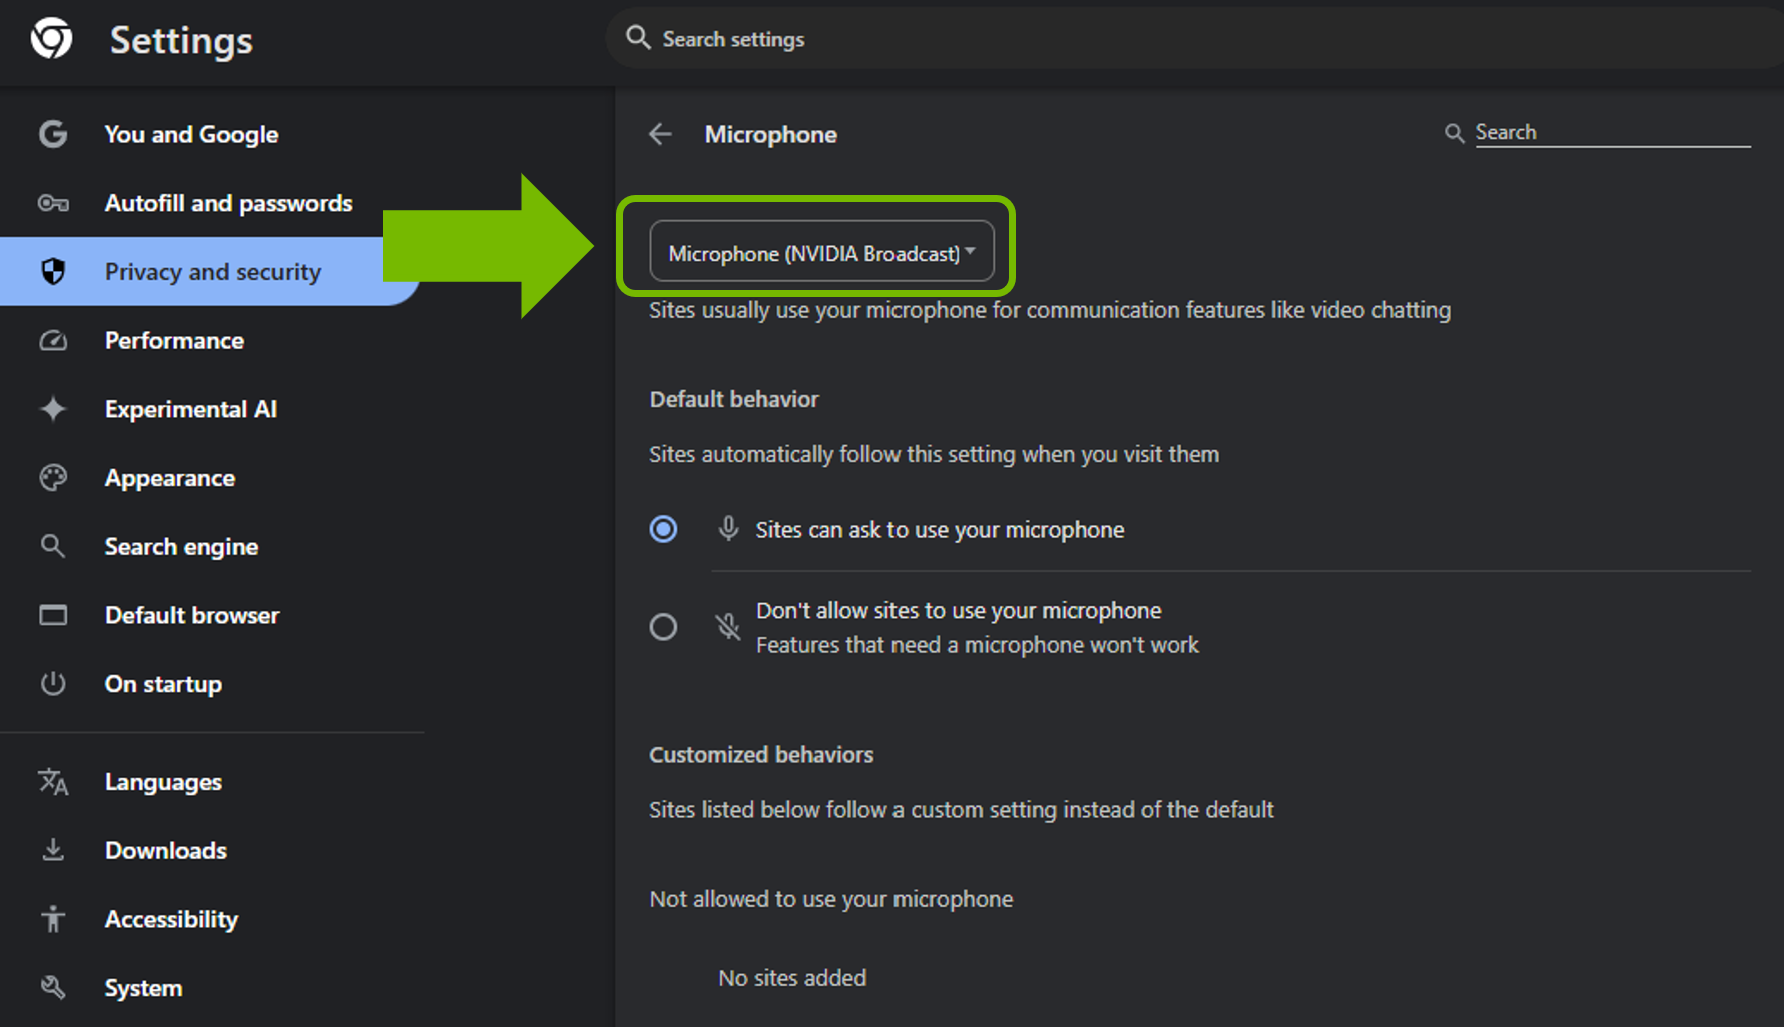
- Go to Settings (click the three dots on the top right, then Settings).
- Click on Site Settings > Microphone.
- Select Microphone (NVIDIA Broadcast).
- Go back to Site Settings, and then navigate to Site Settings > Site Settings > Camera.
- Select Camera (NVIDIA Broadcast).