How to use the NVIDIA Reflex Analyzer
Over the years, NVIDIA has accelerated framerates, minimized micro stuttering, and introduced dozens of enhancements that make gameplay faster and smoother. Now, we’re tackling system latency with NVIDIA Reflex, a suite of technologies that optimizes and measures system latency in competitive games. It includes two technologies: Reflex Low-Latency Mode for reducing system latency in games to help players improve their competitive performance, and Reflex Analyzer for easily and quickly measuring system latency.
End to end system latency (a.k.a. “input lag” or “system lag”) determines the responsiveness of gaming experiences, affecting the time it takes for your clicks to become actions on-screen. Long delays make gameplay feel sluggish, and could well get you killed in competitive multiplayer matches.
The first step to fixing your system latency is measuring it. To enable system latency monitoring, we’ve added NVIDIA Reflex Analyzer hardware into the new G-SYNC monitors. This enables instantaneous latency analysis that is as-accurate as a 10000 FPS camera, without any of the fuss or expense, giving competitive players full confidence in the capabilities and responsiveness of their systems (no longer can they blame the PC when whiffing a clutch moment!).
We’ve also worked with mouse manufacturers to enable real-time latency measurement of mouse clicks, too. When a compatible mouse is plugged into a specific Reflex Analyzer monitor USB port, real-time data is collected and added to system latency stats, giving users end to end system latency for the very first time.
In this guide, you will learn how to set up your NVIDIA Reflex Analyzer, which mice are compatible, and some tips and tricks when measuring system latency.
What’s New
Measuring system latency with NVIDIA Reflex Analyzer was already easy before—allowing gamers to capture and log their system latency with a click of a button without the need for expensive high-speed cameras and other hardware sensors, not to mention the painstaking time it took to set up and analyze the data. We made Reflex Analyzer even easier. Reflex Analyzer Automatic Configuration is a new feature update in GeForce Experience for Reflex Analyzer capable monitors that allows for easier capture of system latency data than before with focus on further simplifying the configuration process.
With each click of the mouse, accurate system latency is displayed in the GeForce Performance Overlay—this time without the need to configure additional options within GeForce Experience or the monitor itself, and with the new enhanced latency flash indicator in supported games, gamers can see their latency accurately during real gameplay. Just enable the latency flash indicator in the game, press ALT+R to open the GeForce Experience Performance Overlay, then press left-click. That’s it! You can now switch weapons, use weapons without muzzle flashes, and measure latency while playing the game. Gamers with a Reflex mouse will be provided full end-to-end system latency measurements, while gamers without a Reflex Mouse can still measure PC + Display Latency. To use automatic configuration on your Reflex Analyzer display in a supported Reflex game, grab the latest release of GeForce Experience and the latest Game Ready Driver.

The GeForce Experience Performance Overlay will update latency stats in real-time.
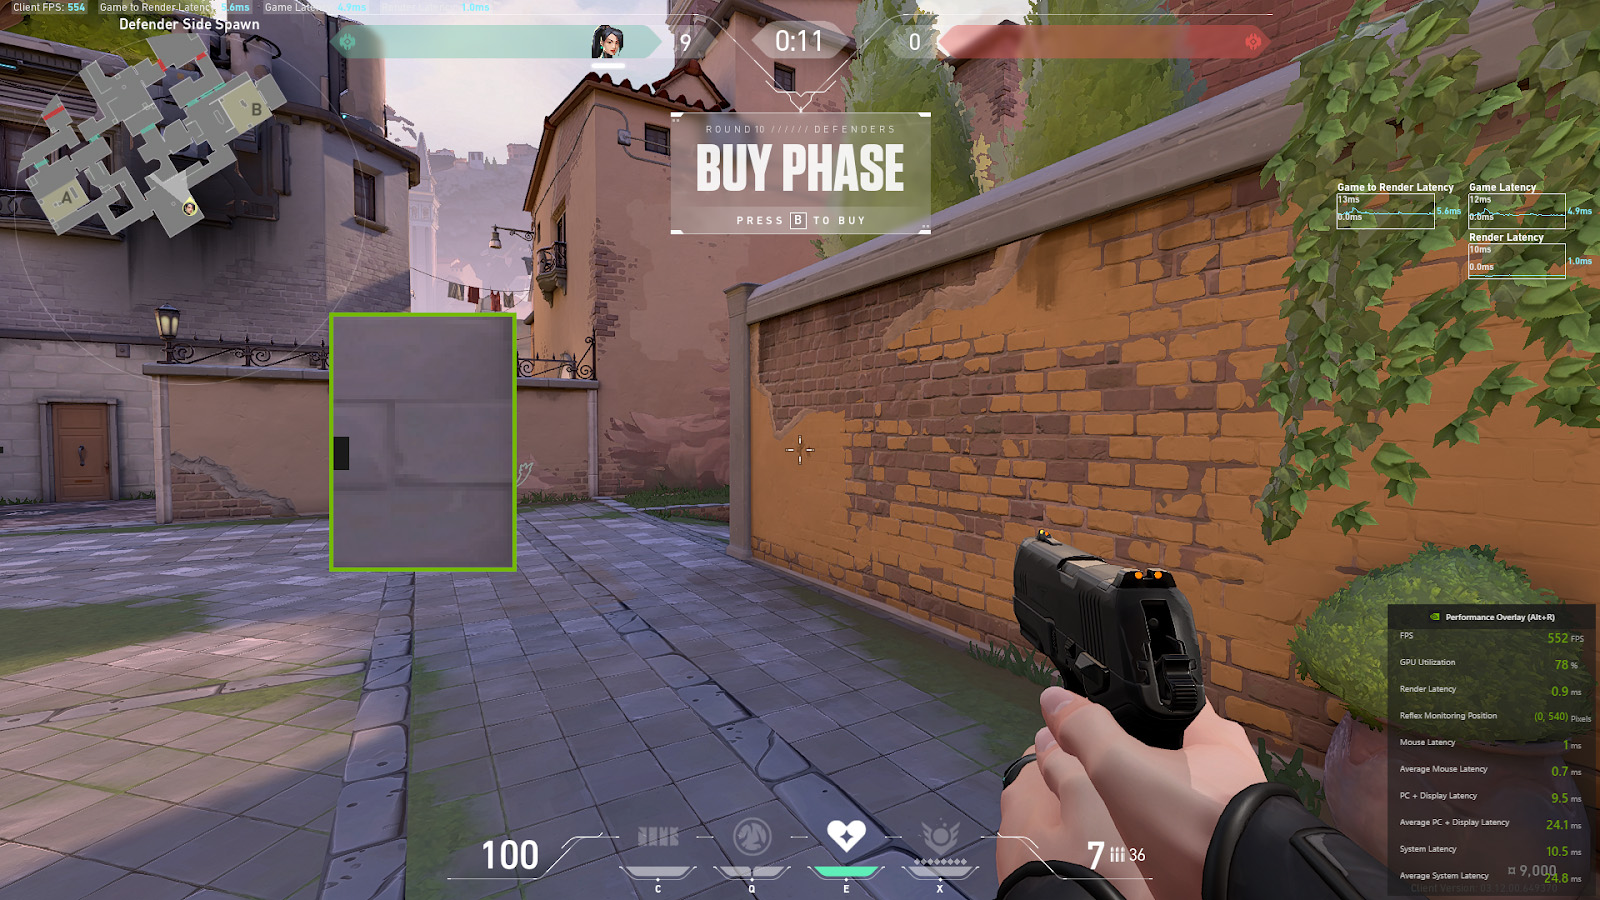
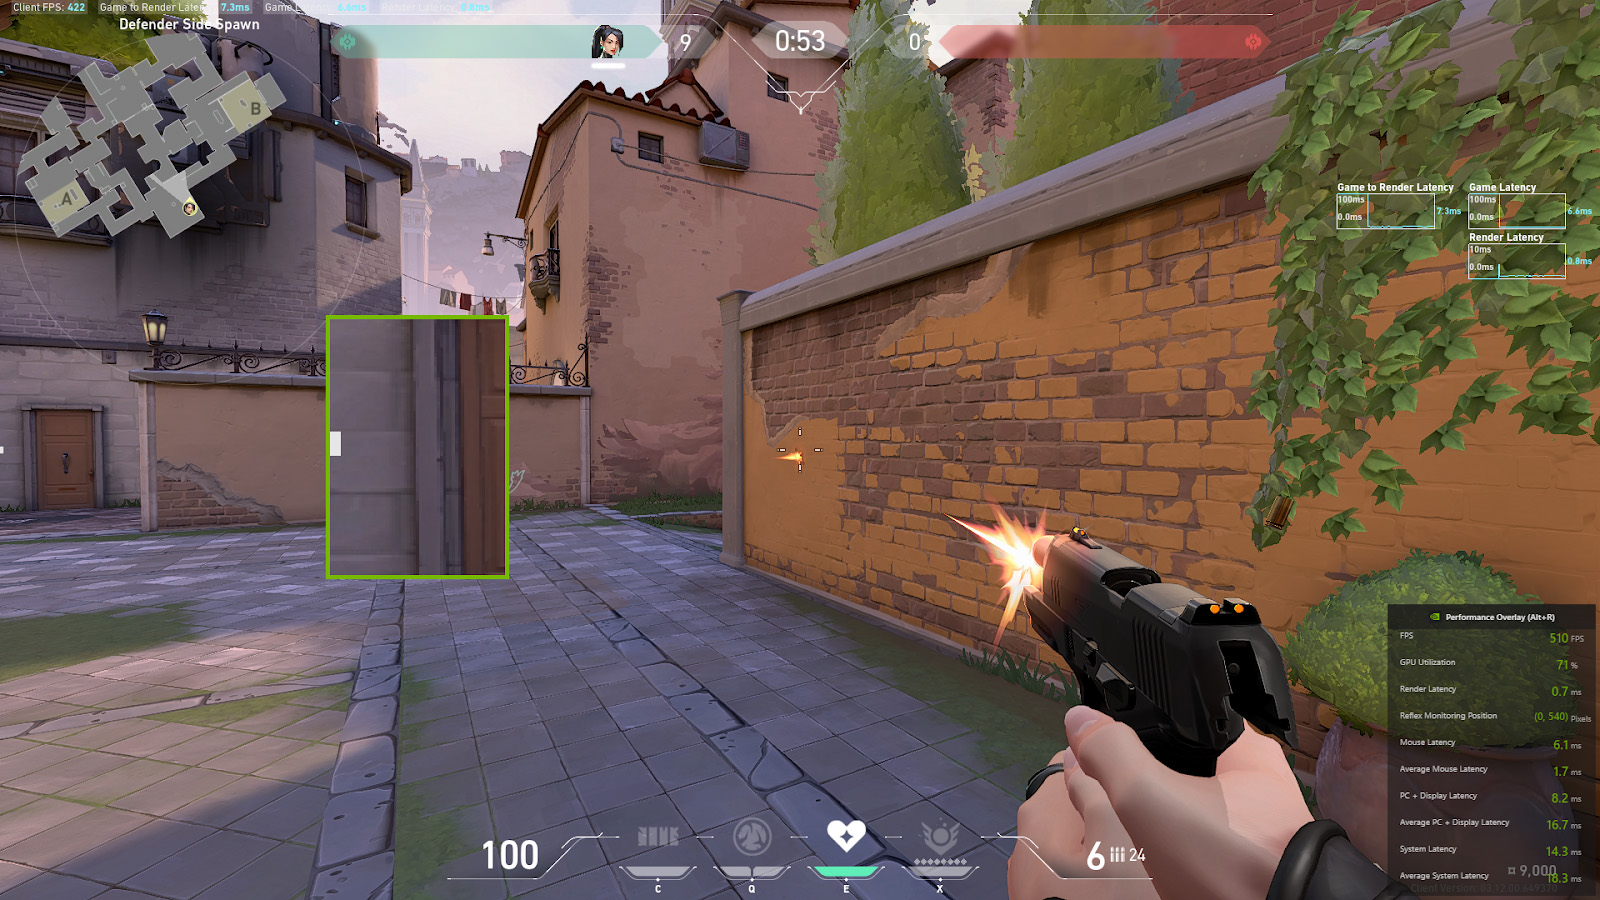
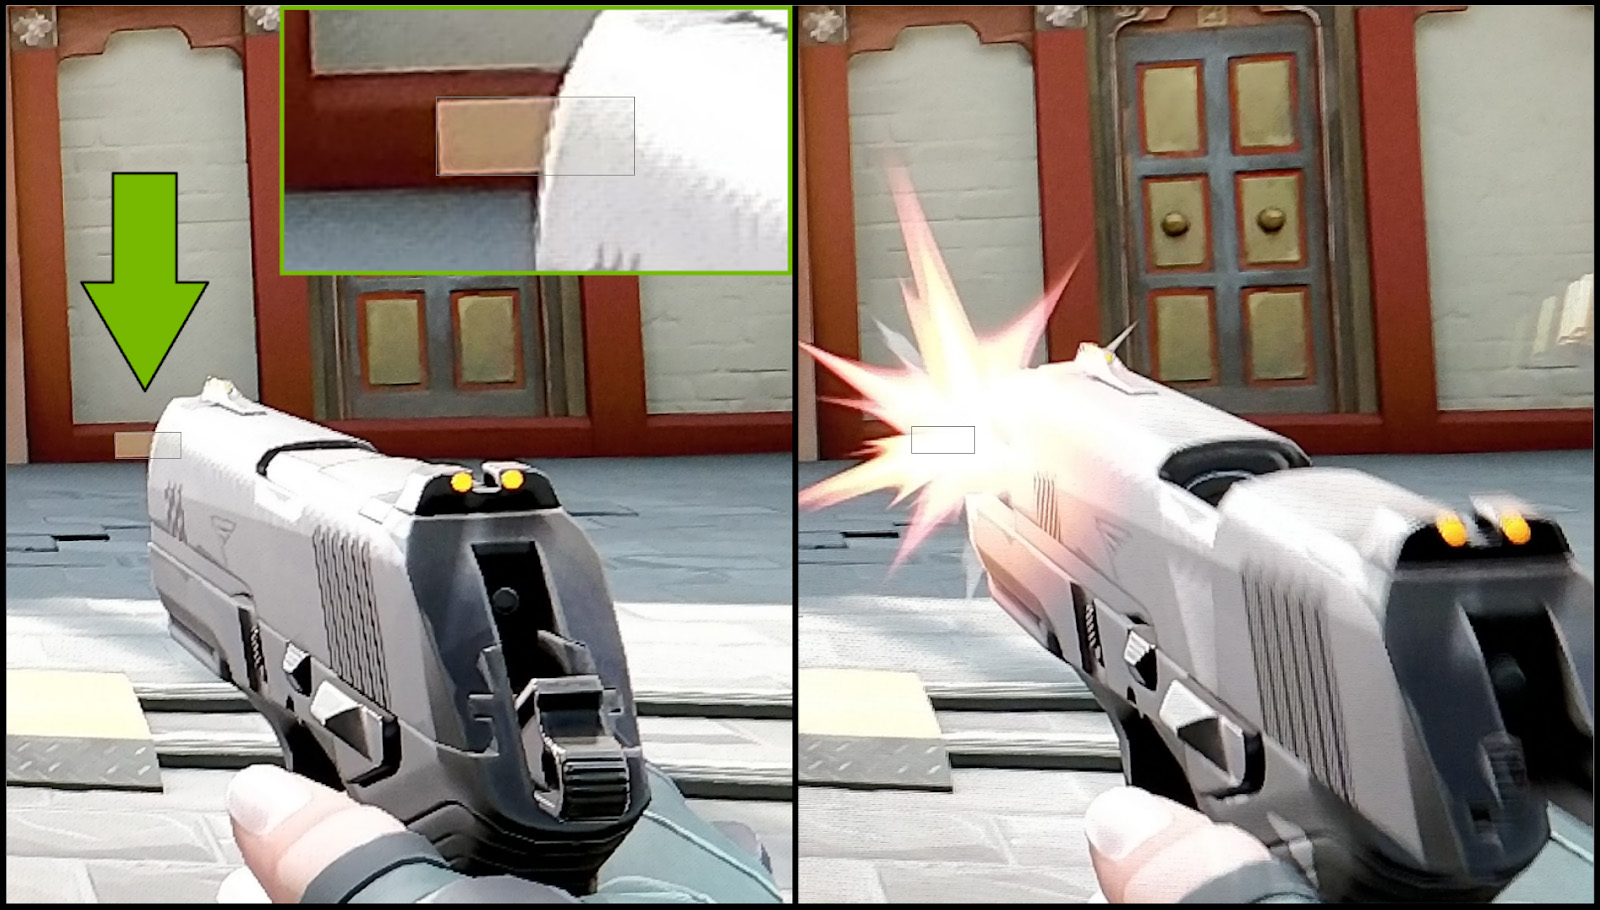
The Reflex Analyzer monitor captures the exact moment the mouse is clicked to when the pixels on the screen update, in this case when the latency flash indicator (tiny square on the far left of the screen) changes from dark gray to white. The time between the mouse click and the pixels changing on the screen is known as System Latency. Lower latency is known to improve player competitive performance.
How To Setup and Use NVIDIA Reflex Analyzer
If you’re buying or have already bought a Reflex Analyzer-compatible G-SYNC display, here’s how to set up and use the tech. Please note that all monitors differ, so please refer to your monitor’s manual for specifics on UI options and USB port usage.
Monitor Setup
- Connect the display port cable – Set up your new G-SYNC 360Hz display, and using the included DisplayPort cable, connect it to a DisplayPort output on your GeForce GPU.
- Connect the provided USB cable – Connect the cable from your monitor to your gaming PC. The Type-A connector plugs into the PC, while the Type-B connector plugs into the monitor.
- Connect your gaming mouse to the Reflex Analyzer USB port – Refer to your monitor’s documentation for the specific Reflex USB port location. There is typically only one port on the monitor that supports Reflex Analyzer - typically a different color from the other USB ports.
- If you have a Reflex compatible mouse, plug it into the Reflex USB port to see real-time latency of each mouse click when exposing the advanced latency overlay. As of this writing, 28 mice have been validated as Reflex compatible. Find the list of Reflex supported mice here.
- Don’t have a Reflex compatible mouse? No worries. For mice that have not been through the validation process to become Reflex Analyzer compatible, there is a mouse database that stores the average latencies of known mice as well, allowing system latency to still be collected, but it won’t include the real-time per-click mouse latency. The database contains the most popular mice used by esports professionals.
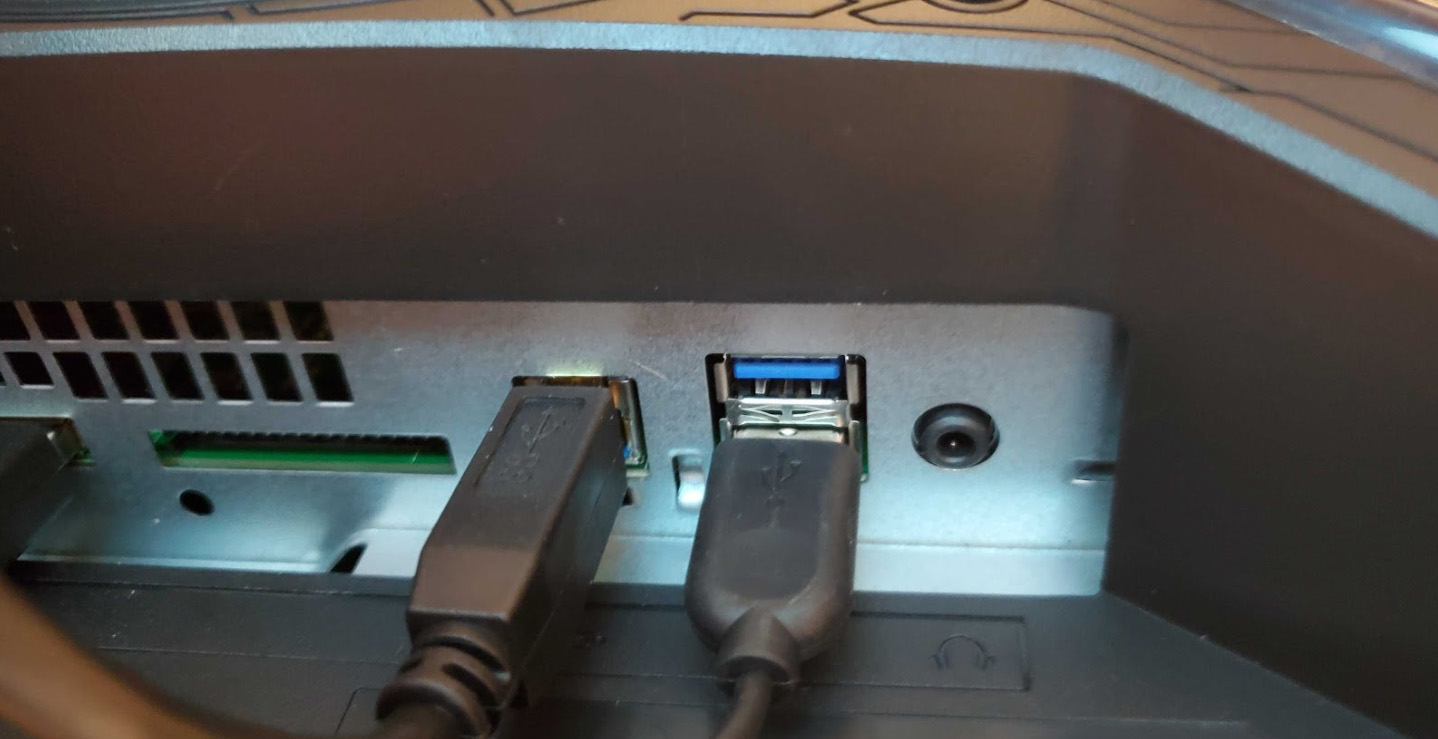
Figure 1: Reflex Analyzer correctly configured on ASUS ROG SWIFT 360Hz (PG259QNR). The left USB Type-B to Type-A cable goes to the PC while the right USB closest to the display is reserved for the mouse. Refer to your monitor documentation for the correct location of the Reflex USB port for plugging in your mouse.
GeForce Experience Setup
4. Download the latest GeForce Experience.
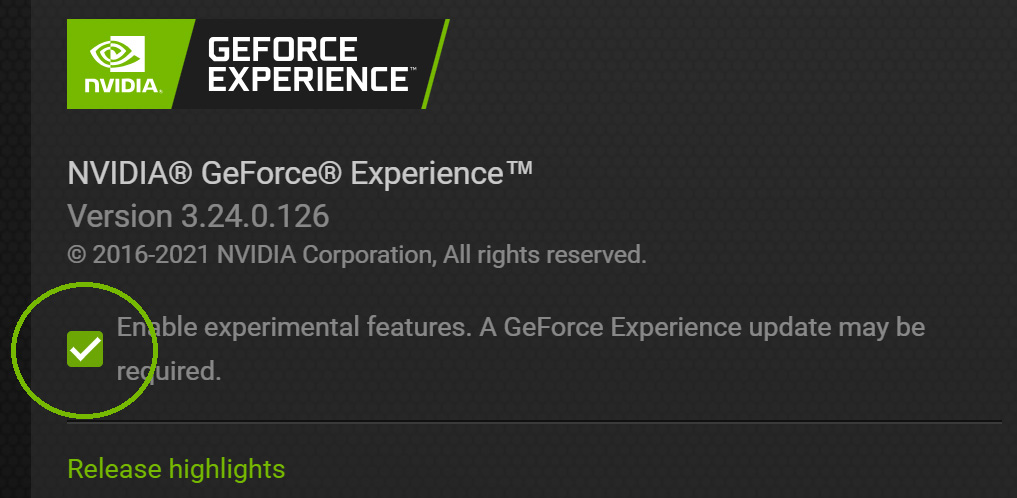
5. Open GeForce Experience, log in, then enable Experimental Features. Open GeForce Experience, click the cog icon on the top right to access the Settings, click General on the left, and tick the “Enable Experimental Features” box.
Game Setup
6. Download a Reflex game that also has support for Auto-Configure Reflex Analyzer.
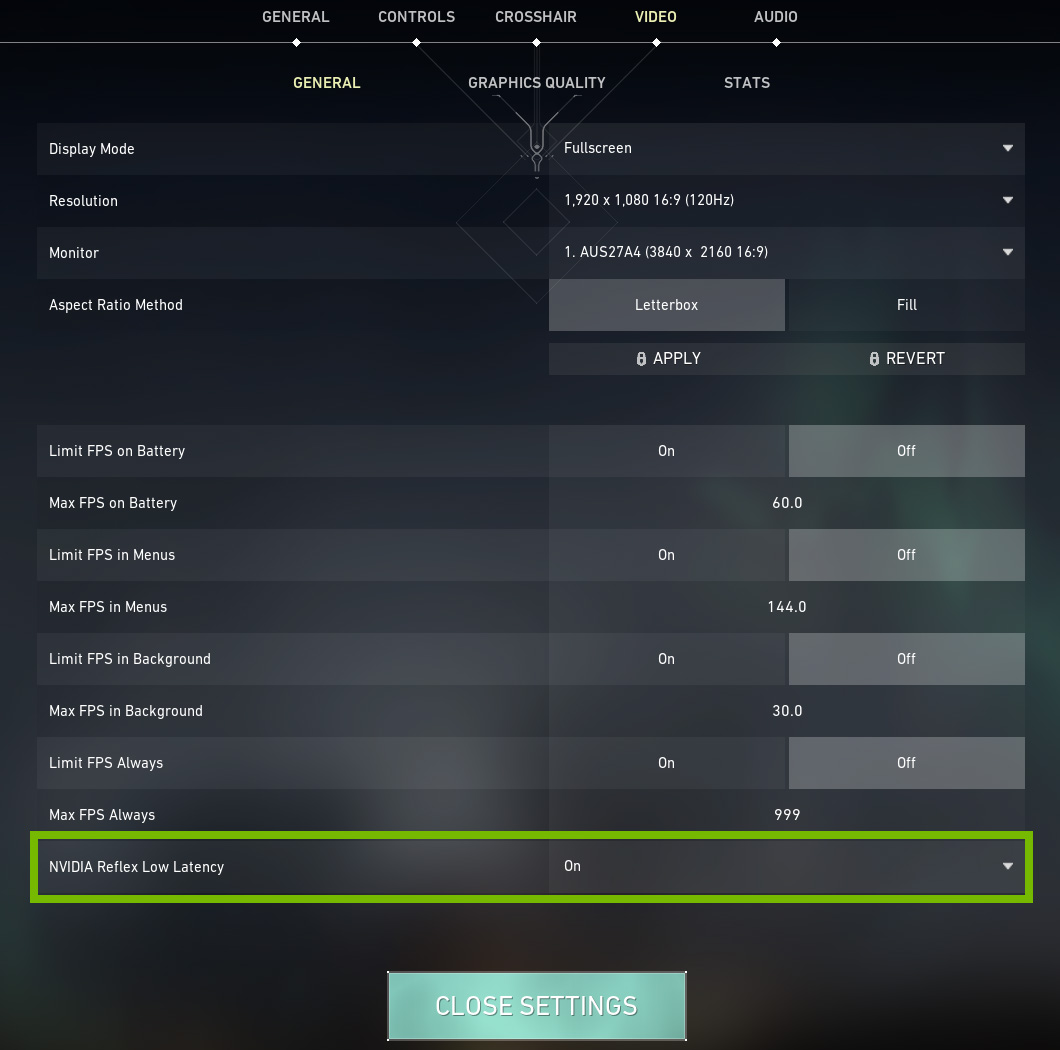
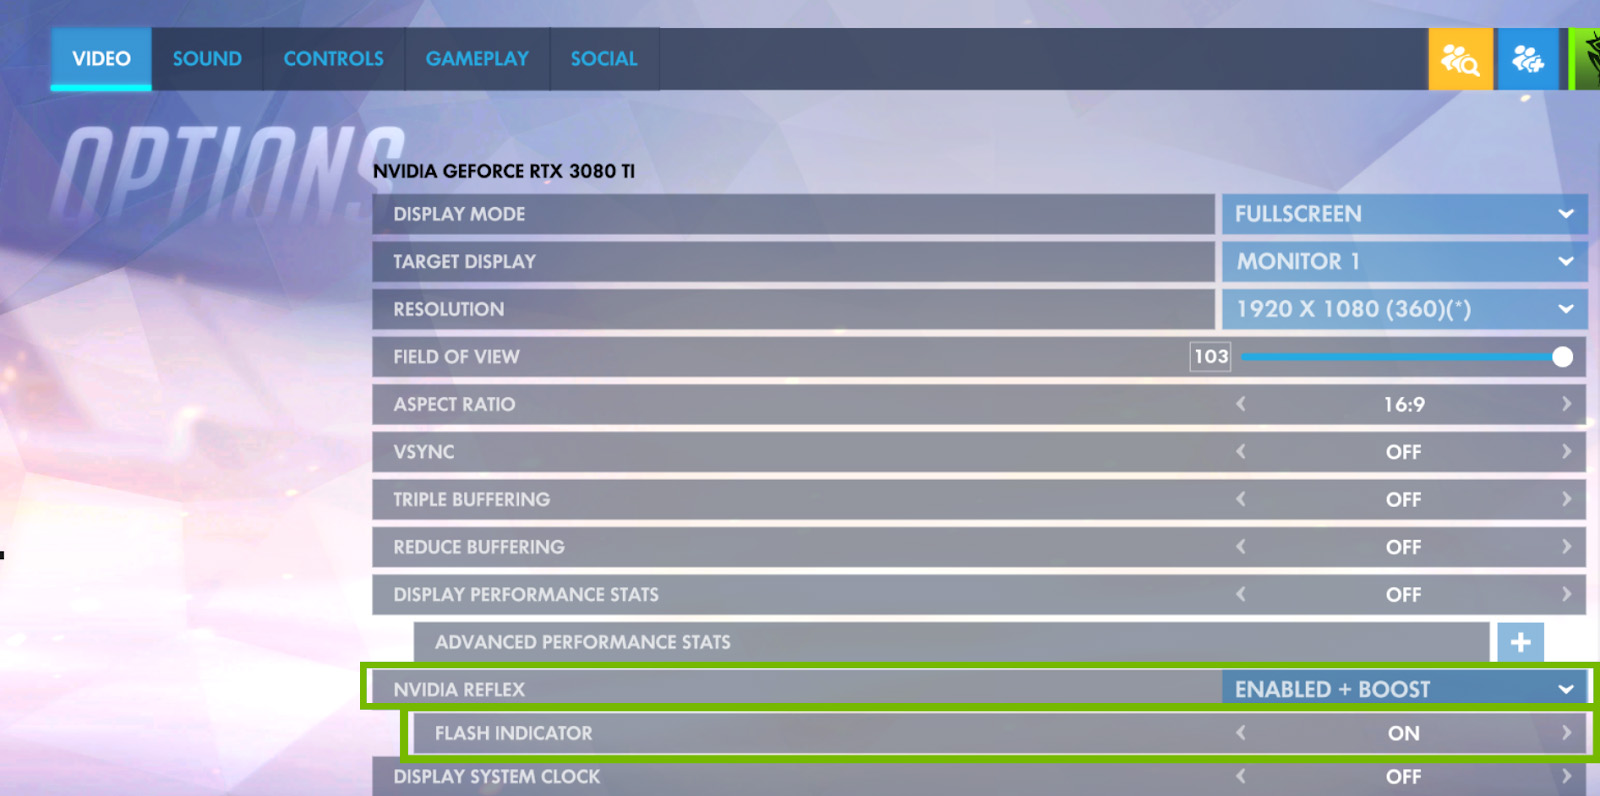
7. Enable NVIDIA Reflex – Be sure to also turn on Reflex Low-Latency mode in Graphics Options to reduce system latency to help improve competitive performance. Reflex Low-Latency mode is supported in 28 games.
-
a. For more information on Reflex enablement, refer to the game-specific help section.
8. Enable the Latency Flash Indicator – Once the supported game is launched (Auto-Configure Reflex Analyzer), find and enable the Latency Flash Indicator in the game menu. This is typically located next to the NVIDIA Reflex / Reflex Low-Latency setting in Graphics Options.
-
a. Most games require that the flash indicator be enabled in the game settings for automatic configuration. Click here to see if your game supports Auto-Configure Reflex Analyzer. If you’re playing Valorant, configuration is even easier—there’s no need to enable the flash indicator.
b. If you’re playing Fortnite or Splitgate, an additional step is necessary for enablement. For more information on flash indicator enablement, refer to the game-specific help section.
9. Press Alt+R to open the GeForce Experience Performance Overlay – Use the keyboard shortcut Alt+R to open the GeForce Experience Performance Overlay. You should now be able to see FPS and system latency measurements in real-time. That’s it!
Optional: Enable Advanced Latency Stats
You can also turn on the advanced latency performance overlay in GeForce Experience. This will allow you to see per-click mouse latency and other metrics.
To access the advanced latency overlay, ensure Reflex Analyzer is chosen.
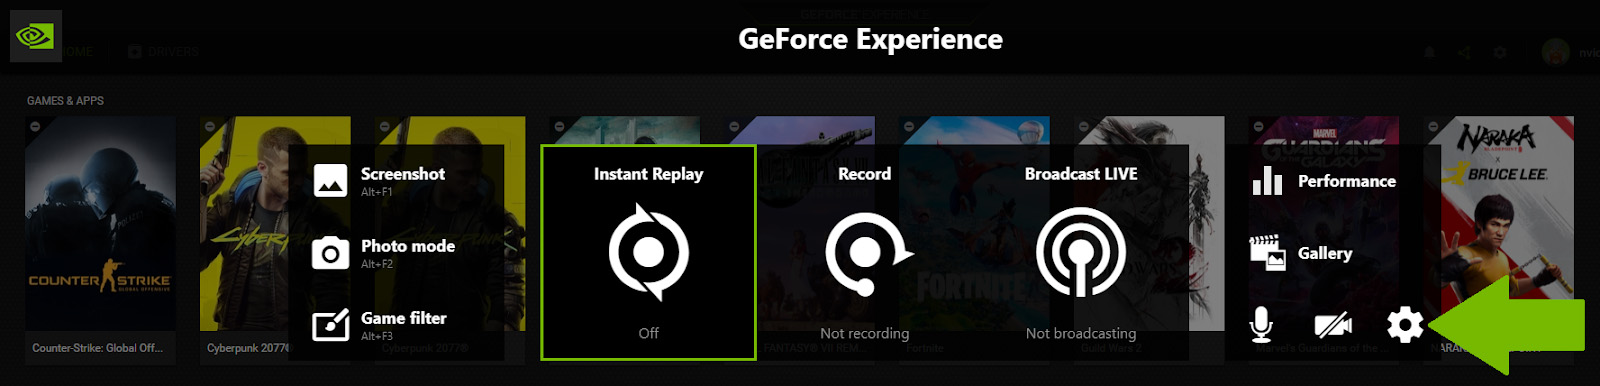
- Press ALT + Z to open the GeForce Experience in-game overlay or click
 in the app.
 - Click the Large Gear next to the microphone and camera.
- Click Hud layout.
- Click Performance.
- Ensure Reflex Analyzer is chosen.
In rare cases, the Latency Stats in the GeForce Experience Performance Overlay may stop working. If this occurs, please toggle the GeForce Experience Performance Overlay to Off by using ALT+R, then wait at least 30 seconds before toggling it back on to restore functionality.
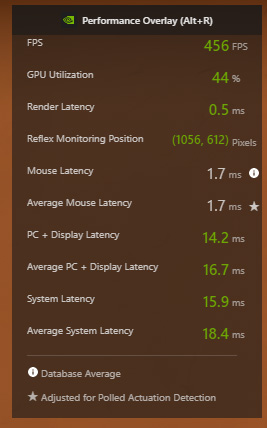
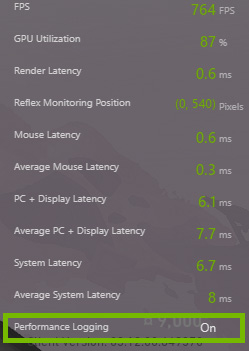
A quick breakdown of the above stats:
- FPS: Frames per second from the GPU—the measure of throughput—not latency.
- Render Latency: The time from when the frame gets in line to be rendered to when the GPU completely renders the frame.
- Reflex Monitoring Position: Monitoring rectangle’s center coordinates.
- Mouse Latency: Mouse peripheral latency only.
- PC + Display Latency: Measured from the moment the mouse click is received by the OS to the end of display latency. Monitor OSD reports this.
- System Latency: The time encompassing the whole end-to-end measurement — from the start of peripheral latency to the end of display latency (requires Reflex Analyzer supported mouse). GeForce Experience reports both PC + Display and total System Latency.
- Averages: Average results from the past 20 clicks by default. Can be configured for more clicks.
Game Specific Set Up — Enable NVIDIA Reflex & Latency Flash Indicator
VALORANT
The Latency Flash Indicator is auto-enabled in this game. Just play the game and press ALT+R!
To enable Reflex Low-Latency mode, click the cog at the top-right corner of the main menu, go to settings, and under the general tab enable NVIDIA Reflex.
Escape from Tarkov
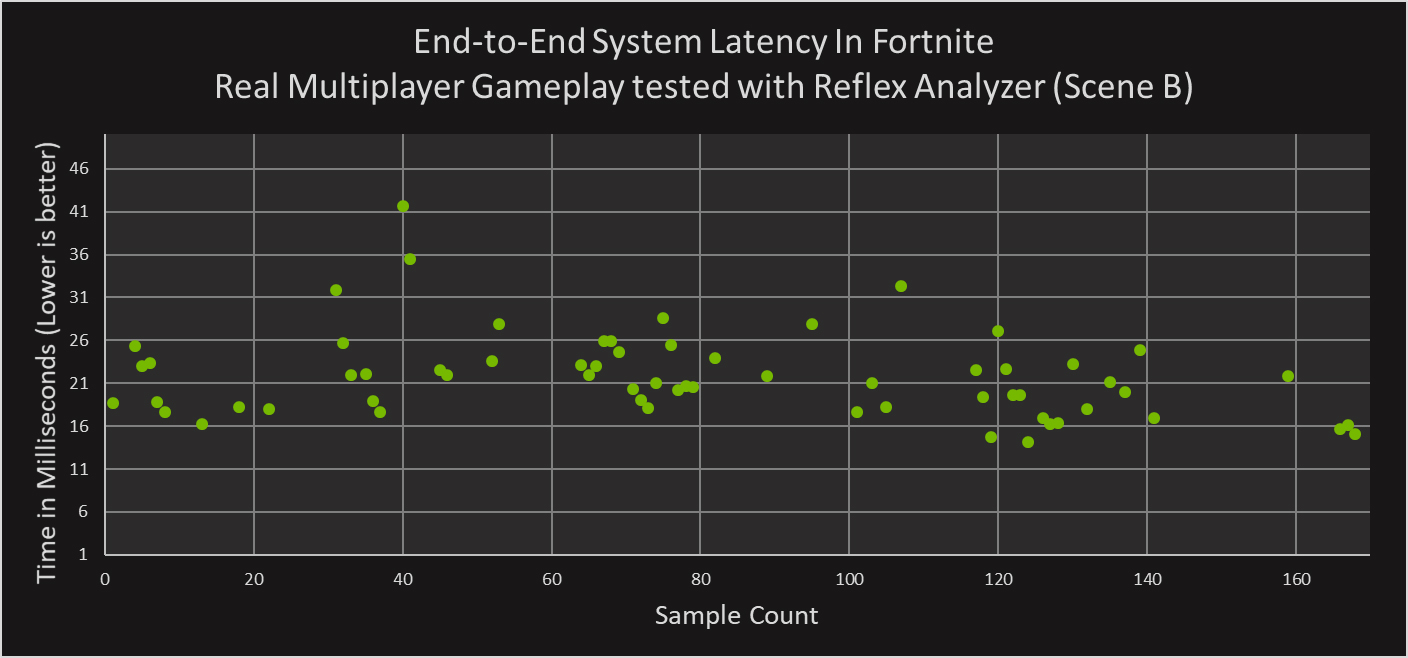
Fortnite
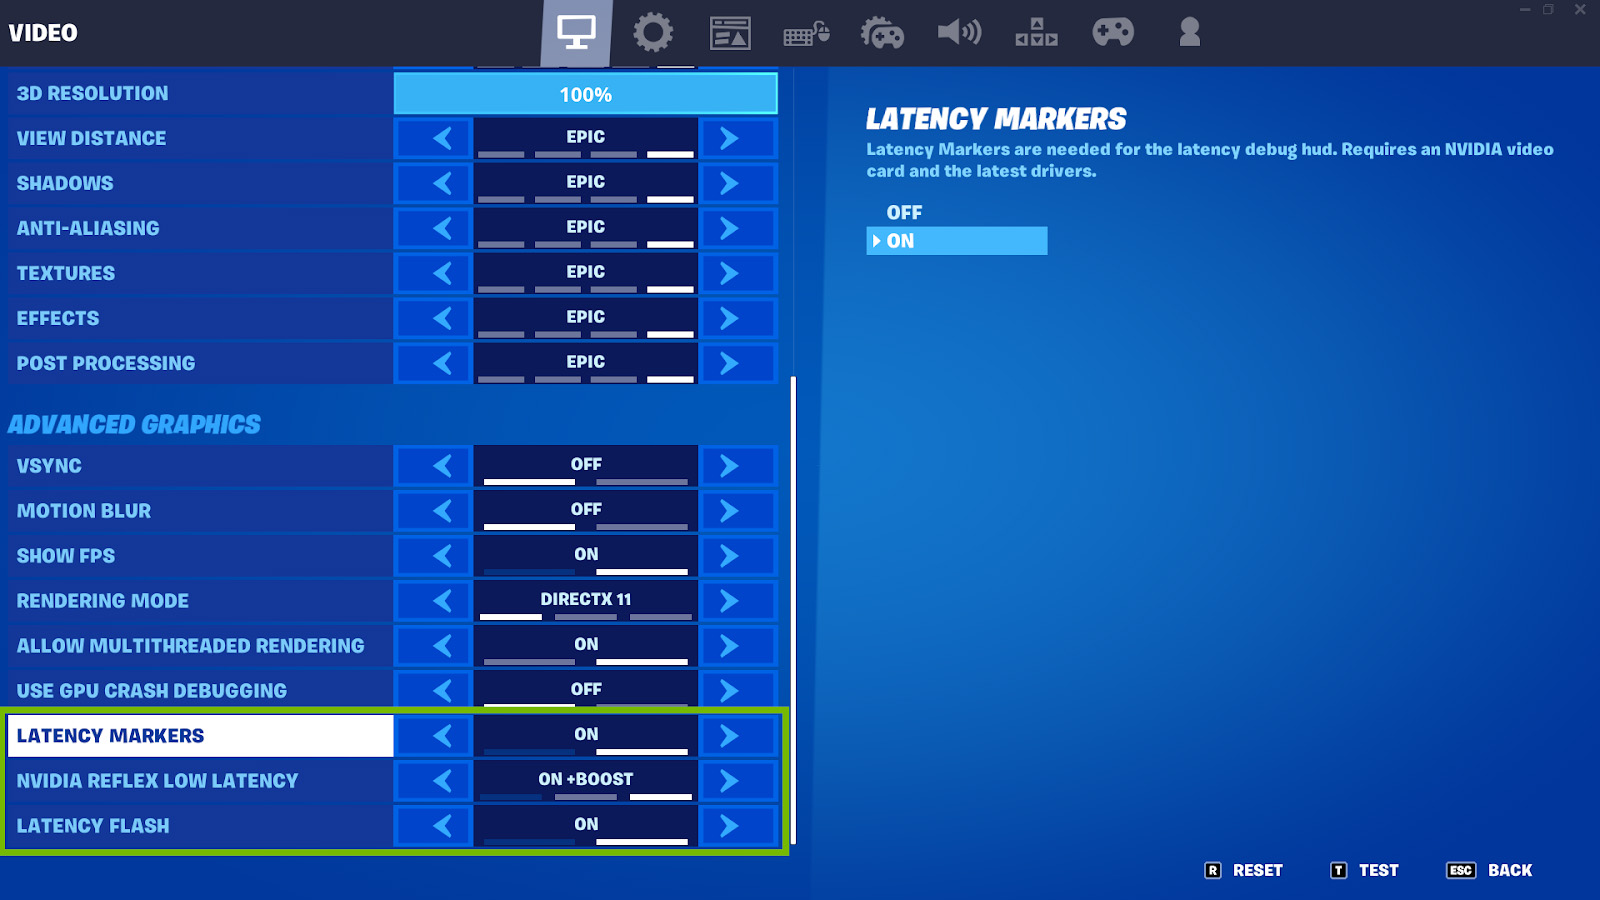
Reflex settings can be found in Settings → Video → Advanced Graphics.
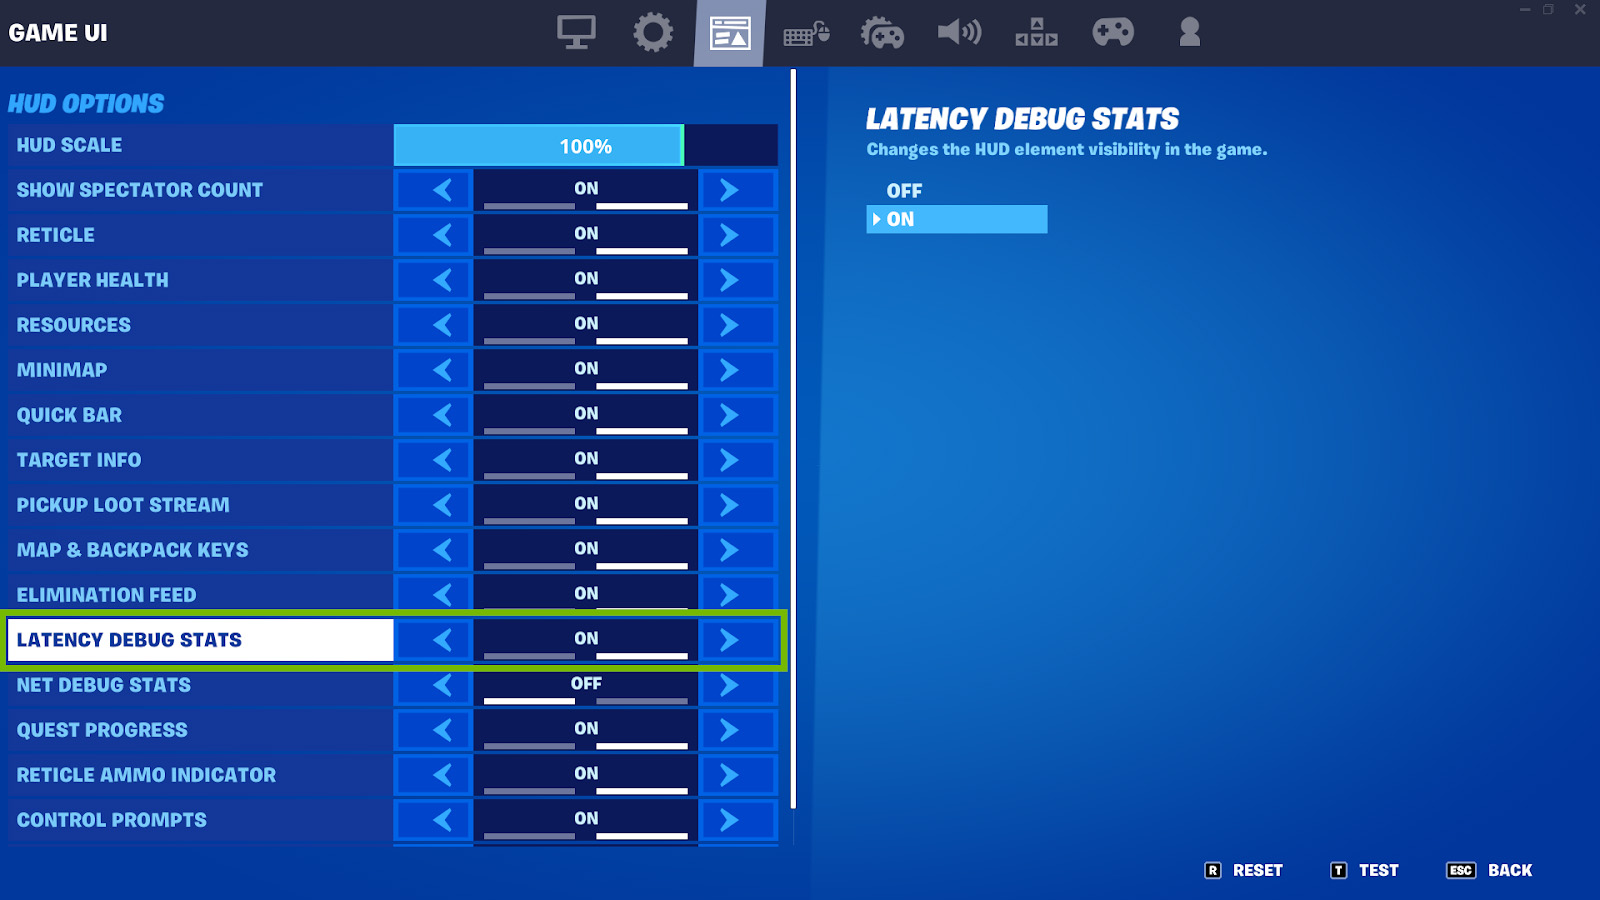
Please be sure to also enable Latency Markers and Latency Debug Stats in this game. The Latency Flash Indicator won’t work in Fortnite unless both are enabled. Please carefully review the below images to enable the latency flash indicator. Be sure all settings highlighted are enabled.
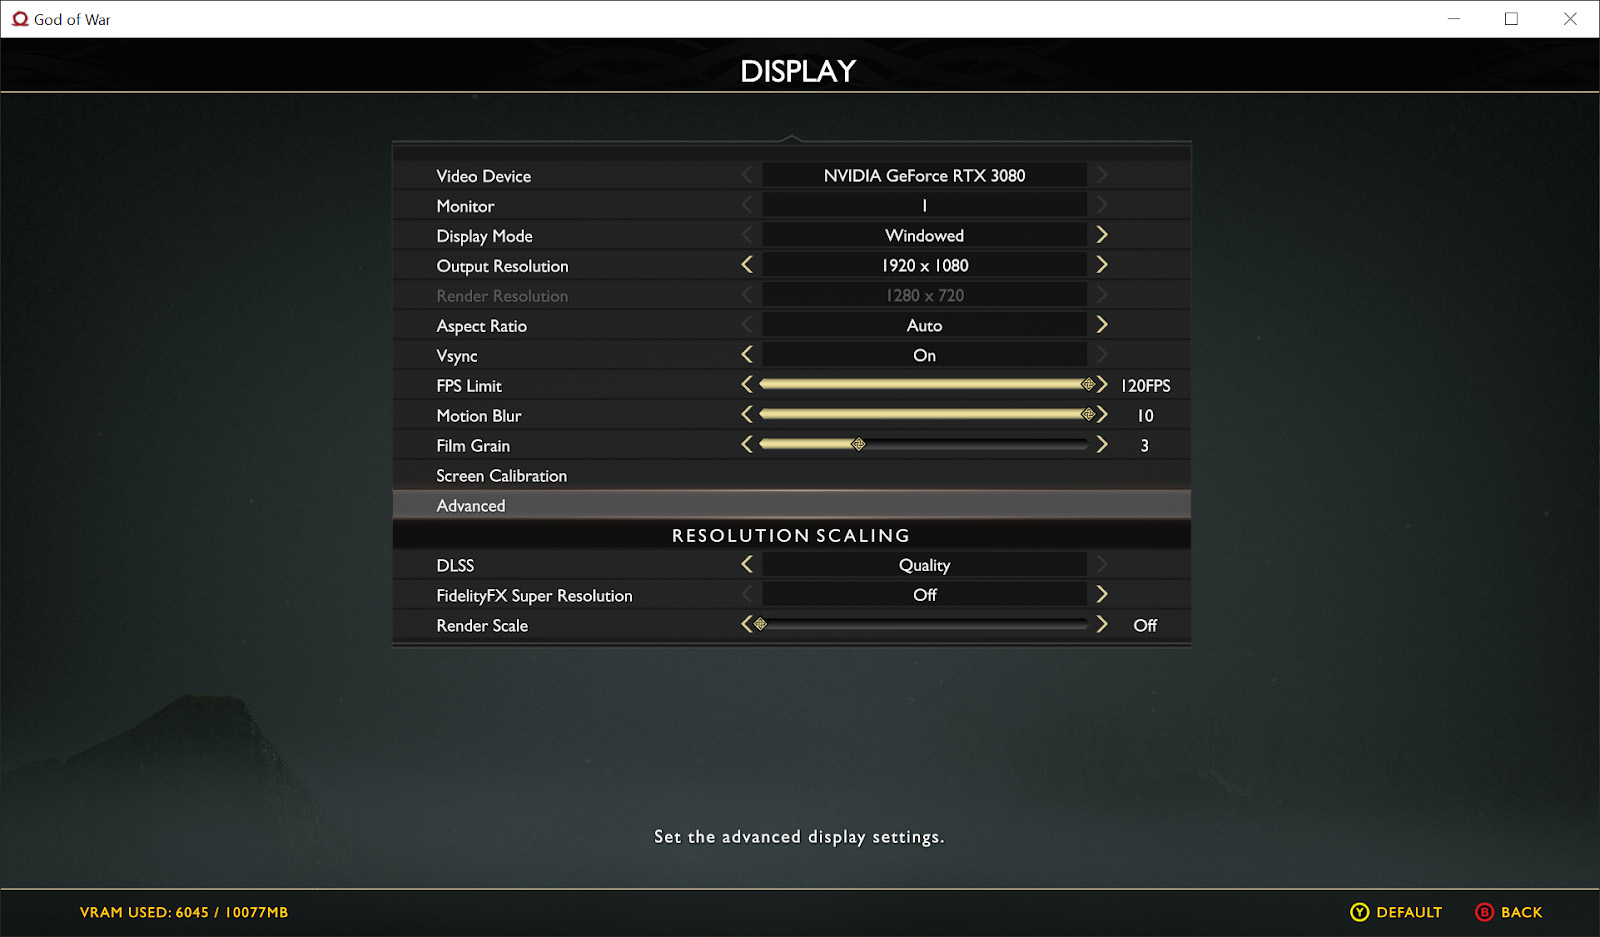
God of War
Reflex settings can be found in Settings → Display → Advanced settings.

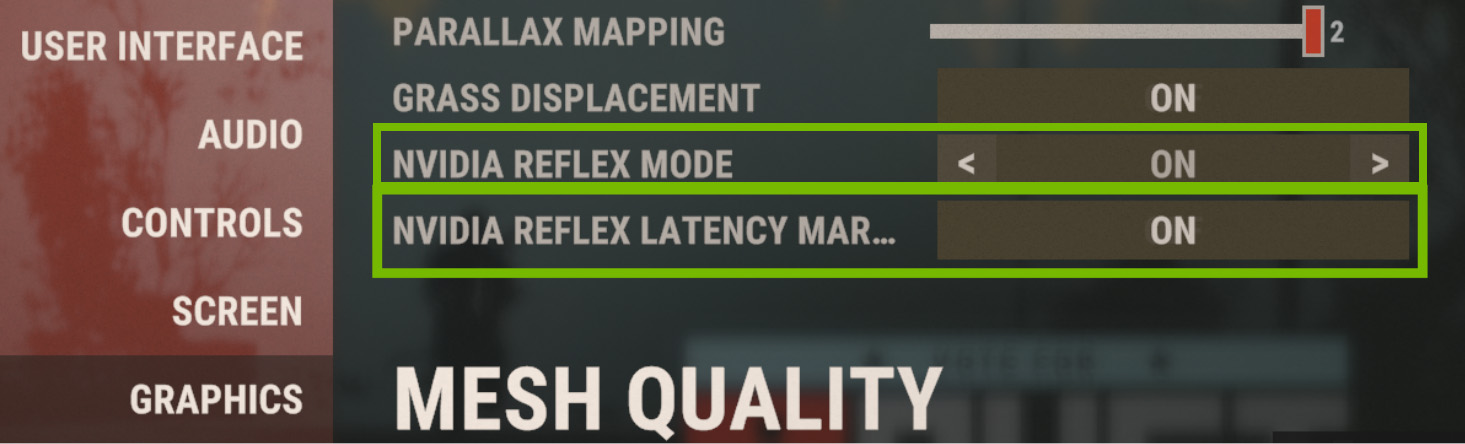
KovaaK’s
Reflex settings can be found by pressing ESC → Settings → Video.
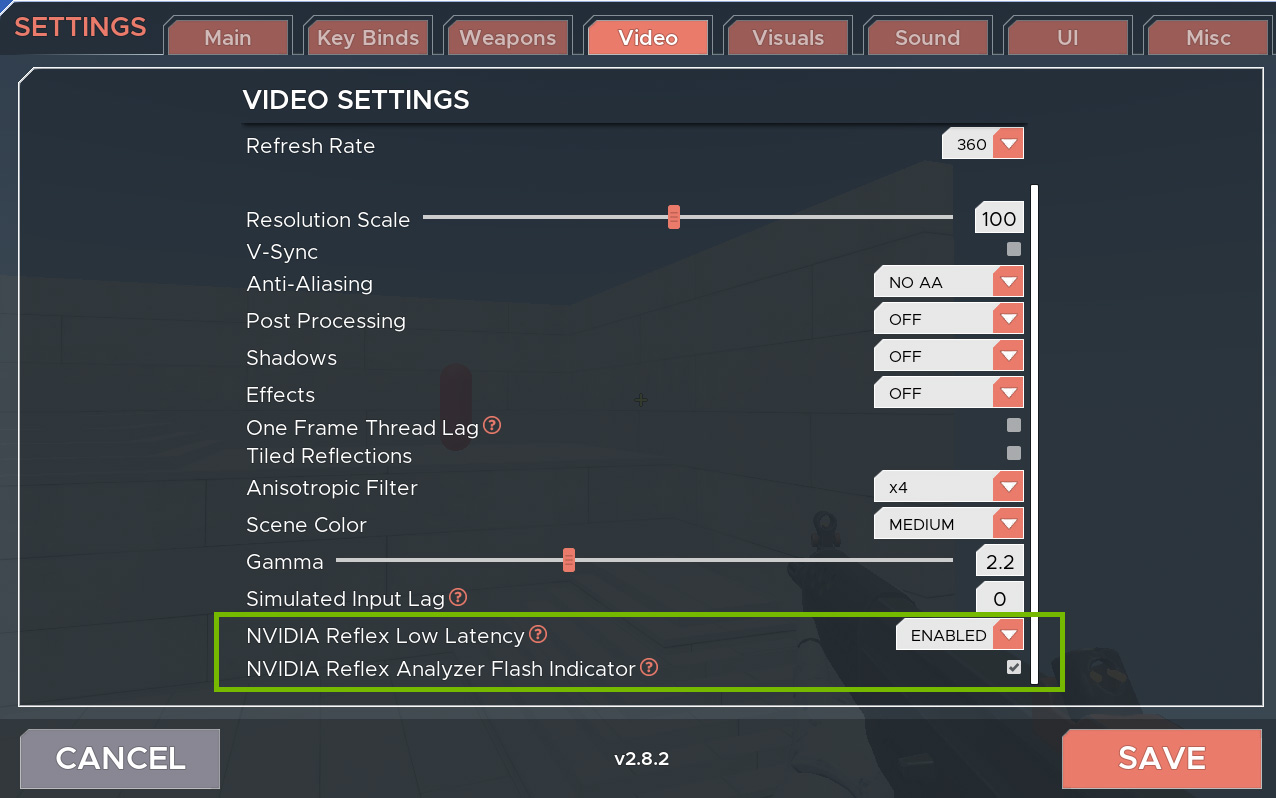
Mordhau
NVIDIA Reflex Low-Latency can be enabled by clicking the Large Gear and going to Video. Follow the next set of instructions to enable the latency flash indicator.

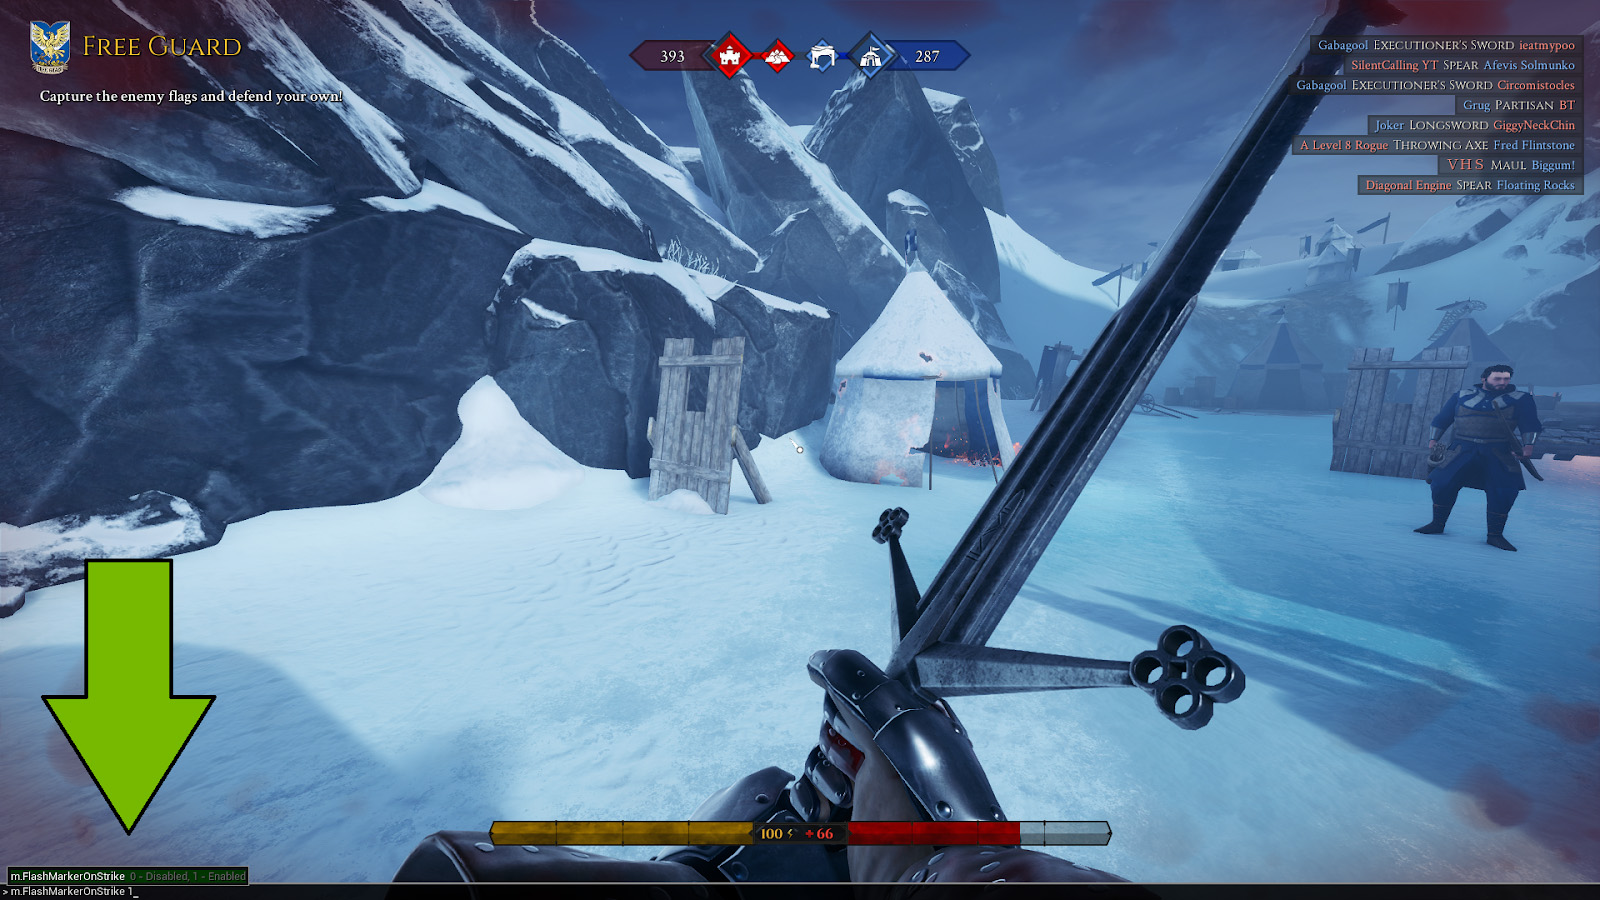
Mordau doesn’t have a UI for the latency flash indicator. Please press ~ on the keyboard to access the console and input the following command to enable it.
- m.FlashMarkerOnStrike 1
Overwatch
Rainbow Six Siege
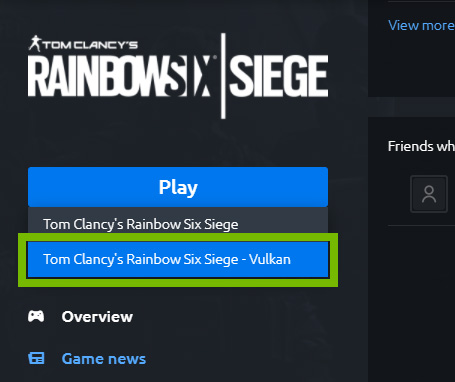
Currently, Reflex is only available in this game from the Ubisoft Connect store with Vulkan API selected.

Rust
Splitgate
Reflex settings can be found in Video → Advanced settings.
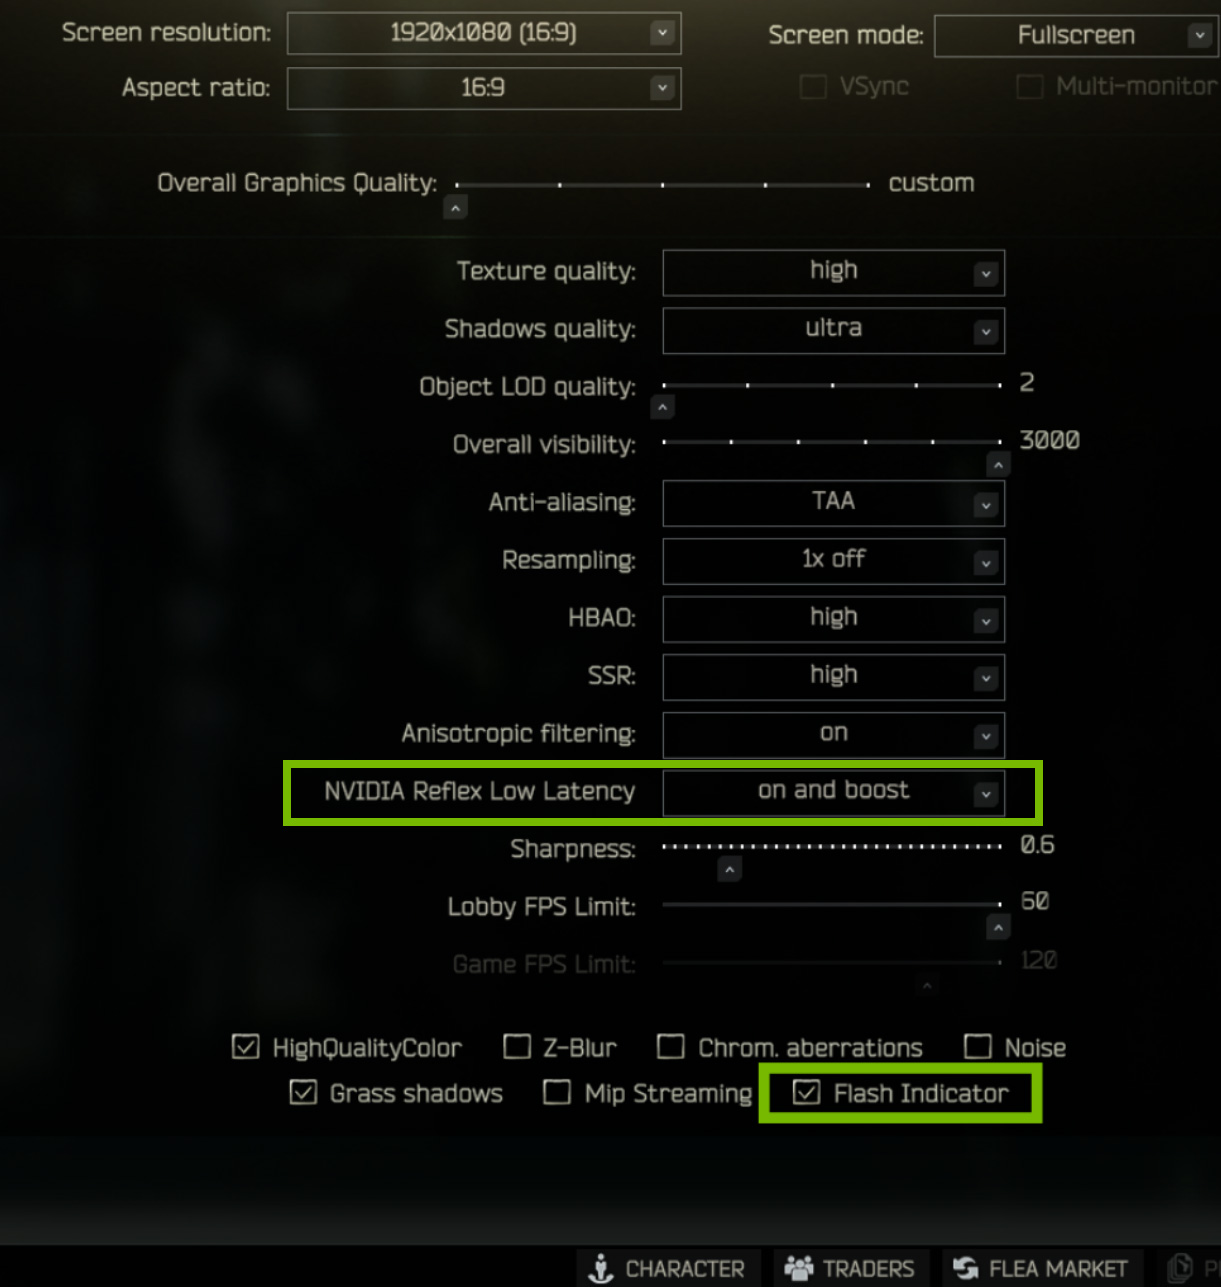
Please be sure to also enable Latency Markers in this game. The Latency Flash Indicator won’t work in Splitgate unless both are enabled. Please carefully review the below image to enable the latency flash indicator. Check both boxes.

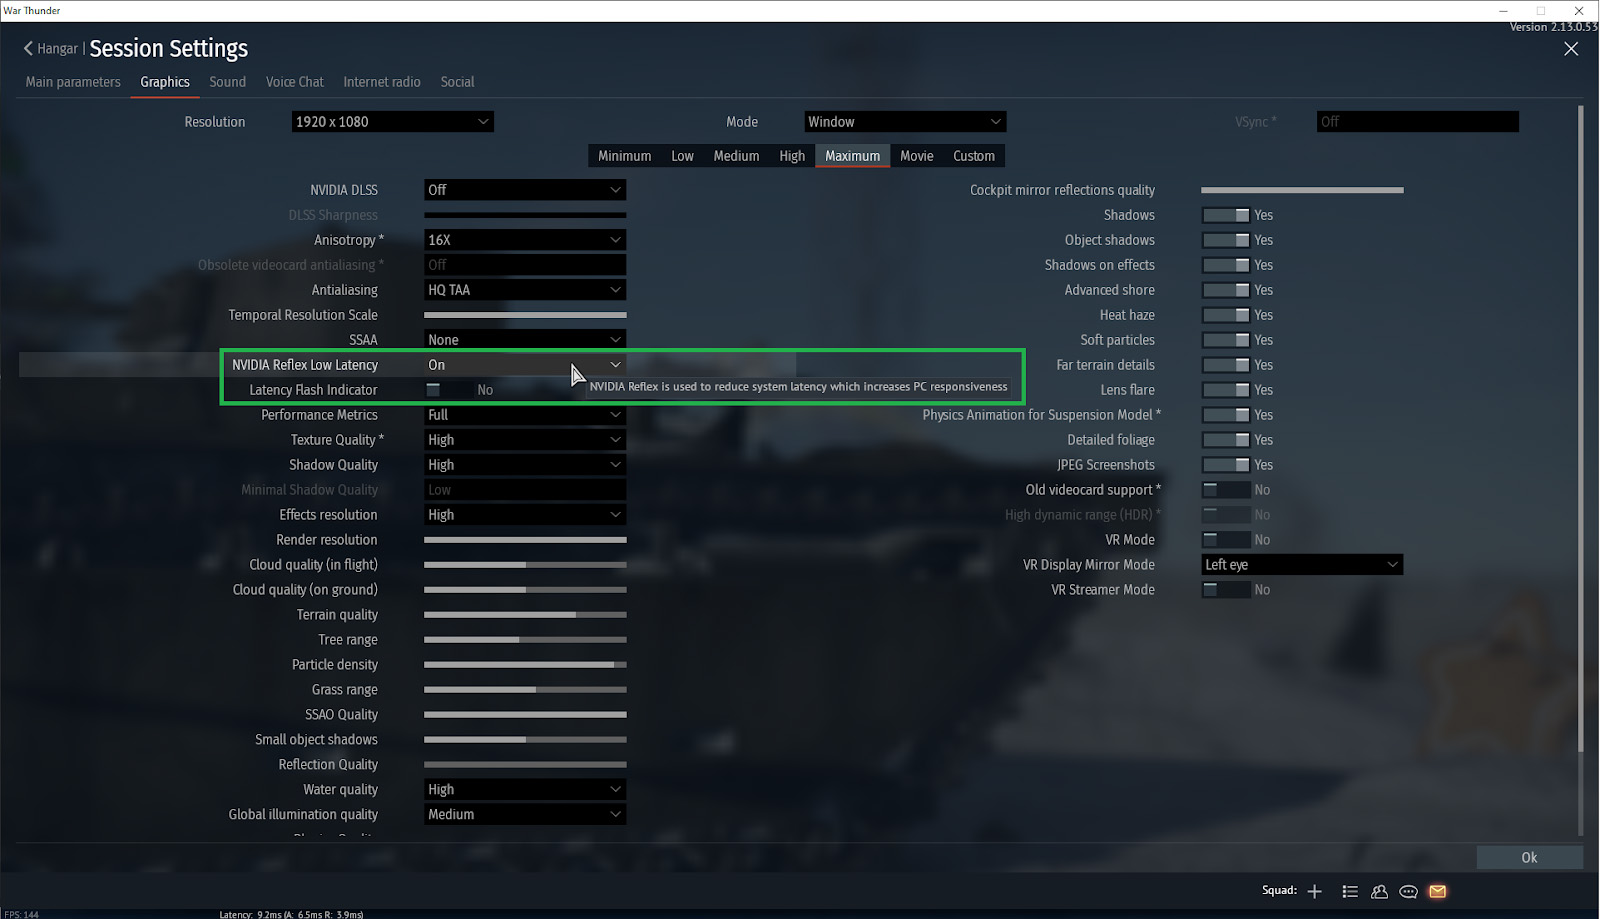
War Thunder
Reflex settings can be found in Settings → Graphics.
Logging & Charting Data
1. You can also capture latency and other performance metrics to a .csv file.
-
a. Press ALT + Z to open the GeForce Experience in-game overlay or click
b. Click the Large Gear next to the microphone and camera.
d. Scroll down to the Performance section.
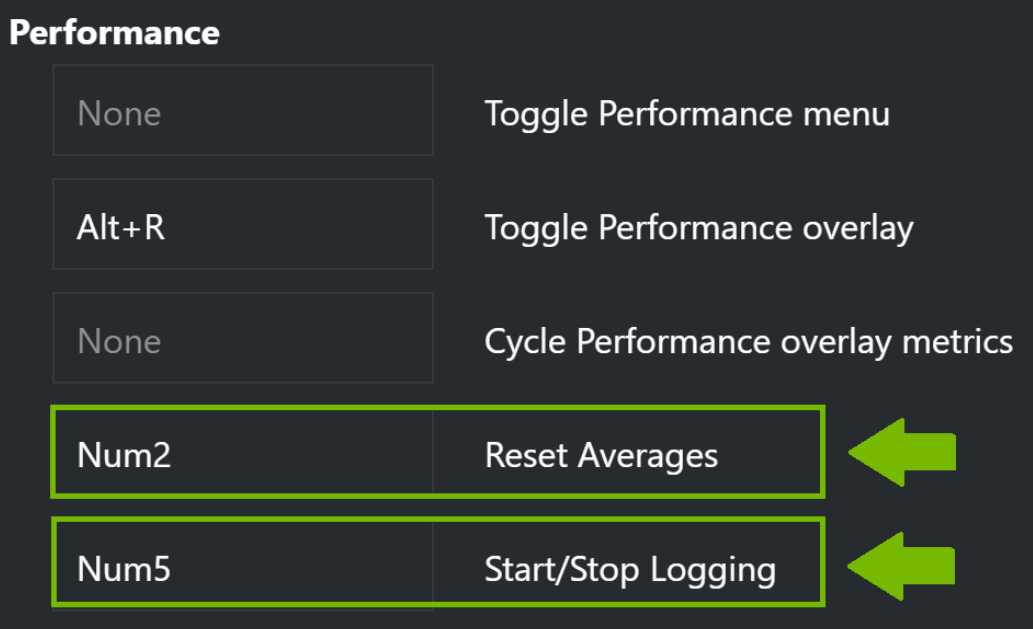
e. Create a shortcut for Start/Stop Logging.
f. NOTE: Also create a shortcut for Reset Averages.
2. Press the user defined shortcut that you created to begin logging both latency and performance data.
3. Press again to stop and save the file to Documents.
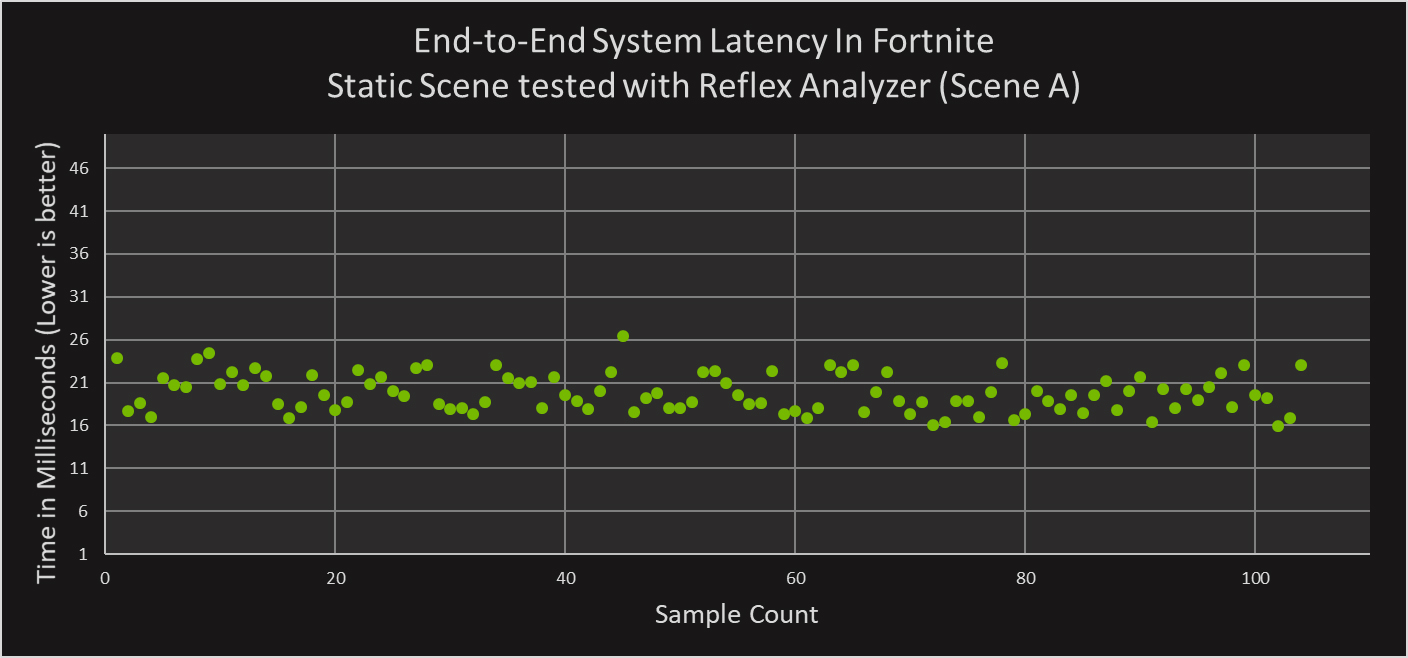
Reflex Analyzer is the perfect tool for checking system latency performance. You can set up a controlled testing environment in a custom match or training mission, or just play the game as you would normally to see real-time system latency performance with every click of your mouse.
Reflex Analyzer Manual Configuration
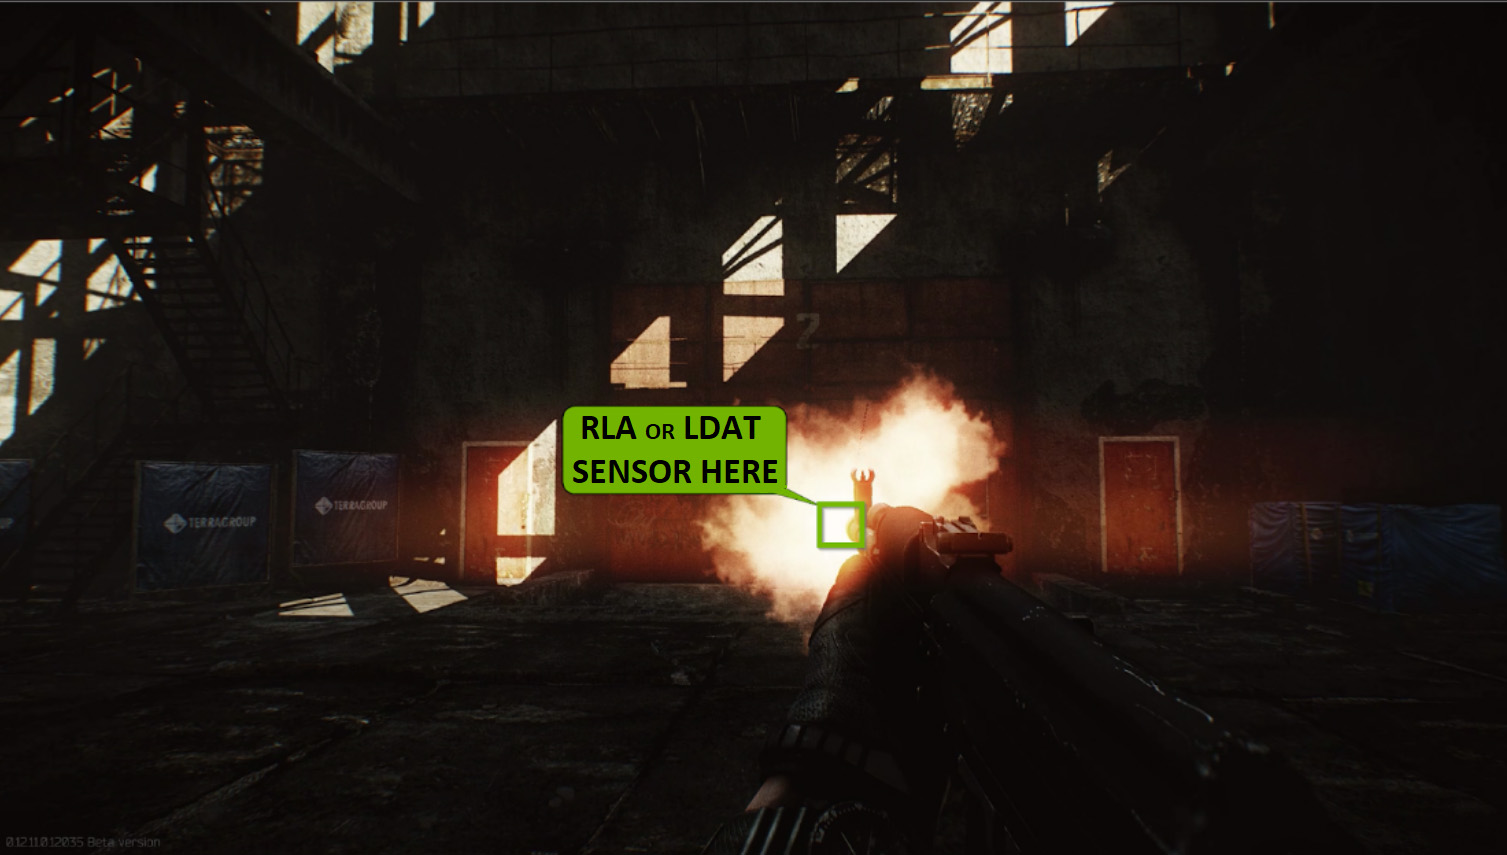
If you'd like to test other games that don't support the latency flash indicator, you can do that too. Simply place the Reflex Analyzer monitoring rectangle on a muzzle flash or other instantaneous animation. Occasionally, it will be necessary to rebind a game action to left mouse click.
1. To manually use Reflex Analyzer without Reflex Analyzer Automatic Configuration:
-
a. Press ALT + Z to open the GeForce Experience in-game overlay or click
c. Click Performance Monitoring.
d. Disable the setting “Configure Reflex Analyzer”

2. Now navigate to the G-SYNC Processor settings in the monitor OSD using the joystick.
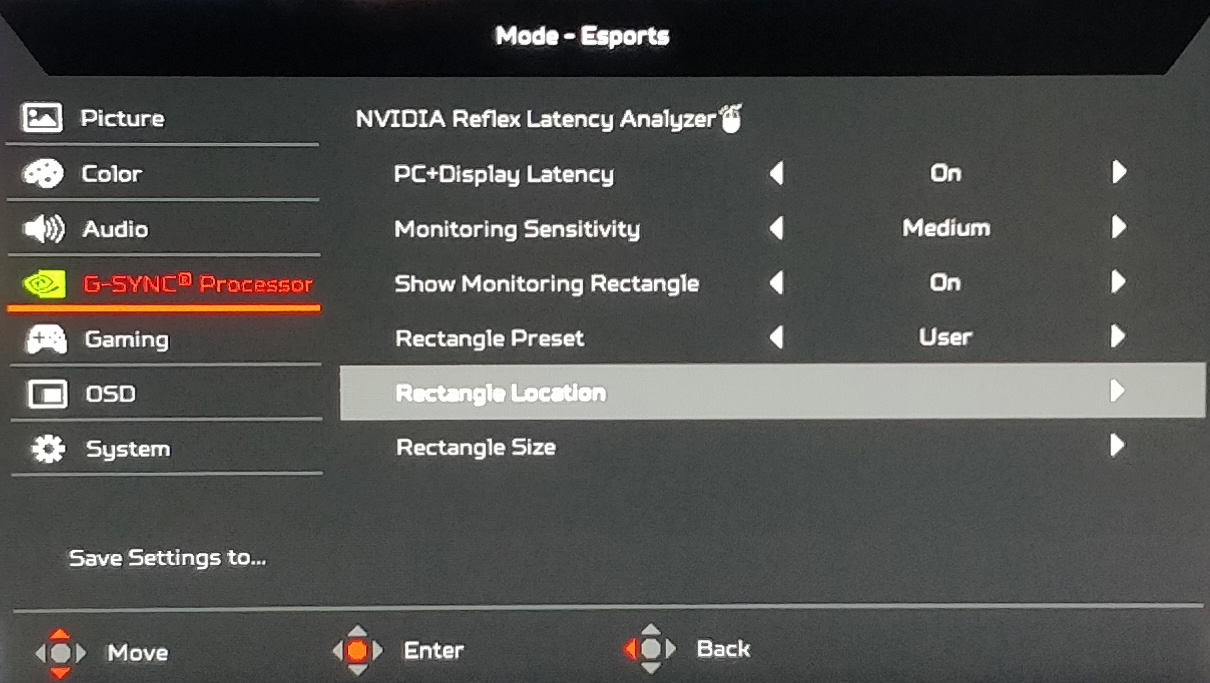
a. Set PC + Display Latency to On.
b. Adjust the monitoring rectangle location and monitoring rectangle size to fit within the game animation that you want to test, such as a muzzle flash from when firing a gun.
Reflex Analyzer: Available Now In G-SYNC Esports Displays
For the first time ever, gamers can accurately discern their end to end system latency, helping them modify their systems and game settings for a superior, more competitive experience. Check out our in-depth latency optimization guide that will help you get started and optimize your system for the lowest latency.
Grab a G-SYNC Esports Display today to start testing for yourself!