NVIDIA Video Generation Guide
By Joel Pennington on March 17, 2026
|
Generating AI video with just a text prompt gives you limited control over the results. This guide will help you get fine-grained control of the output, and ensure your workflow is running as fast as possible with RTX GPUs.
This guide shows users how to generate a storyboard for the video you want to create, and turn it into a 4K high quality video, all with control of the composition, look and style. We start by generating a 3D scene to guide our composition, then turn it into photorealistic images, and then use those images as the first and last frames to generate a video. The video will then be upscaled up to 4K resolution using the NVIDIA RTX Video Super Resolution upscaler. The result is a high-resolution, AI-generated clip that follows your exact composition, camera angle and subject motion.
Getting Started
The NVIDIA Video Generation workflow runs locally on your RTX GPU using Blender, ComfyUI, generative AI models like FLUX.1 from Black Forest Labs and LTX-2.3 from Lightricks, and the new RTX Video Super Resolution upscaler node available now in ComfyUI.
The workflow is broken down into three steps – a blueprint for generating 3D objects from text prompts, a blueprint for using these assets as depth shaders used to control image-gen composition, and a workflow in ComfyUI that uses first and last frame images to generate video from text prompts and upscale the output using RTX Video.
| 3D Object Generation Blueprint
|
3D Guided Generative AI Blueprint
|
LTX-2.3 FirstFrame/LastFrame ComfyUI Template
|
| Describe your objects, get previews, pick what you want. Uses Llama 3.1 8B, NVIDIA SANA, and Microsoft TRELLIS.
|
Lay out your scene in Blender and generate start and end frames from your viewport using FLUX.1. Non-commercial only. Contact Black Forest Labs for commercial use.
|
Turn your keyframes into a video in seconds using LTX-2.3. Then Upscale your video in seconds using ComfyUI's new RTX Video Super Resolution Node.
|
Creators can pick and choose which part of the blueprint they want to use. If you are going to use the full pipeline, we recommend creators work through each step before moving to the next for best performance by ensuring full system resources are available.
If you’re new to ComfyUI, follow this guide to get up to speed: How to Get Started With Visual Generative AI on NVIDIA RTX PCs | NVIDIA Blog
Download and setup instructions for each blueprint or workflow:
- 3D Object Generator blueprint: Follow the instructions on this GitHub (NVIDIA-AI-Blueprints/3d-object-generation)
- 3D Guided Generative AI blueprint: Follow the instructions on this GitHub (NVIDIA-AI-Blueprints/3d-guided-genai-rtx)
- LTX-2.3 FirstFrame/LastFrame + RTX Video upscaler ComfyUI template via ComfyUI template browser (when available) or via GitHub.
System requirements:
- GPU: 16GB of VRAM (NVIDIA GeForce RTX 5070 Ti or higher recommended)
- OS: Windows 11
- System RAM: 64GB
User guide
Step 1: Generate Your Scene Assets and Build Your Scene
Generate assets using the 3D Object Generation blueprint either standalone or in Blender 4.2.
Here’s a reminder how to start it standalone in a PowerShell or command prompt:
C:\3d-object-generation
conda activate 3dwithtrellis311
python app.py
Once running, visit http://127.0.0.1:7860 and start generating. Type a description of the scene you want to build. The below example uses “spaceship bridge” to re-create a retro futuristic puppeteering clip.
3D Object Generator Gradio UI
Run it a few times to create a large collection of assets for my layouts. Users can also model directly in Blender, and find props online. Make sure all assets are saved in the same folder.
Open the sample Blender file that comes with the Blueprint (Documents >> Blender Select the MotorCycle_FF_LF.blend file), delete the props and set decoration in it, and then use the Asset Importer Add-on to pull all your content into Blender in one go. You may need to apply a scale factor to your objects. 10x is a good recommendation.
The layout you establish here matters. Camera angle, scene depth, and subject position will all carry through directly into your generated video.
Step 2: Setup Blender for Image Generation and Make Your First Keyframe
You already went through the installation process for the ComfyUI Blender AI node, so now we just need to make sure it’s set up and ready to run. Open Blender 4.5 LTS and open the 3D scene you built or edited earlier. Since you modified the sample scene, you should already see the ComfyUI Blender AI Node (ComfyUI x Blender) add-on on the right side of the viewport. Before pressing the Launch/Connect to Comfy, make sure the ComfyUI nodes are correctly populated do this for both first and last frame ComfyUI graphs:
- UNET Loader
- unet Name
- DualCLIPLoader
- clip_name1
- clip_name2
- KSampler
- sampler_name
- scheduler
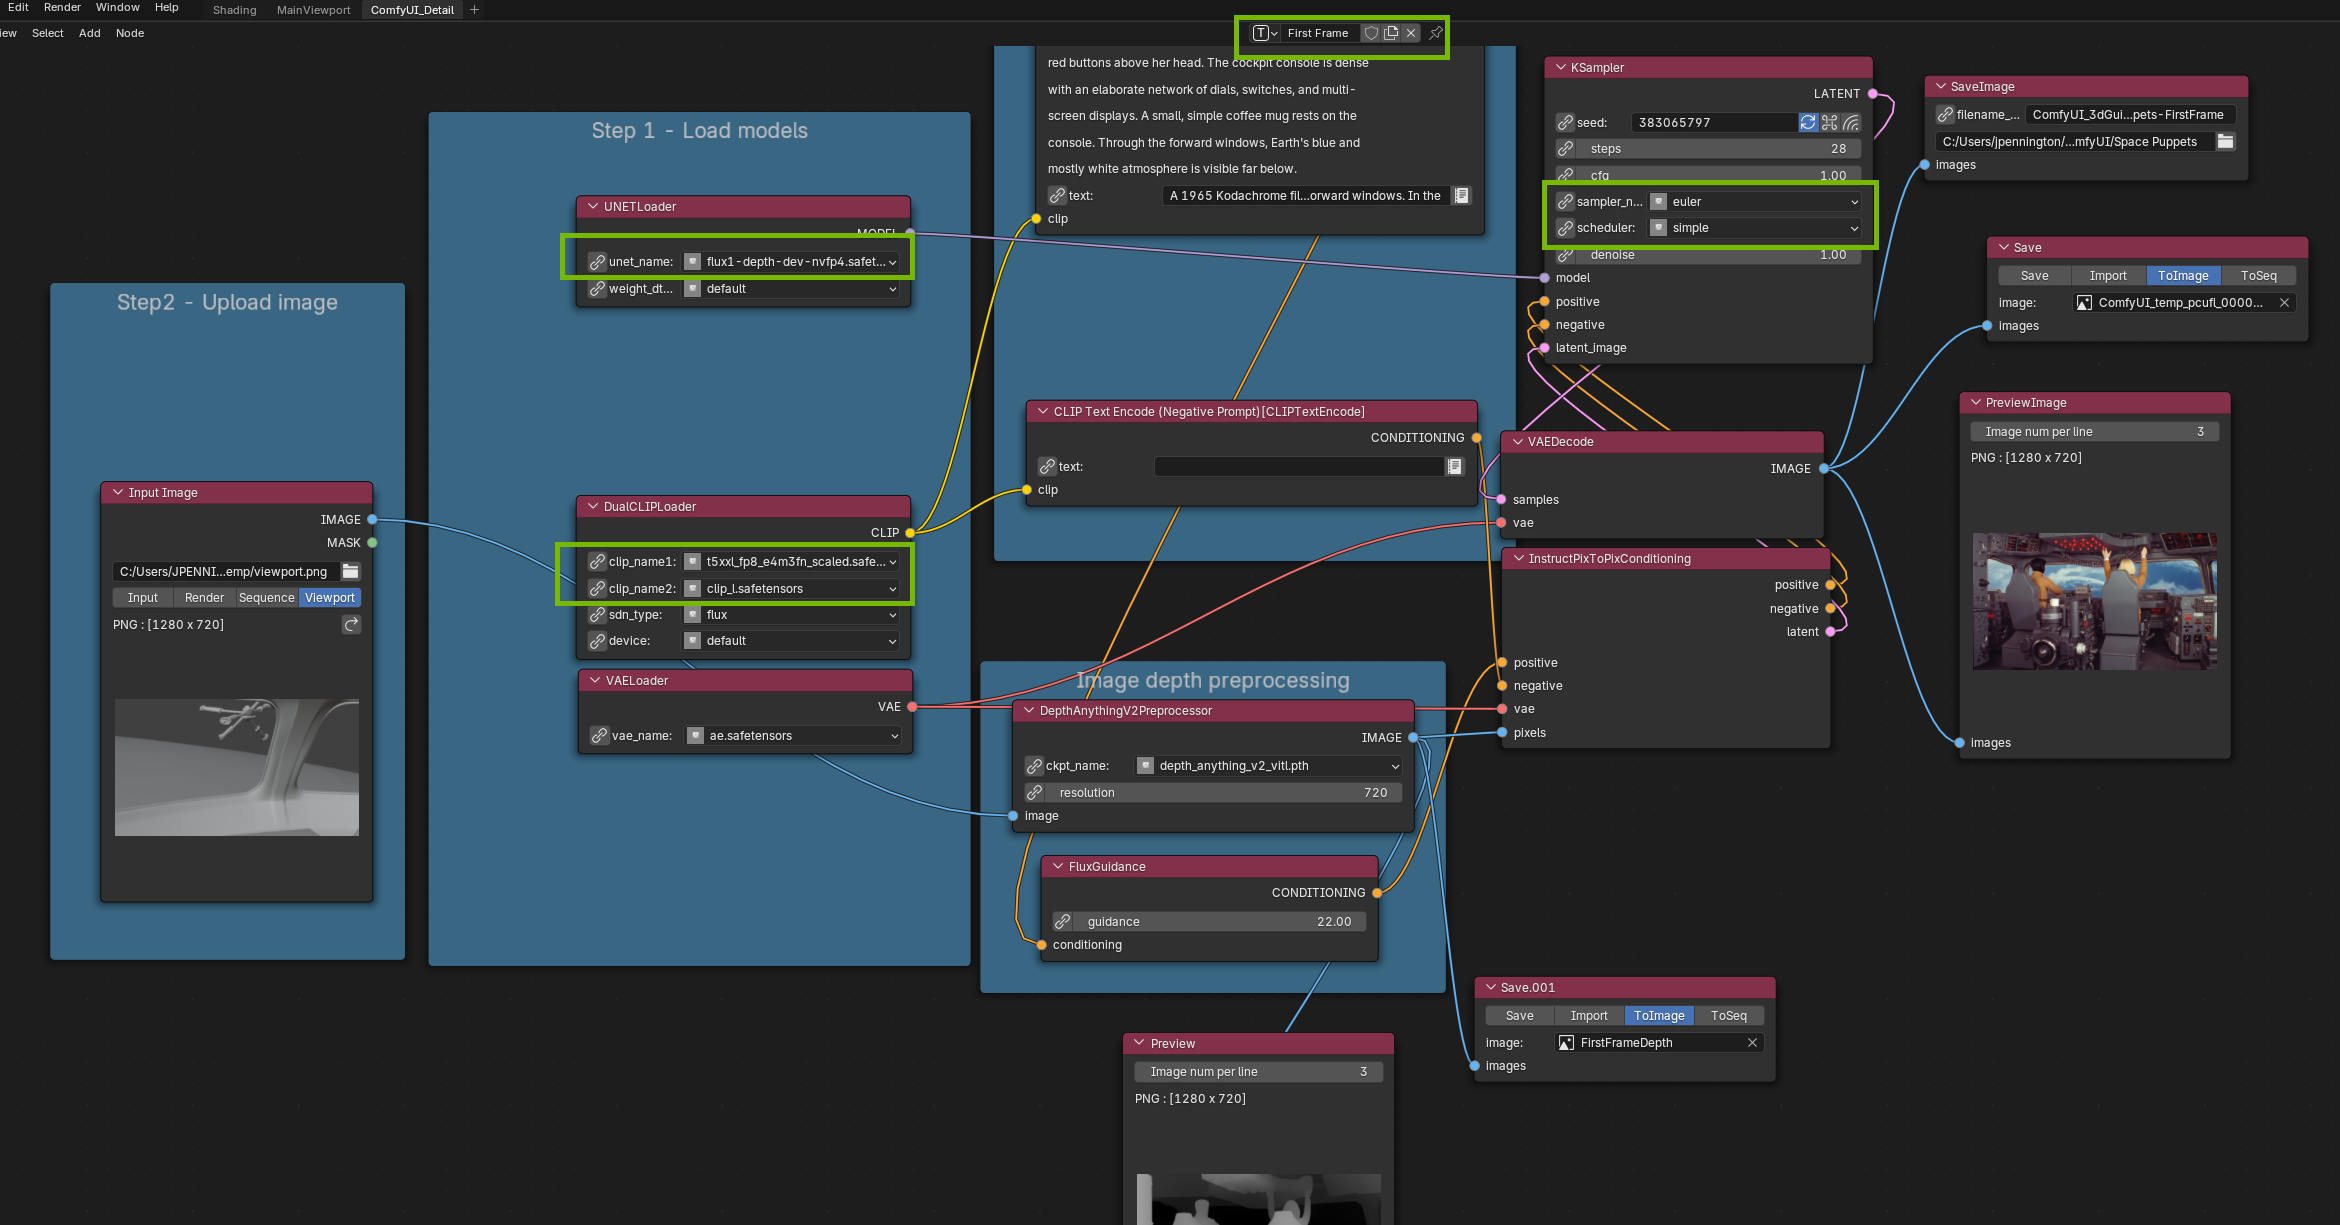
ComfyUI Node View in Blender
Press the Red Launch/Connect to ComfyUI button on the add-on, wait 30-60 seconds for Comfy to load and then pick your composition for your first frame and press “Run.” The image will save on disk according to the SaveImage Node in the ComfyUI graph.
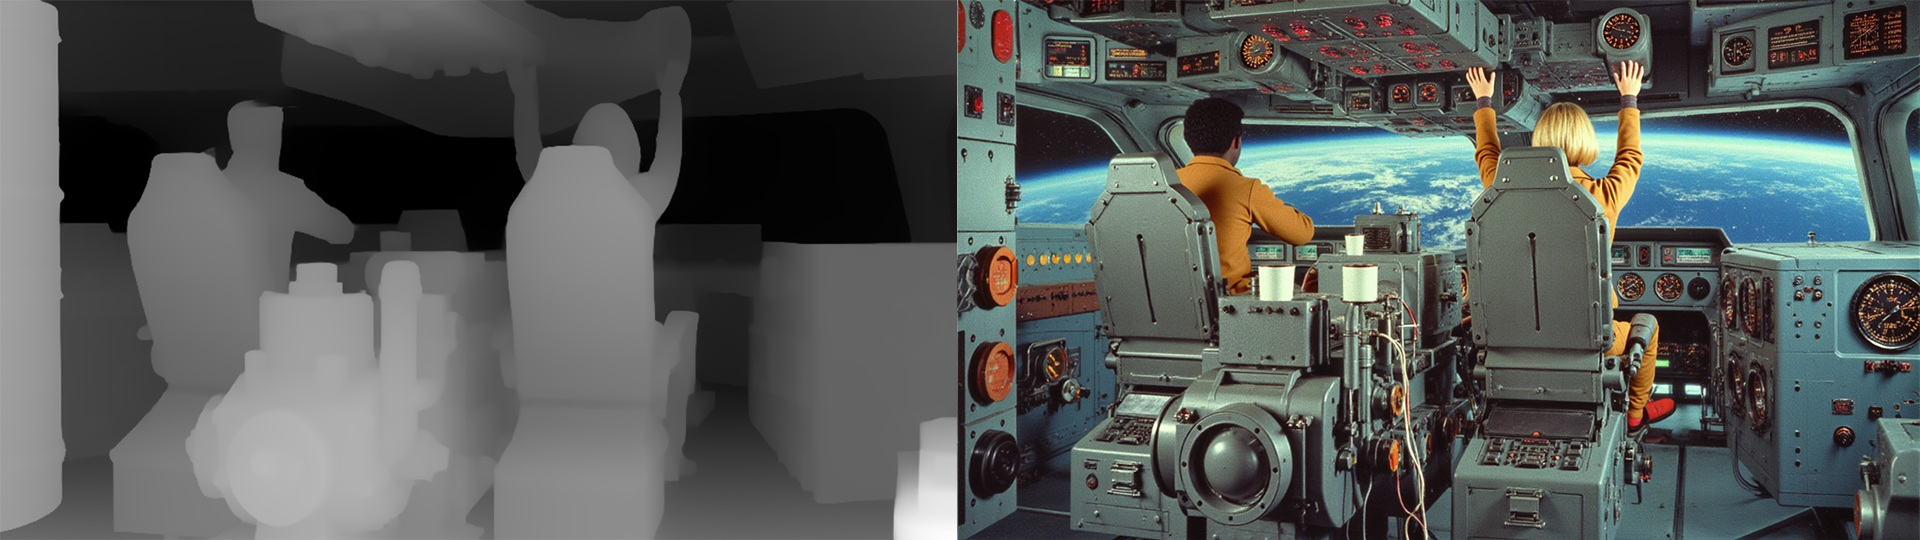
What’s happening is this graph will generate a depth map from your Blender scene (a grayscale image that encodes how far each element is from the camera) and combine it with your text prompt to generate a photorealistic image that matches your exact layout and perspective. It uses ComfyUI embedded in Blender. Image generation uses FLUX.1 Depth, accelerated by NVFP4 on RTX.
Enter your prompt and run.
Step 3: Generate Your Last Keyframe
In Blender, if you have an animated scene, scrub to the point in time of your animation you determine as the end. If you have a static scene, then grab a second camera and place it, plus move other objects where you’d like the motion to end. The below example uses a second camera that’s moved forward to the windows so it could get a shot of the space station:

3D Viewport in Blender showing set and first and last camera views
Make changes to generate a last frame:
- Change the 3D Guided add-on top menu to last frame, and add a text prompt.
- Change the ComfyUI window top menu to last frame
- Edit the file name to distinguish last frame
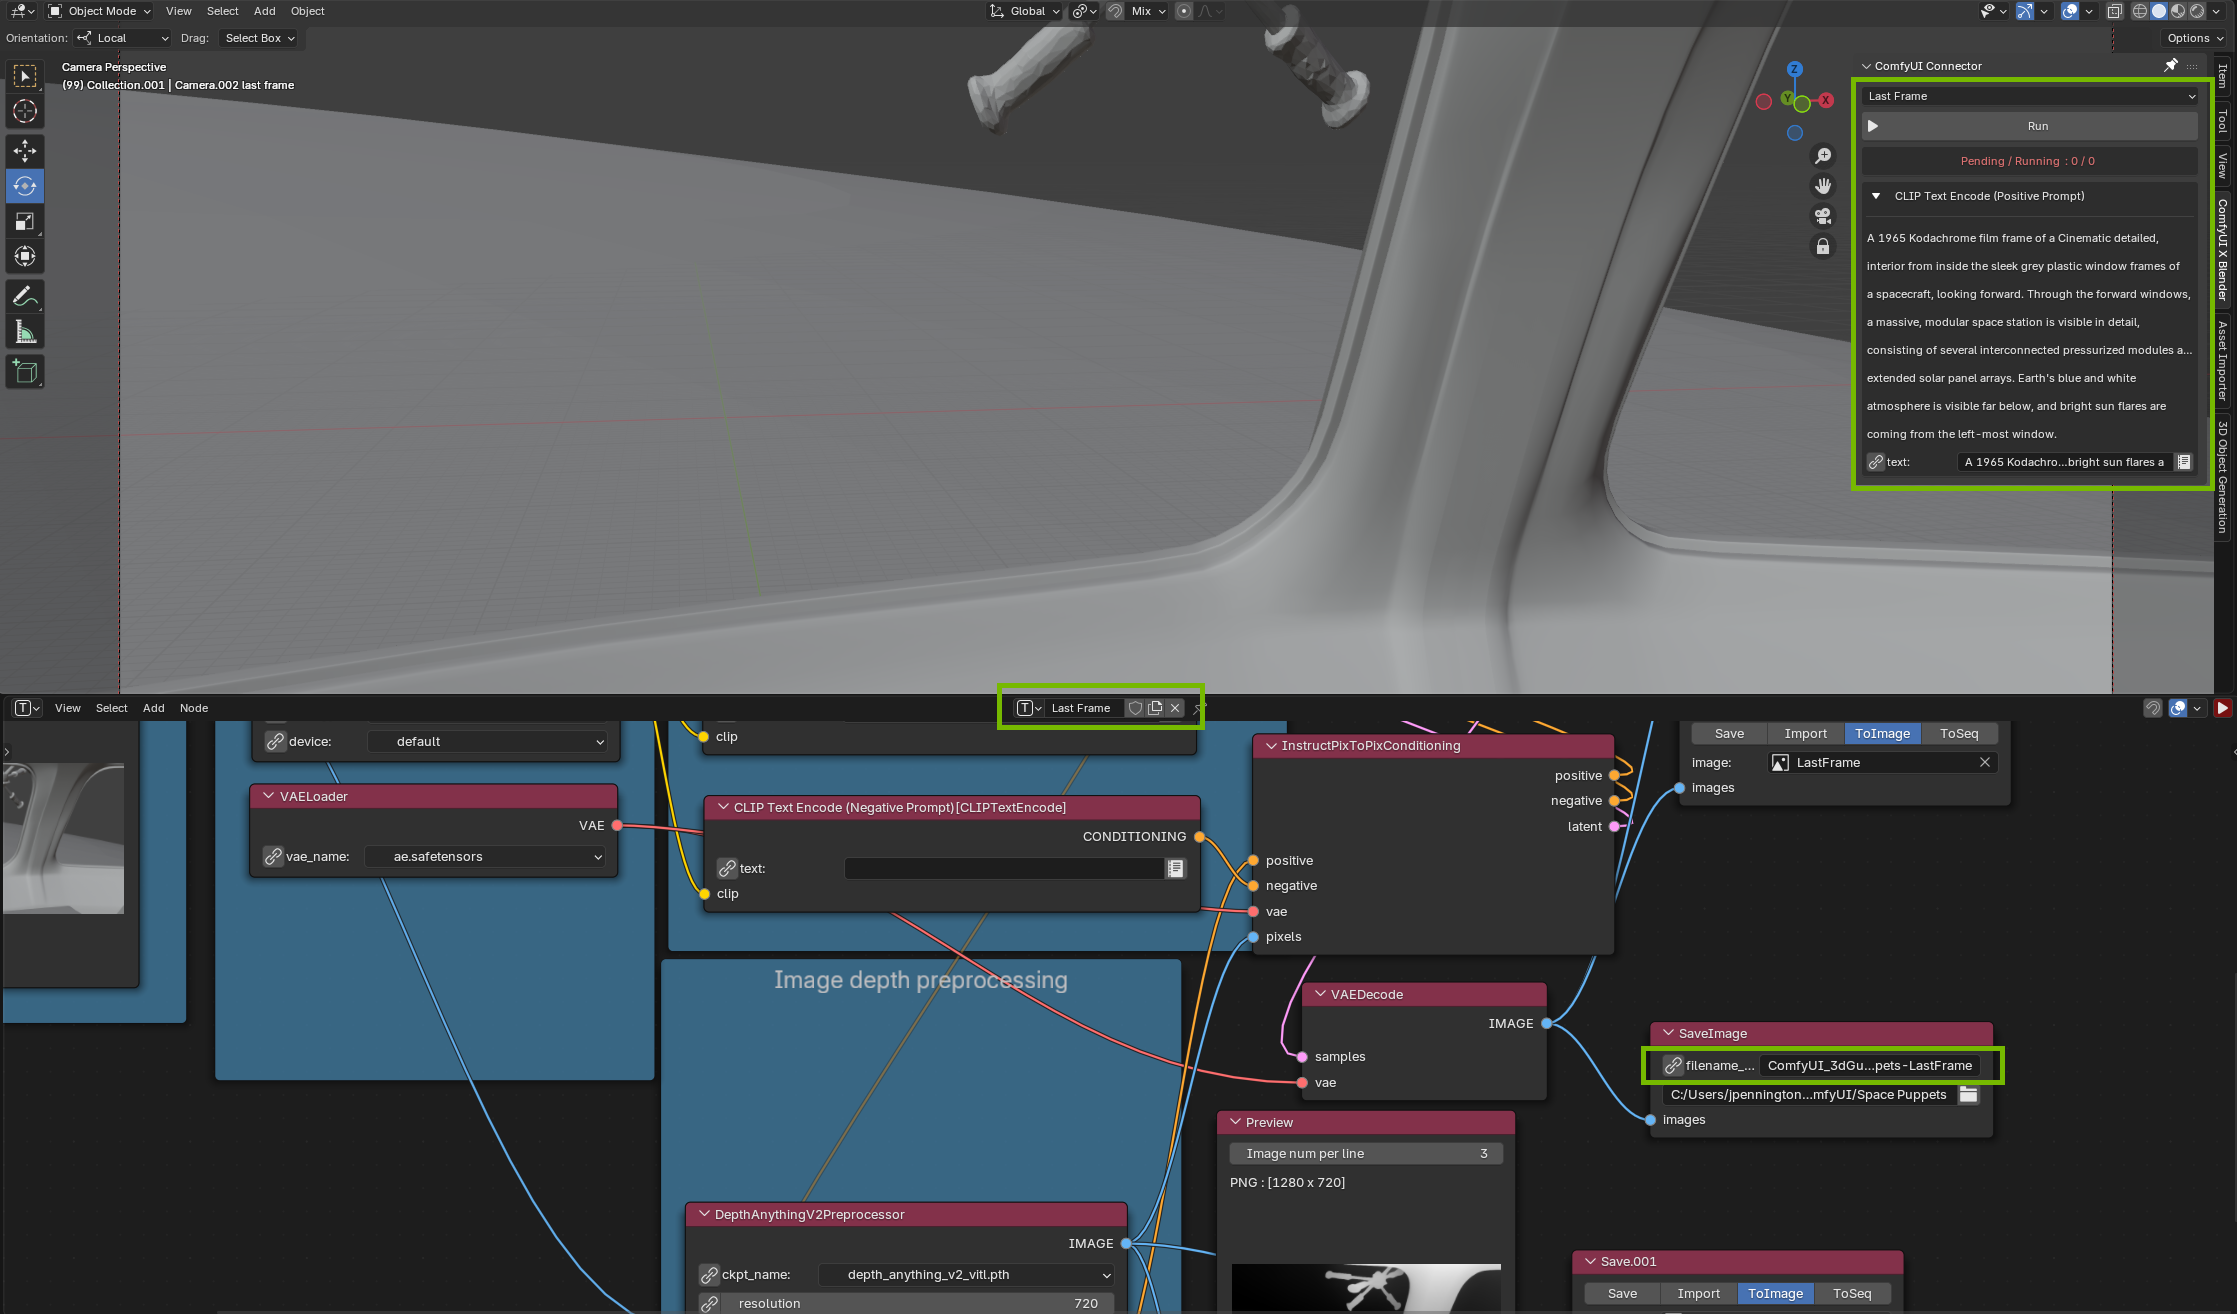
ComfyUI Node View in Blender with Last Frame view
Press Run and create your last frame.

Generated Last Frame
Step 4: Generate Your Video with LTX-2.3
In ComfyUI, search the template browser for LTX and pick the FirstFrame/LastFrame template. Load your first and last frame images into the corresponding input nodes. Write a video prompt that describes the motion between your frames. Write it as a paragraph, as though you were just explaining something to a person. A sample prompt for this project could be:
“Cinematic 1960s Supermarionation style. Two marionette pilots operate a retro cockpit: on the left is a Black man with dark brown skin, and on the right is a blonde woman, both wearing yellow jumpsuits. Their character motion is intentionally stiff, jerky, and staccato, constrained by invisible overhead strings. The pilots maintain consistent skin tones and features throughout the sequence. The camera performs a steady forward dolly-in, passing between the pilots to the front windows. Outside, a rigid, static miniature space station with red solar panels floats in low orbit over a blue planet; the station remains perfectly non-deforming and solid. High-contrast studio lighting, visible model textures, and vintage 35mm film grain.”
Adjust CFG to observe changes in prompt adherence, increasing the number from 1 to 4 will align the generation to your prompt, but lose some creativity.
Hint: writing a small negative prompt, though not required, can help get a generation that’s closer to what the user expects. Getting the video right may take some experimenting with prompting and CFG values.
You can dive into prompting more with this helpful guide from Lightricks: Prompting Direct audio-to-motion mapping for LTX-2 | LTX Blog
If you generate a 1280x704 video and like the results, try re-generating it at 1920x1088. That will produce a nicer looking video. Note: LTX needs pixel dimensions divisible by 32, hence abnormal resolutions like 704 and 1088.
Step 5: Upscale to 4K with RTX Video
For all RTX GPUs, the new RTX Video Super Resolution node connects to your node graph to scale the output video by multipliers. It’s a small model that installs quickly, and will save you time.
- Search ‘RTX’ in the ComfyUI Manager and install the RTX Video Super Resolution node
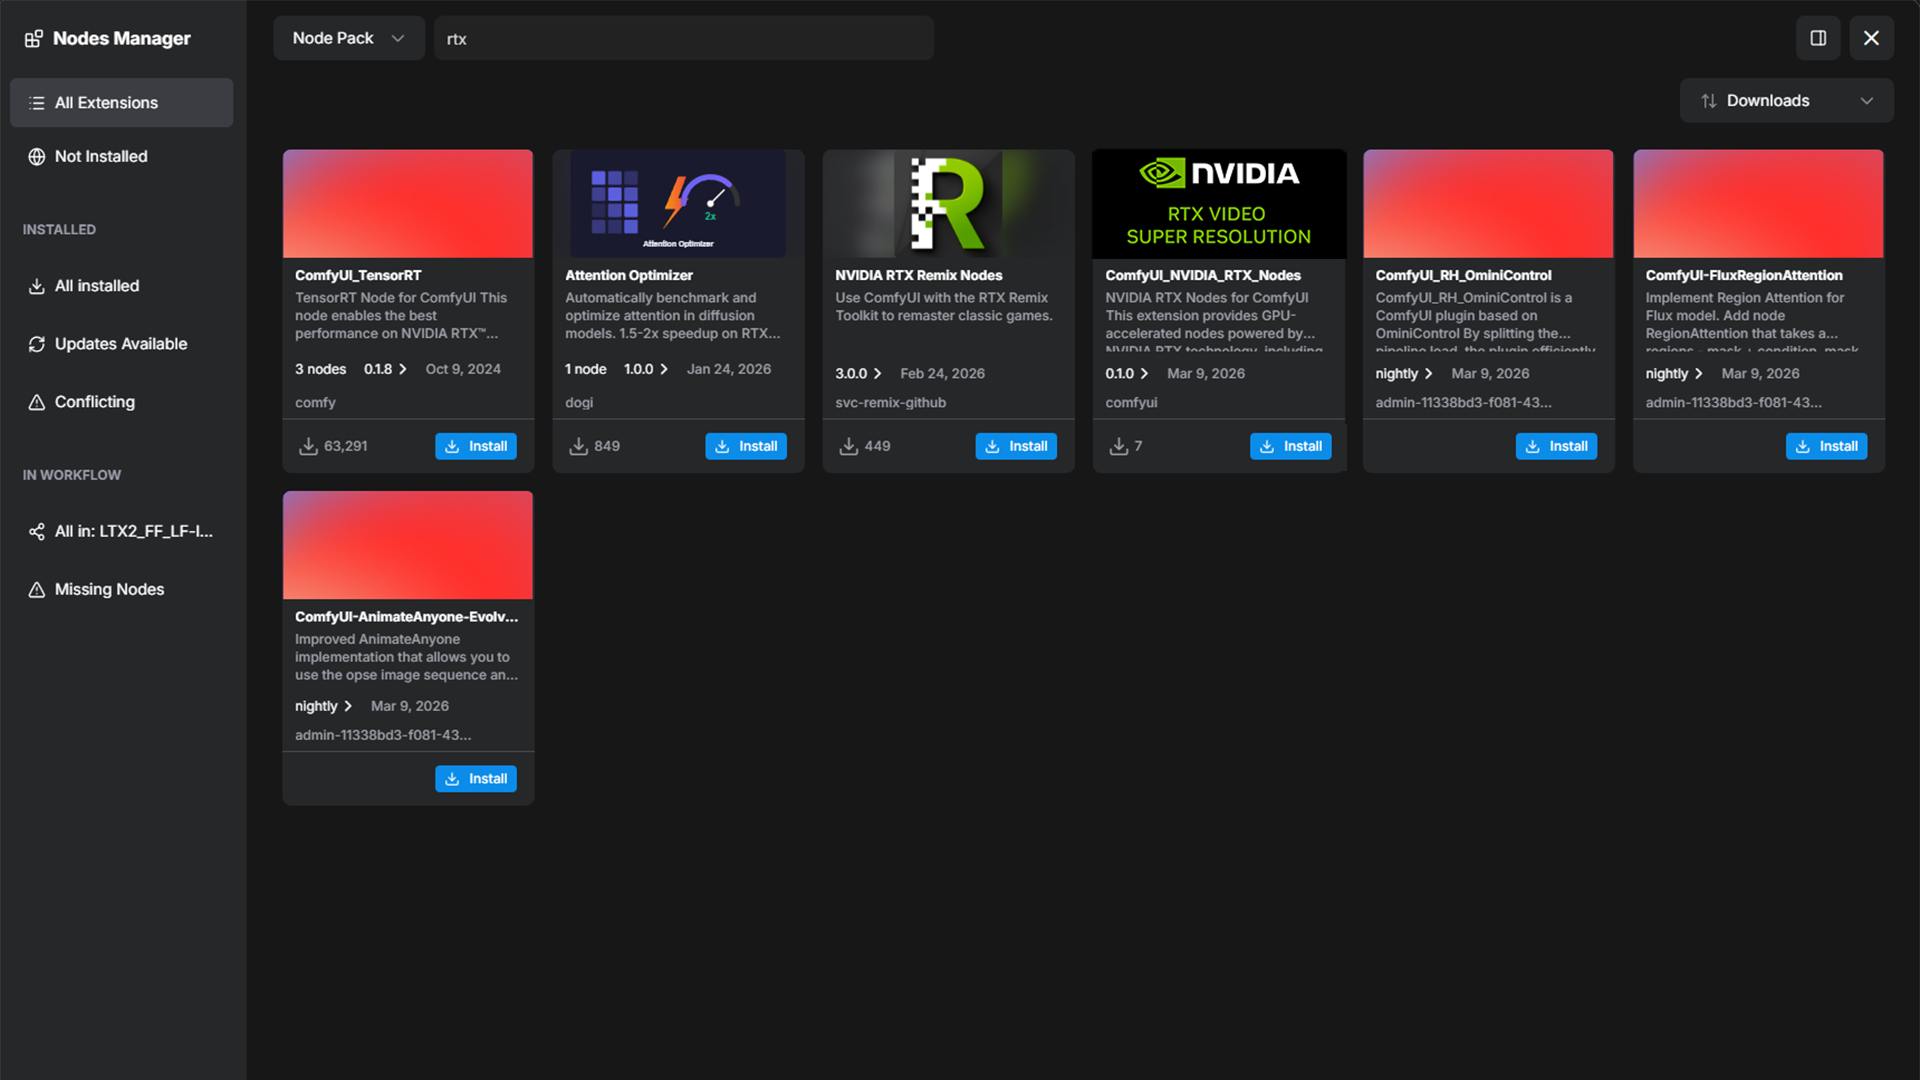
ComfyUI Node Manager, search term ‘rtx’
Search for ‘RTX’ in the Node Library and drag RTX Video Super Resolution into the Node View
Connect the VAE Decode IMAGE out to the RTX Video Images In, and connect the RTX Video upscale_images out to the Create Video Images In

RTX Video Super Resolution Node Connectivity
You've gone from a scene idea to a finished 4K video entirely on your RTX GPU with the kind of creative control over composition, perspective, and motion that text-only video tools can't offer.
FAQ
What input images produce the best 3D objects from TRELLIS?
Use images with a 1:1 aspect ratio, a plain or removed background, neutral even lighting, and a clear front-facing or three-quarter view. Strong directional shadows bake into the texture and create misleading surface normals. If your generated object has a clean silhouette but messy textures, the source image likely had a complex or cluttered background - pre-remove it before feeding into TRELLIS.
How do I improve the quality of generated 3D objects?
Two settings in TRELLIS control quality. Sparse Structure Sampling Steps defines the geometric backbone (more steps give you cleaner topology and sharper edges) and Latent Sampling Steps control surface detail and texture (more steps produce better results). Raising the CFG Scale on both forces the model to follow your prompt more closely. Start with defaults and increase from there if the output doesn't match what you described.
What resolution should I use for SANA image previews?
SANA is optimized for 1024x1024. Use 512 or 768 if you want faster previews during iteration. Quality will be slightly lower but sufficient for picking assets.
Can I swap out FLUX for a different image model?
Yes. For example, in the Load Model node, replace FLUX.1-dev with a smaller mode, such as SDXL, for faster iteration (for example). Open the ComfyUI graph to access additional conditioning options, including positive/negative prompts and Wildcards for randomized variation, useful for cycling through different lighting styles automatically.
What resolution and frame count should I use for LTX-2.3?
Optimize iteration work at 1280x720 and keep sequences under 257 frames for the best balance of coherence and speed. When ready try increasing pixel resolution to 1920x1080
What inference settings should I use for LTX-2.3?
Use 20-30 steps when iterating and 40+ steps for final quality renders. Set Guidance Scale to 3.0-3.5 for the best balance between prompt coherence and natural-looking motion.
How do I configure RTX Video Super Resolution?
Set Upscale Factor (1-4) based on your input resolution and target output, for 720p to 4K, use 3. Set Quality Level to 4 for maximum edge sharpening and artifact removal.
How do I write a prompt for LTX-2.3 image-to-video?
LTX-2.3 expects natural language, not tag lists. Your image already contains the visual information and your prompt should describe what happens. A reliable structure: shot framing ("medium close-up, slight upward tilt"), lighting ("golden hour, long shadows"), then action as a time sequence ("the motorcycle accelerates forward, dust rising behind the rear wheel"). Front-load tone and quality words before subject nouns. Write 4-6 sentences. Don't repeat what's already visible in your keyframe so describe the change, not the static state.
What should I put in my negative prompt?
Keep it focused. A reliable starting point: morphing, distortion, warping, flicker, jitter, blur, artifacts, glitch, overexposure, watermark, text, subtitles. Avoid building long lists. Also, LTX-2.3 doesn’t expect a negative prompt.
My last frame doesn't match the image I provided. How do I fix it?
This is a known issue. First, raise the last-frame strength value to 1.0 in your guide node. If that doesn't resolve it, try setting the last-frame position index to -12 instead of -1 -this gives the model a few frames of landing room before the end. End-frame adherence also degrades over longer clips, so keeping sequences to 5 seconds (121 frames) significantly improves results.
My output video is completely black. What do I check first?
Three things in order: First, confirm your frame count follows the (Nx8)+1 rule (valid values: 49, 65, 97, 121...). Second, if you're using a FirstFrame/LastFrame workflow, make sure you've added LTXVCropGuides before the VAE decode node. Without it, the guide frames corrupt the decode and produce black output. Third, check that your text encoder loaded correctly - a missing Gemma encoder means the model has no conditioning signal and will generate black or near-black frames.
My subject's appearance changes mid-video. How do I reduce this?
Subject drift is a model limitation, not a bug. The most effective mitigations: keep clips to 5 seconds maximum, describe one clear motion at a time in your prompt, reduce CFG to 3.0-3.5. For repeating characters, a LoRA trained on that subject significantly improves consistency across generations.